Most of the actions that you can perform in the Eggplant Automation Cloud user interface (UI) can also be automated by using the REST API. This ability could be useful if you want to automate the process of running tests or generating user data reports. For example, you could use the REST API to integrate Eggplant Manager into a continuous integration (CI) environment. There are many REST API methods available.
The example on this page uses these API actions:
- Listing: Retrieves multiple items of a given type.
- Updating: Updates an item of a given type.
- Uploading: Uploads a file to the API that can then be associated with an app.
- Installing: Installs an app on a system under test (SUT).
Authorization
The REST API uses HTTP basic authorization. You can use Eggplant Automation Cloud or Eggplant Manager user credentials, or the API token found at Account > Account Settings in Eggplant Automation Cloud. When using the API access token instead of username and password, replace the username with the token, and the password should be randomly generated (or blank).

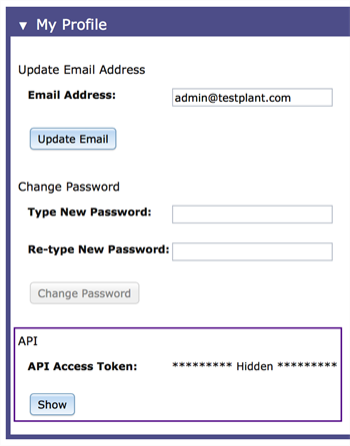
The API Access Token on the Eggplant Manager Account Settings page.
Note that the API Access Token field is hidden by default. To view this field, click the Show button. When the API Access Token field is visible, the Show button changes to a Reset button. If you click the Reset button, Eggplant Manager revokes the previous access token, then generates and displays a new token.
There are a couple of ways to authenticate. The following examples use this sample data:
Username: myUsername
Password: myPassword
Access token: 35609458083e8bc25276a45acea34dd8e581f929950f2c65bfa2a1596c3260a7
Using cURL Built-in Basic Authorization
Enter the username and password:
Enter the access token:
Using cURL HTTP Header Syntax and Externally Encoded Values
If you're using cURL to run the API using the examples in the documentation, the access token must be base64 encoded. If you use Eggplant Functional, you can write simple scripts to convert these values.
Username/Password
This script converts a username and password into base64:
set username to "<username>"
set password to "<password>"
put base64encode(username & ":" &password)
The encoded username and password can then be passed using cURL:
Access Token
This script generates the access token in the appropriate format. Replace <token_string> in the script below with your API access token.
set mytoken to "<token_string>"
put base64encode(mytoken&":")
The encoded access token can then be passed using cURL:
Example: Deploying an App Using the API
A workflow for deploying a new app using the API could be: Using a new app build (apk file), update the Eggplant Automation Cloud app record, then install the updated app on a SUT.
To accomplish this:
- Get a SUT _id to target for installation.
- Upload the new app file.
- Get an app _id to target for updating.
- Update the app record.
- Install the app on the SUT.
Get a SUT ID
To get a list of all SUTs, send a GET request to:
This returns a JSON object:
{
limit: 100,
offset: 0,
count: 2,
suts: [
...,
{
...,
name: "<sut name>",
_id: "<sut id>",
...
},
...
]
}
Choose one to target for the app installation and save its _id for later use.
Upload the New App File
Uploading files requires that the HTTP client supports multipart POST. Only one file can be uploaded at a time.
The URL to send the multipart POST request to is:
The parameter name should be "file", and the binary content should be the app file.
The response will be a JSON object with the following structure:
{
upload_id: "<upload id>"
}
Get the App ID
To get a list of all the apps, send a GET request to:
This returns a JSON object:
{
limit: 100,
offset: 0,
count: 2,
managed_applications: [
...,
{
...,
name: "<app name>",
_id: "<app id>",
...
},
...
]
}
Choose one to target for the app installation and save its _id for later use.
Update the App Record
To associate the new file with the app record, update the app record with the upload id by POSTing the new values to (where app_id is the app _id saved from step 3):
Use these headers:
The request body is a JSON-encoded version of the following, where upload id is the upload_id saved from Step 2:
{
android_app_upload_id: "<upload id>"
}
You can also update the version or description this way using the version or description keys.
This returns a JSON object:
{
...,
_id: "<app id>",
name: "<app name>",
...
}
Install the App on the SUT
To install the new app, use a POST request, sent to:
Use the following headers:
The request body is a JSON-encoded version of the following, where sut id is the SUT _id saved from Step 1:
{
sut_id: "<sut id>"
}
This returns a JSON object:
{
status: "<success or failed>",
message: "<description of status>"
}