Installing Eggplant DAI on Windows
This section provides step-by-step instructions to install and license Eggplant DAI on Windows.
System Requirements
Hardware Requirements
- Operating system: Windows Server 2019, 2016 (recommended for production use), Windows 10
- RAM: 8 GB minimum
- Disk Space: 4 GB minimum
- Processor: 64-bit Intel 2.3 GHz or equivalent (4+ cores or 8+ threads recommended)
Port Availability
By default, Eggplant DAI uses 8000 for the main DAI Server. For information on changing ports after installation, see Changing the Eggplant DAI Port on Windows.
In addition, the following ports must be available:
4566-4568, 4589, 4650, 5433, 5558-5566, 5673, 9000, 15673, 15675.
Supported Browsers
- Google Chrome 87 and later
- Mozilla Firefox 83 and later
- Safari 13 and later
Installing Eggplant DAI
To perform a fresh installation of Eggplant DAI 5.3, follow these steps:
Tip: You can install Eggplant DAI 5.3 without uninstalling the previous version of Eggplant DAI.
- Download the Eggplant DAI installation file from the Eggplant DAI Downloads page.
- Double-click the downloaded installation file to launch the Setup wizard. Click Next to begin installing Eggplant DAI. Note that you may be prompted to uninstall Eggplant AI if you haven't uninstalled it previously.
- On the Installation Directory screen, use the default installation directory (C:\Program Files\Digital Automation Intelligence) or the Browse... button to select the desired installation directory. Then, click Next to continue your installation.
- On the Advanced installer Options screen, select Run Advanced Install Configuration checkbox if you want to enable the option to specify ports, change the PostgreSQL data location, or specify Suite Data Directory and click Next to continue. If you do not select this option then steps 5-8 below do not apply in which case skip to step 9 to continue with your Eggplant DAI installation.
- On the PostgresSQL Data Directory screen, you might need to enter a path for the current installation of Eggplant DAI. Use the following information to decide whether this step is necessary for your installation:
- If you're happy with the default path, then leave this field as-is.
- lf you want to use a different directory, then enter your preferred directory in the Choose Directory field.
- If you want to configure the installer to use the Postgres data directory that was left behind after uninstalling Eggplant AI 3.1, then add the path of the previous installation folder (e.g., C:\eggplantAI\pgsql) by clicking the Choose Directory field.
- Click Next to continue to the next screen. When prompted, set the default HTTP port as follows:
- If port 8000 is available, the installation suggests using port 8000. Click Next to continue.
- If port 8000 is not available, you can enter the HTTP port you want to use.
- Leave the Report usage statistics checkbox selected to let Eggplant collect your usage statistics. Typically, the usage report will include: Product Identifier, Product Version, Host OS, Host OS Version, and License (Serial Number) information. You can disable this option by clearing the checkbox. Note that this option is only available if the Run Advanced Install Configuration checkbox is enabled.
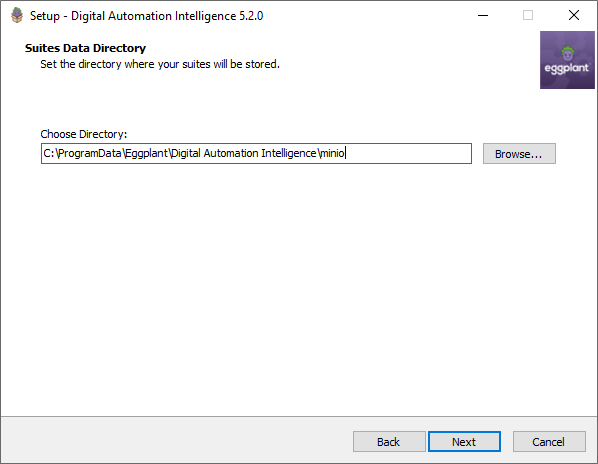
- Specify the directory to point to the folder where you'd like your suites to be stored by browsing to that location and then click Next. This is the location where the agent will upload your suites to, which is also useful when running test configurations. Note that this is a completely different location to where you may be currently storing your Eggplant Functional suites.
- On the Select Start Menu Folder screen, if you want to use a different directory, browse to select it. Click Next to continue or Back to return and make changes.
- On the Ready to Install screen, click Install to begin installation. This installation step might take some time to complete.
- Click Finish to complete the installation.
Note: If you’re upgrading from Eggplant DAI 4.1/4.0.1, this screen will not be available.
Alternatively, to use SSL configuration, select Use HTTPS check box and follow the configuration steps defined further below on this page. Make sure you have obtained a trusted certificate and key in advance.
Note: If you’re upgrading from Eggplant DAI 4.1/4.0.1, this screen will not be shown.
See Initial Login and Licensing on this page for information on how to initially access Eggplant DAI. Note that you need to first create an administrator account and enter your license key.
Configuring HTTPS in Eggplant DAI (Windows)
Eggplant DAI can be configured to support SSL/TLS during the installation and upgrade process.
Prerequisites:
Before configuring HTTPS, make sure that the following prerequisites have been met:
- Eggplant DAI is installed and running at least with one user who is able to successfully log in.
- You should have obtained a trusted certificate and key. A trusted certificate is one that is issued by a Certificate Authority listed on the Mozilla page:
Note: Eggplant DAI doesn't support self-signed certificates.
Step by Step: Configuring HTTPS in Eggplant DAI
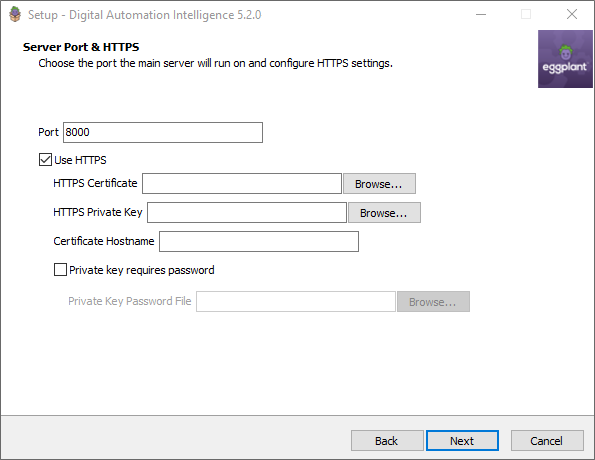
- If installing Eggplant DAI for the first time, proceed with the installation steps until you see the below screen:
- Select the Use HTTPS checkbox and specify the following information:
- HTTPS Certificate: Browse to the HTTPS certificate location and select the certificate.
- HTTPS Private Key: Browse to the HTTPS key file location and select the key.
- Certificate Hostname: Enter the Hostname of the DAI server. This should match the one set in the HTTPS certificate.
- (Optional) Private key requires password: Select this checkbox if the certificate key requires a password to unlock it for use.
- Private Key Password File: Browse to the password file location and select the file to unlock the password.
- Click Next and install DAI as usual.
The steps to configure HTTPS during upgrade is similar to installation. By default, the DAI service is set to automatically start after Eggplant DAI is installed.
Changing the Eggplant DAI Port on Windows
Although Eggplant DAI assigns port 8000 by default during installation, you can specify a different port later using the steps described below. We recommend setting the port in the installer, but if you forget to modify the default port settings or if you want to change it without reinstalling/upgrading DAI, then follow this section.
- Open C:\ProgramData\Eggplant\Digital Automation Intelligence\settings.ini.Important: The C:\ProgramData folder might not be initially visible, as it is hidden by default.
- Find the [settings] section and update the line server_port=8000 to include the port you want to use.
- Save your work.
- Restart the Digital Automation Intelligence Windows service.
Note: Any port changes made here should also be reflected in the Agent Server address section in your execution environment.
Migrating Eggplant DAI Server
Follow these instructions to migrate the Eggplant DAI server from one machine to another.
- Install Eggplant DAI on the new server.
- Stop the Digital Automation Service through the Windows Services manager.
- From the existing location where Eggplant DAI is installed, open C:\ProgramData\Eggplant\Digital Automation Intelligence and copy the data and minio folders over to the same path in the new location.
- In the new location, also copy over the config.yml and settings.ini files to the same (ProgramData\Eggplant\Digital Automation Intelligence) folder.
- Start the Digital Automation Service.
Important: You cannot migrate data settings from one version of Eggplant DAI to another. If you have copied settings data from a 5.2 install, you must first migrate it to another 5.2 install, and then upgrade to 5.3.
Uninstalling Eggplant DAI on Windows
Use the following instructions for uninstalling Eggplant DAI.
- Locate and run the Eggplant DAI uninstall program by choosing Start > All Programs > Uninstall Eggplant DAI.
- Click Yes when prompted to uninstall Eggplant DAI and all its components.
- Click OK after the removal process is done.
Uninstalling Eggplant DAI does leave some folders intact. Note that the data that's left behind after you uninstall Eggplant DAI contains user account information, user models, and execution data. Only remove these files and folders if they are no longer required. Assuming you installed Eggplant DAI in the C:/Program Files/DAI directory, the following folders remain if you need to retain any files:
Eggplant DAI data directory files: C:\ProgramData\Eggplant\Digital Automation Intelligence\data
Server and Eggplant DAI log files: C:\ProgramData\Eggplant\Digital Automation Intelligence\logs
If you decide that you want to do a complete Eggplant DAI removal after following the above steps to uninstall Eggplant DAI, delete the following directory or folder:
C:\Program Files\Digital Automation Intelligence
Initial Login and Licensing
When Eggplant DAI is installed and running, you access the application in a browser. On your initial login, you must enter your license key. Follow these steps to complete your initial login:
- Launch your browser from any computer that has access to the Eggplant DAI server and enter the appropriate URL:
- To display the login prompt from the computer on which the Eggplant DAI server is running, enter http://localhost:8000
- To display the login prompt from a remote computer, enter http://<serverIPaddress>:8000 where <serverIPaddress> is the Eggplant DAI server's IP address or fully qualified domain name
Note: To obtain the IP address of the Eggplant DAI server, see your local IT administrator. Distribute the URLs from this step to all users requiring access to this Eggplant DAI application. - Eggplant DAI prompts you to set up an administrator account. Enter an email address (username) and password for the account and click OK.
- In the License page that opens, enter your License Key and click Agree. A copy of the Eggplant Software License agreement can be read and downloaded before clicking Agree. You can generate your license in the Greenhouse Licensing Web Portal. After your license is accepted, the Models tab appears.

A new Login dialog box appears prompting you to log in to Eggplant DAI.
Greenhouse Licensing Web Portal
As an Eggplant customer, you have access to the Greenhouse licensing web portal, where you can review and create available license keys as well as download generated licenses for your account.
You can also use this portal to submit questions to support and view information about any support cases.
You should receive your initial Greenhouse login information from your account manager. If you don't have a password, you'll need to contact your account manager or sales@eggplant.io. If you need an Eggplant DAI license, contact your account manager or Eggplant Support.
Frequently Asked Questions
- When installing Eggplant DAI on a Windows machine, why do I get the following error message?

Uninstall Eggplant AI via Windows Control Panel > Add or remove Programs.
If that doesn't work, you need to delete the Eggplant AI (e.g., Eggplant AI 3.1 folder) registry key, which is found here:
Restart your computer and install Eggplant DAI.
- Where can I find the Eggplant DAI log files?
- Where are movies saved by default when the StartMovie command is used via in Eggplant DAI 4.2.3? I was able to access movies in the Results directory in Eggplant DAI 4.1 but since updating, I can't see any movies there. Has the location changed?
The log files for Eggplant DAI 4.x are located in the following path:
Windows: C:\ProgramData\Eggplant\Digital Automation Intelligence\logs
Linux:/var/log/eggplant/dai
DAI Agent Log files:
Windows: %LOCALAPPDATA%\eggplant\agent\Logs
Mac: ~Home\Library\Logs
Linux: ~/.cache/agent/log
From Eggplant DAI 4.2.3, the movies folder is created at the root of your Eggplant Functional Suites folder when you run the StartMovie command. However, when running theStartMovie command from Eggplant Functional directly, there is no change in saved movie location. Movies are still saved to the Suite’s Results folder.
![]() Eggplantsoftware.com | Documentation Home | User Forums | Support | Copyright © 2022 Eggplant
Eggplantsoftware.com | Documentation Home | User Forums | Support | Copyright © 2022 Eggplant