テスト構成の操作
テスト構成は、Eggplant DAI でオンデマンドで実行したり、定期的に実行するようにスケジュールしたりできるテストのコレクションです。テスト構成 (「テスト構成」) は、本質的には、次々に実行できるテストの青写真です。テスト構成では、指示されたテスト ケースとモデルベースの探索的テストを実行できます。 テスト ケースの詳細については、テスト ケースについて を参照してください。
Controller > Test Config に移動し、定義したテスト構成を作成、編集、または表示します。
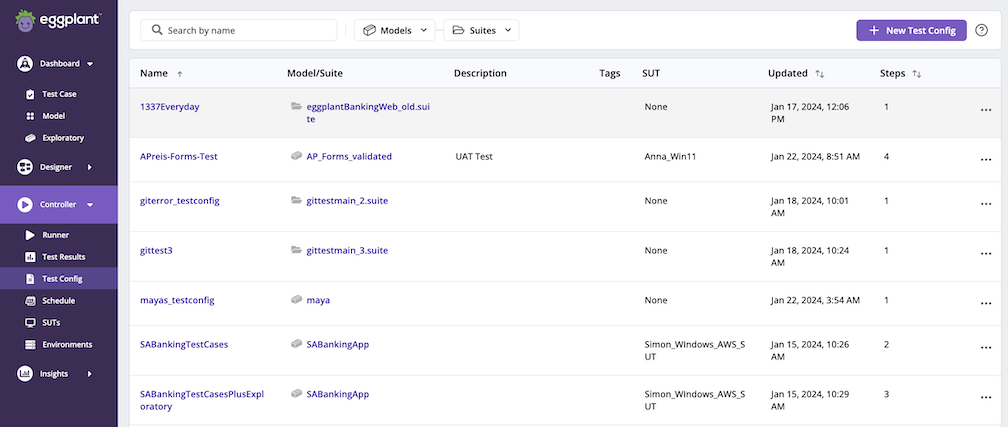
各テスト構成の詳細を一目で確認できるように、次の列が表示されます。
- Name:テスト構成の表示名。
- Model/Suite: 実行することを選択したテスト構成のタイプに応じたモデルまたはスイートの名前。
- Description:テスト構成の説明。他のテスト構成と区別しやすくするための意味のある説明を提供します。
- Tags:表示している選択されたテスト構成のために定義されたタグ。
- SUT:関連��するSUT、またはテスト構成のためのSUTを選択するための基準。
- Updated:テスト構成が最後に更新された日時。
- Steps:テスト構成に含まれるテストステップの数。テストステップは、モデルからのテストケース、スクリプトベースのテストケース、または停止基準を持つ探索的テストです。
Action () メニューをクリックして、テスト構成をEdit、Delete、またはCopyします。
テスト構成のフィルタリング
次の方法でテスト構成をフィルタリングできます。
- By name: By name 検索バーにテスト構成名の一部を入力します。 DAI は、入力時に表示されるテスト構成をフィルタリングします。
- By Model: モデルに関連付けられたテスト構成を表示したい場合は、Model ボタンの矢印をクリックして、提案されたリストからモデルを選択するか、Search.. にモデル名の入力を開始します。 DAI は入力時にSuiteを提案します。
- By suite: Suiteに関連付けられたテスト構成のリストを表示したい場合は、Suite ボタンの矢印をクリックし、提案されたリストからSuiteを選択するか、ボックスにSuite名の入力を開始します。 Search... フィールド。 DAI は、入力中におすすめの内容を提案します。
テスト構成の作成
Controller > Test Config に移動して、テスト構成 (「テスト構成」) を作成します。
ステッ�プバイステップ:テスト構成の作成
テスト構成の作成は 3 つのステップで構成され、各ステップに 1 つのページがあります。手順とページの概要を以下に示し、その後に詳細な手順を示します。
- ステップ 1: 全般: 名前、説明、テスト タイプなど、テスト構成に関する一般情報を入力するページ、テスト構成タグ、実行設定、および SUT。
- ステップ 2: ステップ/Action: テスト構成で実行する探索的テストまたはテスト ケースのActionを構成するページ。
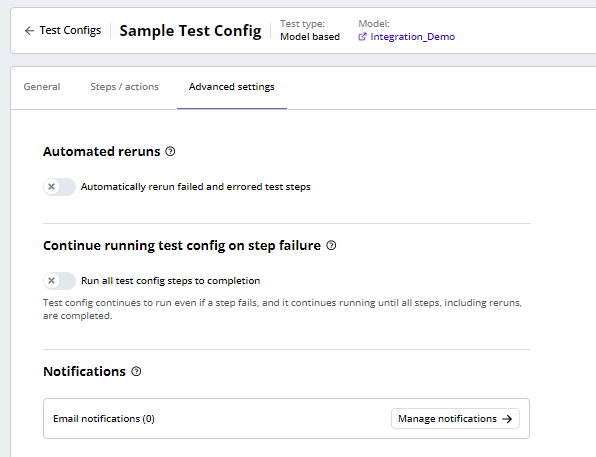
- ステップ 3: 詳細設定: 失敗したテスト ステップを自動的に再実行し、電子メール通知を設定するかどうかを設定できるページ完了したテスト構成の実行を通知します。
以下の図に示すように、ページの上部にある進行状況トラッカーには、作成プロセスのどこにいるかが表示されます。紫色で強調表示された番号は、プロセス内の現在のステップを示します。ページでの情報の入力が完了して次のページに進むと、進行状況トラッカーにはステップが完了したことを示す緑色のチェックが表示されます。
ページには Cancel ボタンと Back ボタンが含まれているため、必要に応じてテスト構成の作成をキャンセルしたり、前のページに戻ったりすることができます。
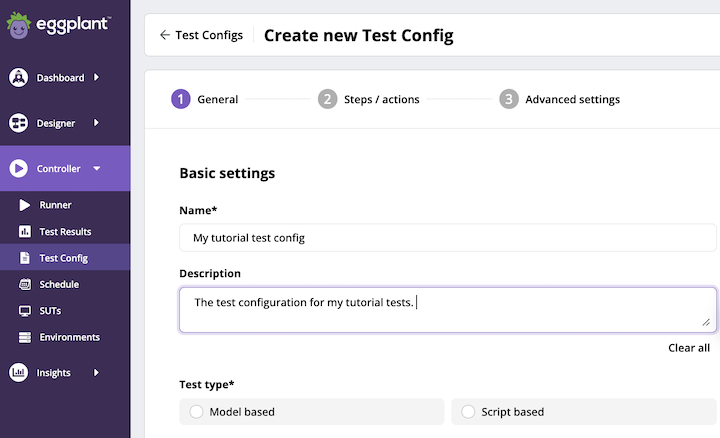
名前とテスト タイプを指定すると、追加の設定が有効になります。
ステップ 1: テスト構成の一般情報を構成する
-
Controller > Test Config に移動します。 Test Configs ページが開きます。
-
トップメニューの右側で、+ New Test Config をクリックします。 Create new Test Config ページが開き、プロセスの最初のステップとして、上に示したGeneral ページが表示されます。ここでは、テスト構成の Basic Settingsを指定します。
-
テスト構成の Name と Description を入力します。これは、テスト構成のリストに表示される名前と説明です。 Description フィールドをクリアするために使用できる Clear all ボタンにも注目してください。
-
テスト構成の Test type (Model based または Script based) を選択します。テスト タイプを指定すると、さらに多くの設定が表示されます。表示されるオプションの一部は、選択したテストの種類によって異なります。どちらのテスト タイプでも、Test configuration tags セレクターと Execution settings セレクターが表示されます。
-
Model based テスト タイプを選択した場合は、Model セレクターが表示されます。

-
Script based テスト タイプを選択した場合は、Suite セレクターが表示され、テスト構成で実行するスクリプト/スニペットを含むSuiteを選択できます。

-
-
テストの種類に応じて、セレクターからモデルまたはSuiteを選択します。
注記モデルまたはSuiteを選択すると、ページの下部にある [Next] ボタンが有効になることに注意してください。この時点で、このページの残りの設定のデフォルト値を使用して ステップ/Action ページに進むことができます。
-
タグの名前を入力し、Enter を押して、Test configuration tagsを追加または選択します。タグは、テスト構成によって識別およびフィルタリングするための別の方法を提供します。テスト タグは必要なだけ追加できます。 Clear allボタンを押して、選択したタグのリストをクリアすることもできます。

-
ページの Execution settings セクションで、テスト構成で使用する実行環境のタイプ (Local または Cloud) を選択します。
-
次のように、実行環境に適したこのテスト構成の SUT オプションを選択します。
Local execution environmentsの場合は、次の SUT から選択します。
-
None (SUT なし) SUT がコード内で定義されている場合、または必須ではない場合。
-
SUT by name 事前に定義されたSUTを選択する。

-
SUT by criteria tag: ドロップダウン リストから SUT タグを選択します。 SUT タグは、SUT ページ (Controller > SUT) で利用可能な SUT に関連付けられています。 SUT または SUT タグを作成する場合は、SUT ページに移動します。

Cloud execution environmentsの場合は、次の SUT から選択します。
-
ローカル実行環境については、上記と同じオプションがリストされています。
-
Eggplant hosted cloud: これを選択すると、Eggplant がクラウド実行環境 (エージェントと Eggplant 機能を含む) をプロビジョニングするクラウド SUT でテストを実行します。詳細については、「DAI クラウド SUT への接続」(./dai-hosted-cloud-sut.md) を参照してください。 (このオプションはクラウド SUT でのみ使用できます。)
-
-
Basic Settingsの構成が完了したら、Next をクリ��ックします。テスト構成作成プロセスの 2 番目の部分である Step 2: Test steps/actions ページに進みます。
ステップ 2: テスト構成のステップ/Actionを構成する
Steps/actions ページに表示されるオプションは、選択したテストの種類によって異なります。ページの上部には、選択したテスト タイプ (Model based または Script based) と、テスト タイプに適切なモデルまたはSuiteが表示されます。テストの種類に応じて、以下の適切な手順に従ってください。
モデルベースのテストタイプのステップ/Actionの構成
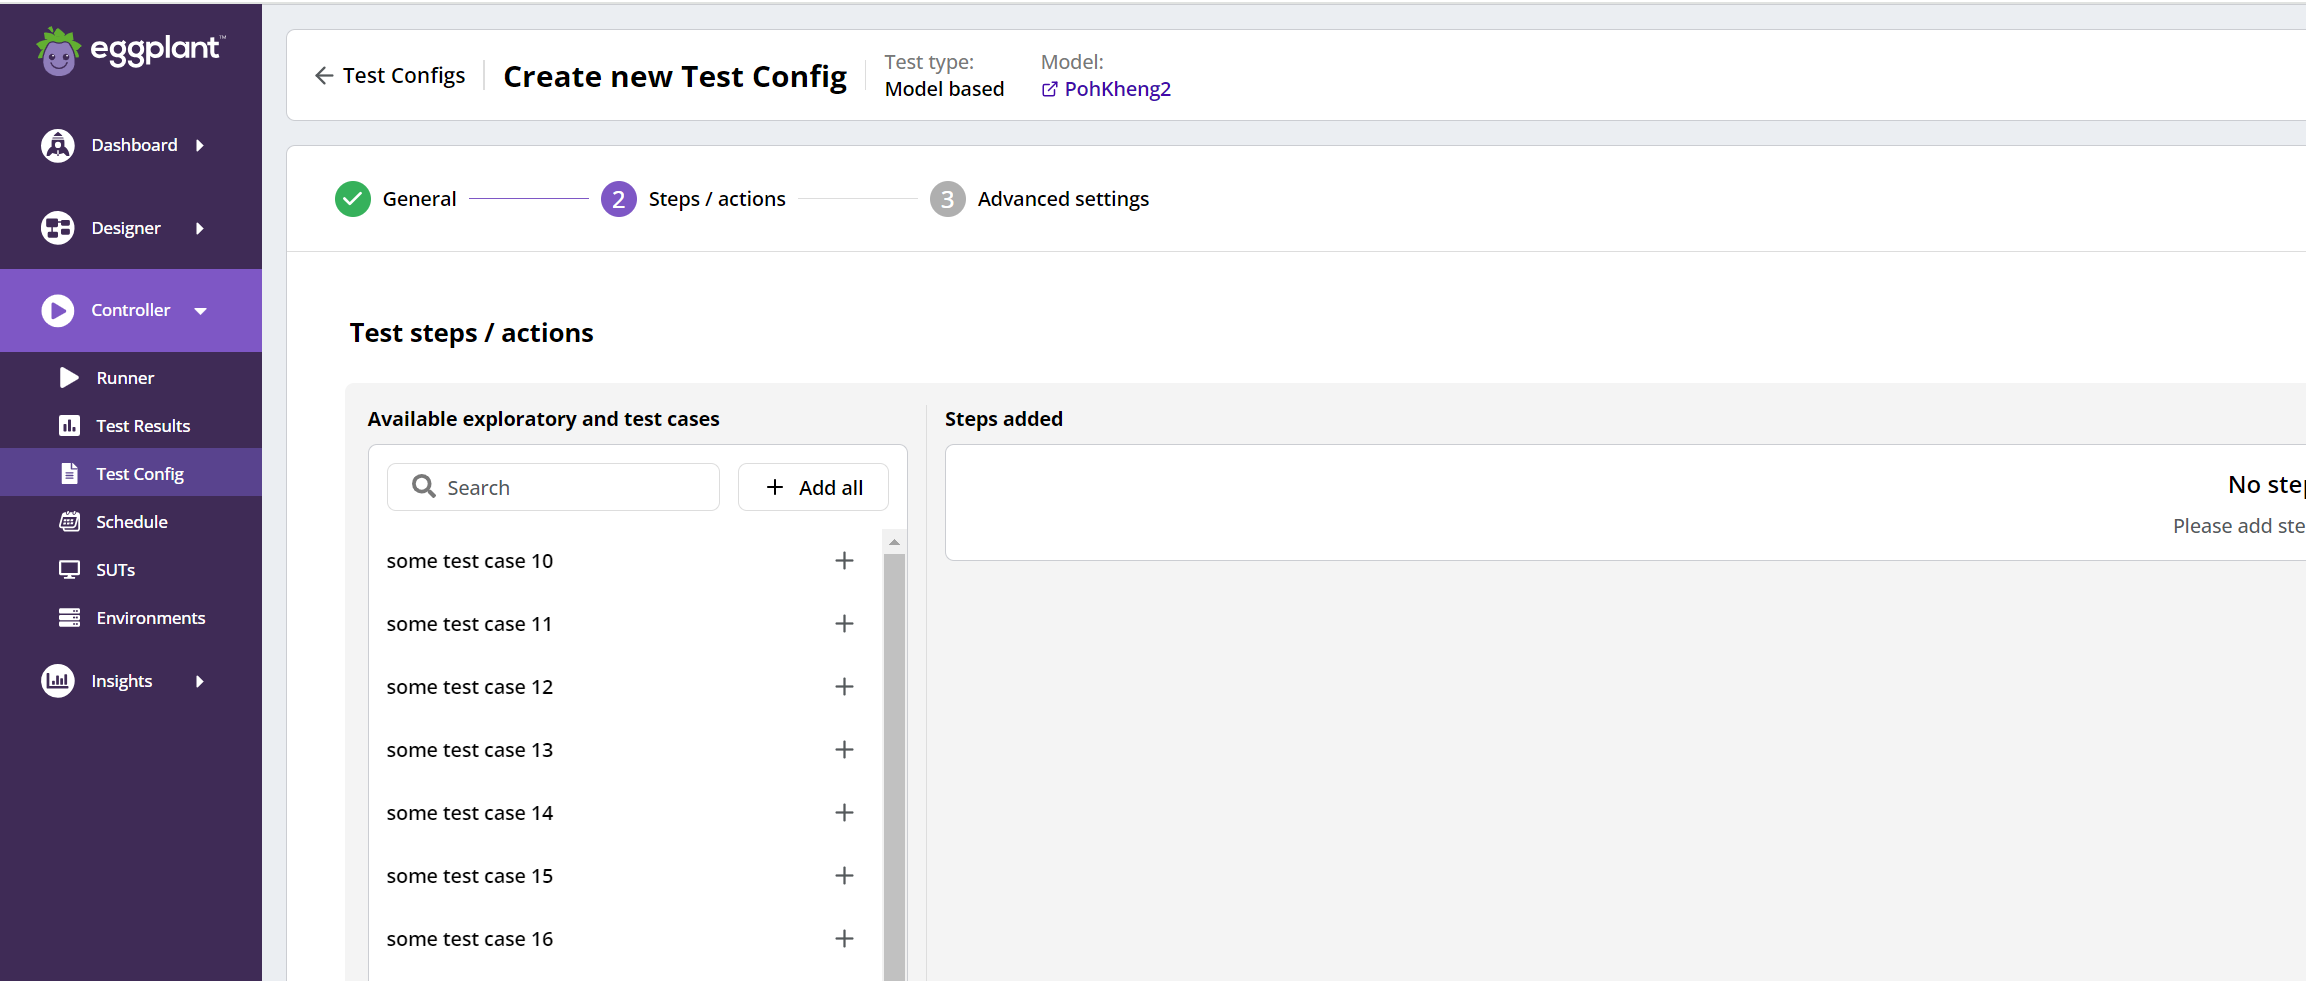
Model based のテストの種類の場合は、Available exploratory and test cases の一覧が表示されます。
-
Available exploratory and test cases セレクターから探索的テストまたはテスト ケースを追加することを選択します。ページの右側にある Steps added リストに追加される内容は、選択したテストの種類によって異なります。

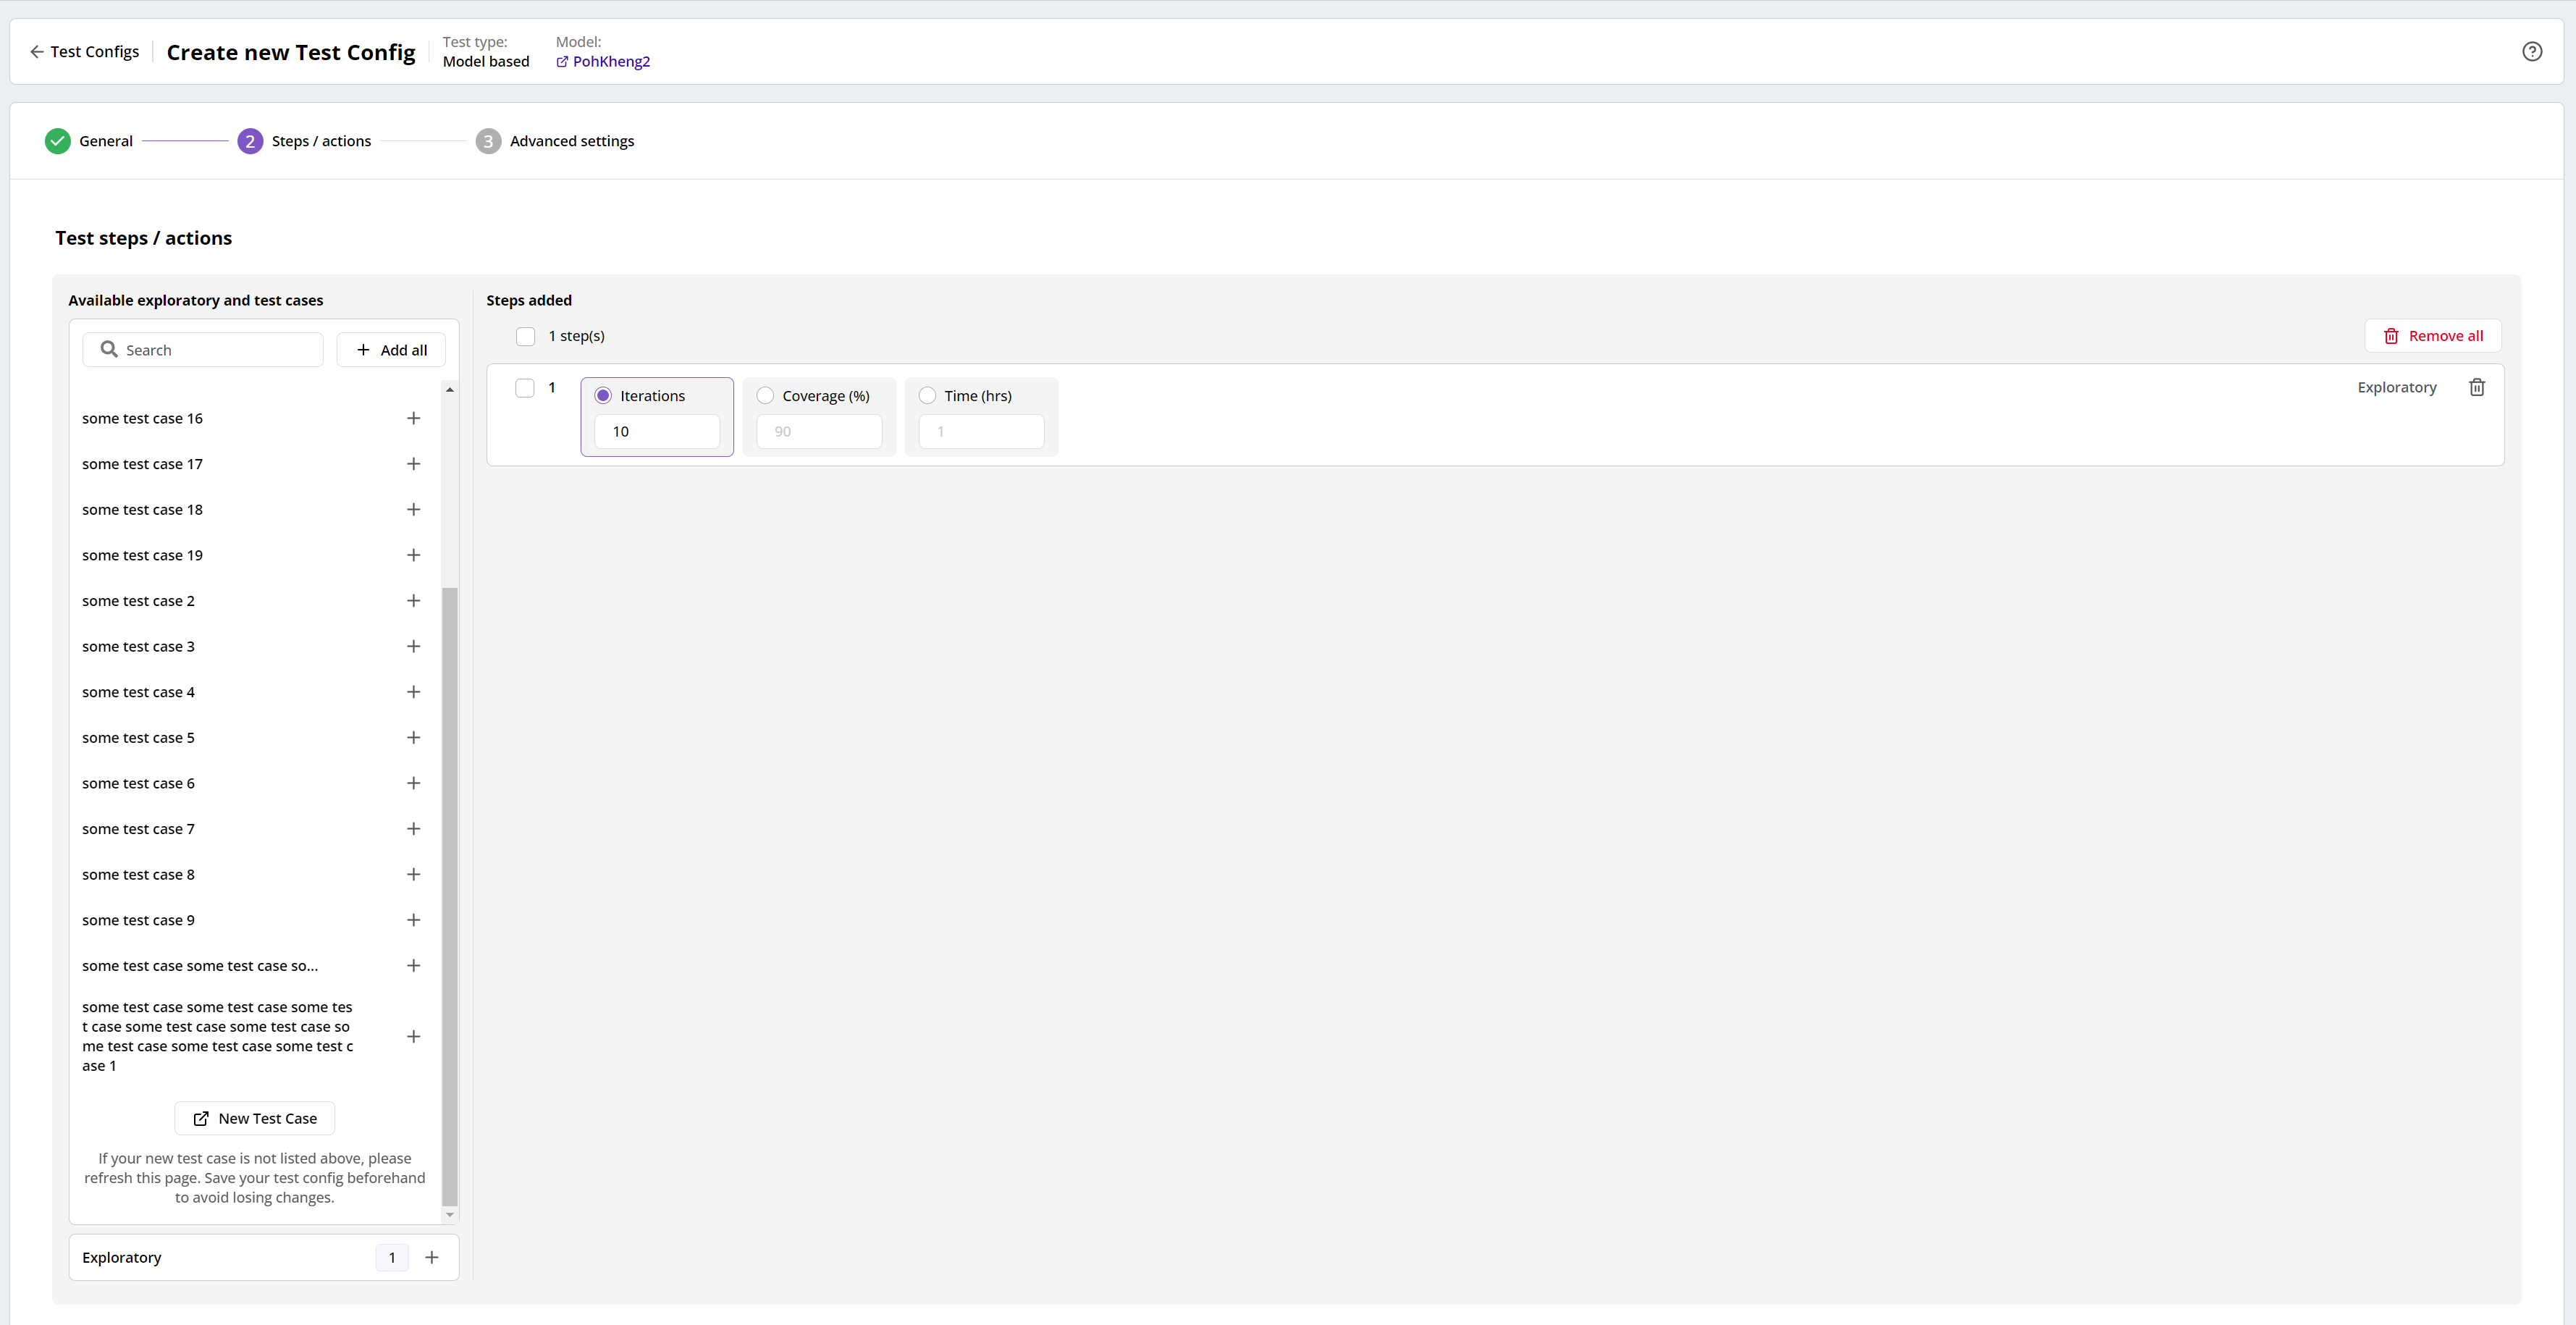
- exploratory テストの場合、以下に示すように、Iterations、Coverage、Time (hrs) の数を指定できる探索的テスト オプションが表示されます。
 注記
注記探索的ステップの場合、停止基準は常に期間、反復、または目標カバレッジによって設定されます。テストがステップを使い果たした後、Eggplant DAIは各ステップの実行を検討し、テスト構成が成功か失敗かを示します。
- テスト ケースの場合は、テスト ケースが表示されます。

-
上記の手順 1 を繰り返して、テスト構成を実行するすべてのテストを追加するか、Add All をクリックして、Available exploratory and test cases リスト内のすべてのテスト ケースを追加します。Available exploratory and test cases にフィルターが適用されているときに Add All をクリックすると、フィルター処理された一覧にテスト ケースのみが追加されることに注意してください。
注記Available exploratory and test cases の一覧がフィルター処理されているときにAdd all をクリックすると、フィルター処理された一覧にテスト ケースのみが追加されます。
-
Next をクリックして ステップ 3: 詳細設定 ページに進み、そのページの指示に従います。
Configuring steps/actions for Script based test types
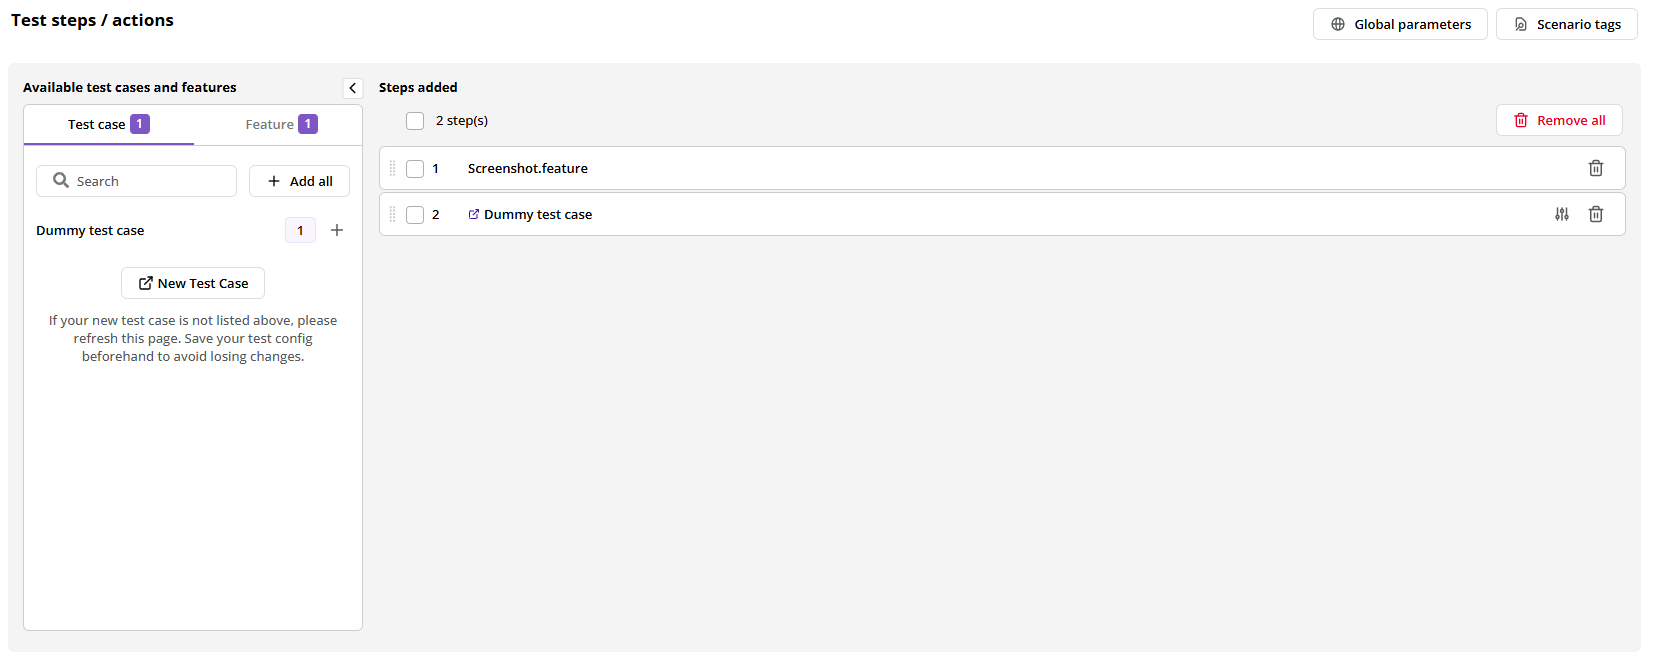
Script based テスト タイプの場合、Select a Scripted Test Case セレクターが表示されます。セレクター ボタンをクリックすると、使用可能なスクリプト化されたテスト ケースがリストされ、Search... バーが表示されるため、テスト ケースの長いリストがある場合に名前で検索できます。
-
リストからスクリプト化されたテスト ケースを選択するか、検索バーで名前で検索して選択します。テスト ケースが右側の Steps added リストに追加されたことがわかります。
-
テスト構成で実行するスクリプト化されたテスト ケースをすべて追加するまで、上記の手順 1 を繰り返します。
-
Nextをクリックして Step 3: Advanced settings ページに進み、次のセクションに進んで設定の詳�細を確認します。
ステップ 3: テスト構成の詳細設定を構成する
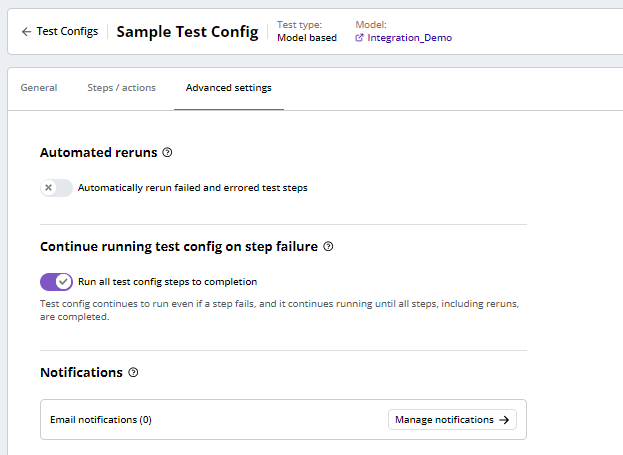
Advanced settings ページにアクセスすると、次のオプションがあります。
-
テスト構成を作成する場合は、Create test config ボタンをクリックします。詳細については、テスト構成の作成を完了する を参照してください。
-
テスト構成で失敗およびエラーが発生したテスト ステップの自動再実行を有効にする場合は、Automatically rerun failed and errored test steps の横にあるスライダーをクリックします。テスト構成を再実行するように DAI を構成する方法の説明については、再実行の有効化 を参照してください。
-
ステップが失敗したときにテスト構成の実行を停止する場合は、その横にあるスライダーをクリックして、Run all test config steps to completion を無効にします。すべてのテスト設定ステップを完了まで実行するか、ステップが失敗したときに停止するようにDAIを設定する方法については、Stop On Failure を参照してください。
-
電子メール通知を有効にして、完了したテスト構成の実行について通知する場合は、Manage notifications -> をクリックします。通知設定ページが開きます。
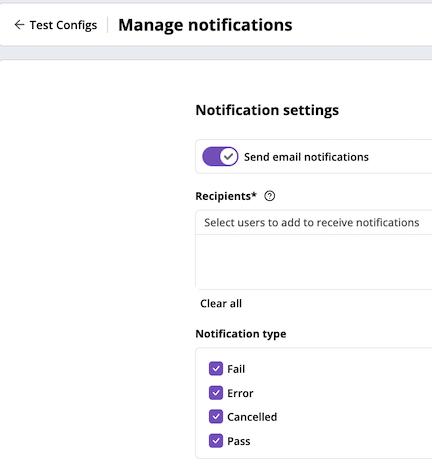
Recipientsボックスで通知を受け取りたいユーザーを選択し、受信者に通知したいステータスを選択します。
テスト構成の作成を完了するには、以下の テスト構成の作成を完了する を参照してください。
テスト構成の作成を完了する
テスト構成の作成が完了したら、右下隅にある Create test config ボタンをクリックします。 DAI によって新しいテスト構成が保存され、Test Configs ページが開きます。新しいテスト構成がリストに表示されますが、表示するにはスクロールまたは検索する必要がある場合があります。
追加されたステップのカスタムパラメータを構成する
カスタム パラメータ機能を使用すると、テスト ケースのパラメータのデフォルト値を Custom value で上書きできます。その後、DAI はテスト構成がテスト ケースを実行するときに Custom value を使用します。テスト ケース パラメータは必要な数だけカスタマイズできます。
任意のテスト ステップのカスタム テスト ケース パラメータ値を構成するには:
-
ステップ上の
アイコンをクリックします。右側から、すべてのテスト ケース パラメータを表示するスライド パネルが開きます。
-
Custom value 列に値を追加して、テスト ケース パラメータのデフォルト値を上書きします。
-
Saveをクリックします。
この構成により、異なるデフォルト値でテスト ケースを複製することなく、同じテスト ケースを異なるパラメーター値で多様化できます。
再実行の有効化
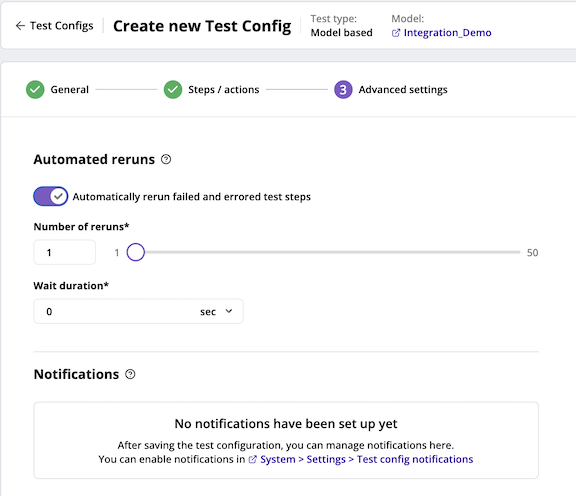
再実行機能を使用すると、失敗したりエラーが発生したりしたテストステップを、テスト構成全体を実行することなく最大50回まで自動的に再実行することで、時間と労力を節約できます。テストステップは、モデルベースのテストケース、スクリプトベースのテストケース、または探索的テストである可能性があります。
失敗したりエラーが発生したりしたテストステップの再実行機能を有効にするには:
-
Automatically rerun failed and errored test stepsのトグルを右にスライドして再実行を有効にします。(緑色のチェックがオプションが有効であることを示します。)
-
以下のコントロールで再実行Parameterを設定します:
- Number of Runs:失敗またはエラーが発生したテストステップの最大再実行回数を指定します。この値はテキストボックスまたはスライダーを使用して調整でき、最大で50回の再実行が可能です。
- Wait Duration:各再実行の間隔を定義し、再実行プロセスを最適化します。秒単位で測定される時間間隔をドロップダウンリストから選択します。デフォルトはゼロに設定されており、待機時間はありません。
この合理化されたプロセスにより、再実行を効果的に管理し、テストワークフローを強化できます。
- 選択した再実行回数と待機時間は、再実行機能を非アクティブにしても保存されます。これにより、後で再度有効にする際に再設定する必要がなくなります。
- 再実行統計は、Controller menu の ランナーページ で完了した再実行の合計を表示してアクセスできます。 各テスト結果を展開してこの情報を見つけ�ます。

失敗時に停止
障害発生時の停止機能を使用すると、ステップが失敗したときに残りのステップの実行を続行するのではなく、テスト構成の実行を停止することで、リソースとライセンス使用量を節約できます。テスト ステップには、モデル ベースのテスト ケース、スクリプト ベースのテスト ケース、または探索的テストがあります。
失敗したテストステップの失敗時に停止機能をアクティブにするには:
- 実行から完了まで無効にするには、Run all test config steps to completion トグルを左にスライドします。(Run all test config steps to completion を無効にすると、失敗時に停止できます)。
- デフォルトでは、ステップが失敗した場合でも、テスト設定は常に完了まで実行されます。
- 失敗時の停止ステップにアクセスするには、ランナー ページ の Controller メニュー の下にあるテスト構成ログを表示します。 各テスト結果を展開してこの情報を見つけます。

テスト構成の実行
コントローラー > ランナー から実行したいテストに対して をクリックすることで、テスト構成を実行できます。
コントローラー > ランナー に移動して、定期的に実行される特定の頻度でテストスケジュールを設定します。テスト構成ごとに1つのスケジュールのみ設定できます。
テストを実行する前に常にSuiteをモデルに関連付けることを忘れないでください。
テスト構成スケジュールの一部であるテスト実行を中止すると、その構成スケジュールの一部である_すべての_実行が中止されます。
テスト構成実行のためのEggplant Functional停止および再起動設定
テスト構成を実行する際、以下の環境変数を使用して、Eggplant Functional(EPF)を再起動するまでの実行時間、またはポーリング時間停止および再起動の猶予期間を設定できます:
| 環境変数 | デフォルト | 説明 |
|---|---|---|
RESTART_EPF_AFTER_SECONDS | 1800 | EPFが起動してから次のEPF再起動までの期間。この変数は、現在のステップが終了した後、次のステップに移動する前に有効になります。DAI Run Agentで実行されるテスト構成にのみ適用されます。ライブ実行中は、EPFは再起動せずに継続して実行されます。デフォルト:30分。 |
EPF_QUIT_POLL_TIME_SECONDS | 20 | 再起動プロセス中のEPF停止の猶予期間。 |
EPF_RESTART_POLL_TIME_SECONDS | 120 | EPFが停止した後の起動までの猶予期間。EPF_RESTART_POLL_TIME_SECONDSはEPF_QUIT_POLL_TIME_SECONDSを含みません。 |
既存のテスト構成の表示�、編集、通知設定
テスト構成を表示または編集するには:
-
Controller > Test Configに移動します。
-
更新または表示するテスト構成を見つけて、Action メニュー (
) で Editを選択します。
-
ここからテスト構成の詳細を表示または更新できます。
既存のテスト構成の通知設定
テスト構成の通知は、特定のテスト構成内で通知を設定する前に、DAI全体で有効にする必要があります。これを行うには、管理者である必要があります。詳細については、DAI設定の管理を参照してください。
デフォルトでは、すべてのテスト コンフィギュレーションの通知は無効になっています。通知を有効にするには、次の手順を実行します。
- Controller > Test Configに移動します。
- 必要なテスト構成を見つけてから、 (
) Actions メニューを開き、Edit を選択します。
- Advanced settingsタブをクリックして表示します。
- Manage Notifications (
)タブの Notifications 領域にあります。
- ここから、Send email notificationsを有効または無効にし、確認済みのユーザーを通知を受け取るRecipientsに割り当てることができます。
- また、以下に示すさまざまなオプションから選択して、受信する通知タイプを管理することもできます。
- Recipientsのルール:
- 機能がenabledの場合、保存する前にat least one受信者を選択する必要があります。
- 機能がdisabledの場合、フィールドを空白のままで保存できます。
- Notification typeのルール:
- 通知が有効で、すべてのチェックボックスの選択を解除すると、通知は無効になり、Disabledステータスに切り替わります。
- 通知がDisabledで、すべてのチェックボックスの選択が解除されている場合、Send email notificationsを切り替えると、通知が有効になり、すべてのチェックボックスがデフォルトで有効になります。
- Recipientsのルール:
テスト構成の削除
既存のテスト構成を削除するには:
- Controller > Test Configに移動します。
- 削除するテスト構成を見つけて、(
) Actions メニューから Delete を選択します。
- ここからテスト構成の詳細を表示または更新できます。
既存のテスト構成の複製
既存のテスト構成を複製するには:
- Controller > Test Configに移動します。
- 複製するテスト構成を見つけて、(
) Actions メニューを選択し、Duplicate を選択します。
- ここで、新しいテスト構成の名前を入力する必要があります。
- 有効な名前を入力したら、Createをクリックします。
- ここから、新しく複製されたテスト構成を編集することができます。
- 複製されるテスト構成と同じ名前を入力しないように注意してください。
- 新しい名前には次のルールが適用されます:
- 1 文字以上 100 文字以下 (最大長)
- 特殊文字は、次のものを除き、使用できます:
, ;: " ' { }