In Eggplant Performance Studio, you can create a workflow to order the scripts that you will run in your performance test. Using a workflow gives you a greater degree of control over your scripts when running a test. In a workflow, you can place scripts in three categories:
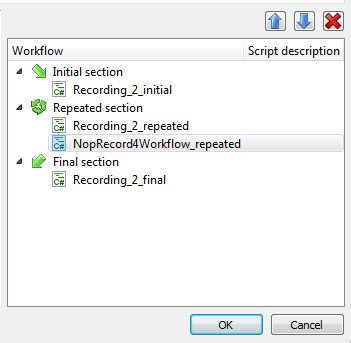
- Initial section: Scripts placed in this section are run once at the start of a test.
- Repeated section: Scripts in this section are iterated multiple times as specified in Configuring Runtime Settings.
- Final section: This section includes any scripts to be run once at the end of the test.
A scenario where this approach is useful is when applications require a user to first log on to the application, perform a series of repeated actions, and then log out. By creating separate logon and logout scripts, you can place them respectively within the Initial section and Final section of the workflow so that these actions are performed only once.
Step by Step: Creating a Workflow
Follow these steps to create a new workflow.
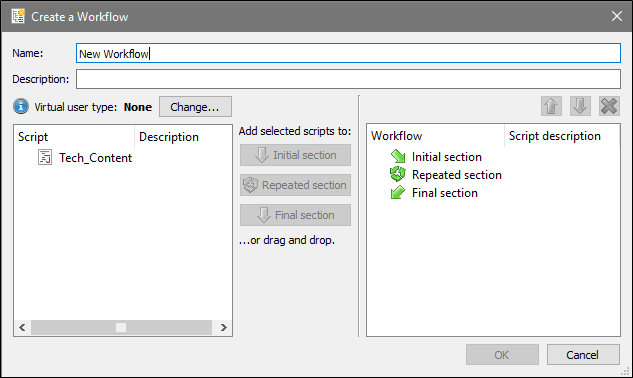
- In the Eggplant Performance Project tree, right-click the Workflow folder (or a custom Workflow folder), then select New workflow to open the Create a Workflow dialog box.

- Enter a name for the workflow in the Name field.
- (Optional) Enter a description for this workflow in the Description field.
- Add scripts from the Script column on the left into the three sections, Initial, Repeated, and Final, in the Workflow column on the right. You can move scripts by selecting the script in the left column, then clicking the appropriate button in the center for the section you want to move the script into. You can also click and drag the script from the left column, and drop it into the appropriate section in the right column.
Initially, the Script column shows all available scripts. However, all scripts in a workflow must be of the same virtual user type. When you add the first script to the workflow, the virtual user type is set and the Script list is filtered to show only scripts of the appropriate type.
You can use the Change button above the Script column to change the virtual user type. If you change the virtual user type, any scripts of a different type that you've added to the workflow will be removed. - Organize scripts within the workflow. You can add multiple scripts in each section, including adding the same script multiple times. If you need to further order the scripts within the workflow, select a script, then use the up or down arrow buttons to change the order within the section. You can also drag scripts to change the order. Use the delete button to remove a script from the workflow.
- Click OK when you're satisfied with the workflow definition.

The new workflow is added to the Project tree under the Workflow folder. After you create a workflow, you can select it as an option for what the Virtual User Group should run.
Modifying Workflows
To modify an existing workflow, select it in the Project tree under the Workflow folder. The workflow displays in the center section of the Eggplant Performance window. You have the same controls to modify the workflow here as in the Create a Workflow dialog box described above, including adding scripts, rearranging scripts, and removing scripts from the workflow.
To delete a workflow, right-click it in the Project tree, then select Delete workflow from the drop-down menu. You will be asked to confirm your choice.
To clone a workflow, right-click it in the Project tree, then select Clone workflow from the drop-down menu. Enter a New Workflow Name on the Clone Workflow dialog box. A duplicate of the original workflow is placed in the same folder, and you can then modify it to suit your needs.