Licensing Eggplant Studio
You must have a valid Fusion Engine (Eggplant Functional) Developer license to run or debug test scripts, or to use the Optical Character Recognition (OCR) features, in Eggplant Studio.
You can see any licenses applied in the
License Registry in Eggplant Studio. If you
need to purchase licenses,
contact your account manager or ep-sales@keysight.com.
When you first launch Eggplant Studio in a workspace, Fusion Engine (Eggplant Functional) starts at almost the same time. You can use Eggplant Studio without a license to edit test scripts. However, you cannot run or debug them, or use the Optical Character Recognition (OCR) functionality, without a license.
See Licensing Eggplant Functional for an explanation of the different license types, including Developer licenses, and the node-locked and Reprise License Manager (RLM) Server license schemes discussed below.
How you apply the Developer license in Eggplant Studio depends on which license scheme you are using at your site as described in the table below:
| License Scheme | Notes |
|---|---|
| Node-Locked licenses | You need to add a license key for each instance of Eggplant Studio you run from a desktop installation, or each Coder workspace you create in Cloud deployments. Eggplant Studio looks for a license when you run or debug a script, or try to use OCR functionality. Once you apply a node-locked license, Eggplant Studio will use that license every time you launch it, as long as the license is valid. See Adding Node-Locked Licenses on the Add License Panel for instructions. |
| Reprise License Manager (RLM) Server floating licenses | If you are using a RLM License Server at your site, you need to provide the connection information for the RLM Server in your Eggplant Studio desktop installation, or in the Coder template or workspaces for cloud deployments. Eggplant Studio will try to check out a floating license from the server when you run or debug a script, or try to use the OCR functionality. Once Eggplant Studio obtains a license, it holds on to the license until you quit VS Code for desktop installations, or shut down the workspace for cloud deployments. If Eggplant Studio cannot obtain a license, you will have to wait for one to become available to run scripts or use OCR functionality. See Configuring Access to a Reprise License Manager for instructions. |
Below you will find information about accessing the License Registry, where you can add and manage both types of licenses in Eggplant Studio.
Using the License Registry
You can view existing licenses, add new node-locked licenses, or specify the connection information for a Reprise License Manager (RLM) Server in the Eggplant Studio License Registry view. It provides two tabs for license information as follows:
-
The Licenses tab shows available licenses, including both node-locked and floating RLM licenses. If there is more than one license available, you will see numbers at the bottom of the view with right and left-facing arrows, so you can scroll through and display the different licenses.
-
The License Server Options tab shows fields for a RLM License Server hostname or IP address and the RLM Server password. You can specify this information for an RLM Server, or these fields may already be populated if someone configured access to an RLM Server. You can roam floating licenses on this tab as well.
Examples of the different tabs and licenses are provided in the steps below.
Click the + (Add button) in the upper-right corner of the License Registry to quickly display the Add License panel for adding node-locked licenses.
To display the License Registry:
-
Open a window in VS Code. You will see the Eggplant Studio button
 in the Activity
Bar on the left side of the window.
in the Activity
Bar on the left side of the window. -
Click the Eggplant Studio button to make it the extension in focus. You will see the prompt to open a suite, if one is not open.
-
Open a suite, if necessary. You can open one of your own, or open the Demo.suite. If you need information about opening a suite, see 1. Create or Open a Suite. The suite will open in Eggplant Studio.
-
Click the Eggplant Studio button again. The list of different views, including the License Registry should appear as shown below.

-
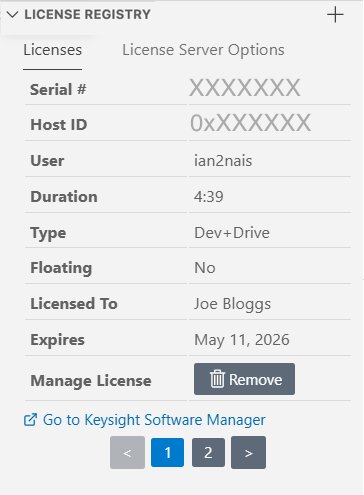
Click > next to License Registry to display it. The License Registry view opens with the Licenses tab in focus. The example screen below shows the Licenses tab for a node-locked license, including the Host ID, which is the hostname or IP address the license is for, and a Remove button you can use to remove a node-locked license.
-
Click License Server Options to switch the focus to that tab. If the connection information for a RLM Server is configured, you will see it on this tab. Or, you can configure that information here. You can also roam RLM licenses on this tab.

Adding Node-Locked License on the Add License Panel
To add a node-locked license key in Eggplant Studio:
-
Display the Eggplant Studio License Registry view as described Using the License Registry above.
-
Click + at the top of the License Registry panel to display the Add License panel.
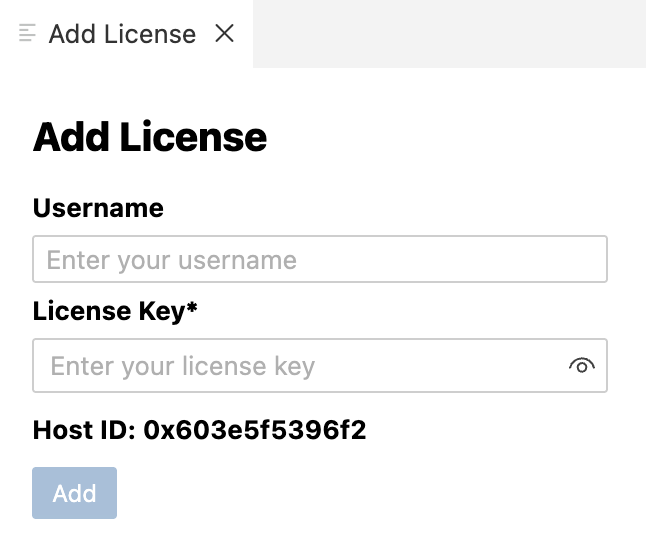
-
Provide the licensed user's name in the Username field if required by the license, and the node-locked license key in the License Key* field, which is required as indicated by the asterisk.
-
Click Add to save the license. You can see the new license on the Licenses tab in the License Registry.
Eggplant Studio is now ready to use. Continue to Next Step to start using Eggplant Studio.
Configuring Access to a Reprise License Manager Server
If your site is using a Reprise License Manager (RLM) Server to serve floating licenses, you need to configure access to the server. You specify the RLM Server connection information in Eggplant Studio, on the License Server Options tab in the License Registry. For information about licensing with RLM, please see Using RLM for Team License Management .
To configure access to a RLM Server:
-
Display the License Server Options tab in the License Registry as described in Using the License Registry above.
-
Provide the hostname or IP address of the system where your site's RLM Server is running in the License Server* field, which is required as indicated by the asterisk.
-
Provide the password for the RLM Server, if your RLM Server requires one, in the Password field.
-
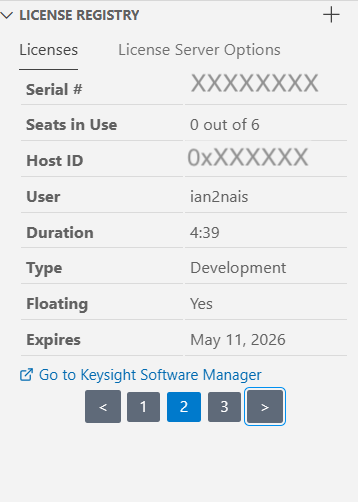
Click Save to save the information. If a license is available in the RLM Server, you can see a license on the Licenses tab in the License Registry. The example Licenses tab below shows what you see for RLM floating licenses, including the Seats in Use, which is the license in use out of the total number available in the RLM Server, and the Floating option indicating this is a RLM floating license.
Eggplant Studio is now ready to use. Continue to Next Step to start using Eggplant Studio.
Next Step
You can use the Eggplant Studio in-app walkthroughs or see Eggplant Studio Walkthrough in this guide to get started using Eggplant Studio.