4. Capture Images
After you open a suite and script, and connect to your System Under Test (SUT) in Eggplant Studio, you can start capturing images and adding them to your test script. If needed, please skip back to the previous pages for details of how to open a suite or connect to a SUT.
Before you can capture images in Eggplant Studio, you need to decide if you are adding them to an existing script or if you need to create a new file. Once you have your script file open, you are ready to begin.
Working with Capture Mode
To capture an image:
-
Click the Capture Mode (camera icon) button at the top of your SUT screen (called the Connection Viewer).
-
Select the part of the image you want to capture by clicking and dragging on the image. The area you select is highlighted and called the Capture Area. If a Capture Area is already drawn, and you want to change it, you can press your
BackspaceorDeletekeys to remove it and draw a new one. -
Click the lightbulb icon and, under on the SELECT AN ACTION menu that appears, select Add image to suite....
-
Specify a file name for your image and the location where you want to save it. Eggplant Studio saves image with the name and location you specified.
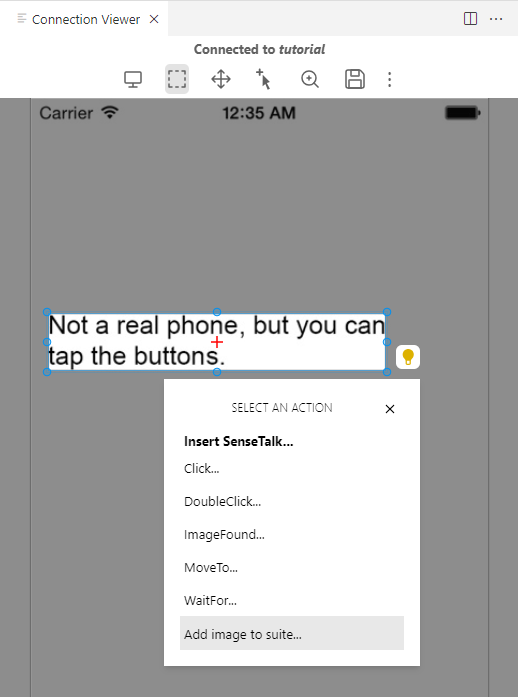
Capturing an image
Magnetic Snapping
When capturing an image, Eggplant Studio auto-identifies the boundaries
of the selected element and snaps the Capture Area to it. To override
this behavior, hold the Alt key on Windows/Linux or Option on Mac
while making the selection. After the initial snapping, any adjustments
to Capture Area boundaries will be maintained when you save the image.
Using Assisted Capture
In addition to the manual process of capturing images and adding them to your script, Eggplant Studio has an Assisted Capture feature. The Assisted Capture feature captures images in a method similar to the manual process described above, but it also auto-composes the SenseTalk script for the action you want to perform related to the image, and inserts that code into your script. For example, you can draw the capture box for the image you want to capture and choose the action you want to perform, such as Click, DoubleClick, find (ImageFound()), MoveTo, or WaitFor, and Assisted Capture will capture the image, create the SenseTalk code for your selected action, and insert it into your script.
-
In your script, place the cursor where you want Assisted Capture to insert the SenseTalk code it will generate when you capture the image.
-
If you have not already enabled it, click the Capture Mode button at the top of the SUT screen (Connection Viewer).
-
Select the part of the image you want to capture. If a Capture Area is already drawn, and you want to change it, you can press your
BackspaceorDeletekeys to remove it and draw a new one. -
Click the lightbulb icon and select the action you want to insert into your script.
-
Choose a file name for the image and where to store it. The generated SenseTalk code will be added to your script after the image has been saved.
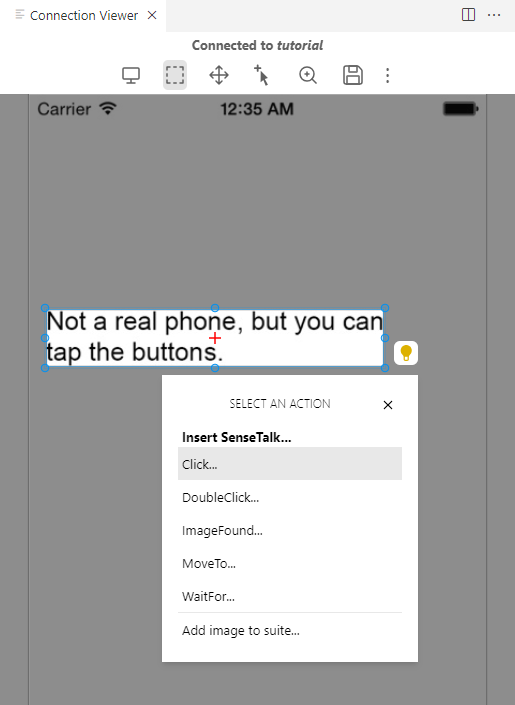
Using assisted image capture
Positioning the Hot Spot
The Hot Spot, the red crosshair you see in the Capture Area, determines where on an image the test clicks when it runs.
By default, the Hot Spot is placed at the center of the Capture Area. But if you want the test to click a different location, you can set it manually by clicking anywhere on the canvas using:
Ctrl+Clickon Windows/LinuxCmd+Clickon MacCtrl+arrow keysto nudge the hot spot in increments of 10 pixels on Windows/LinuxCmd+arrow keysto nudge the hots pot 1 pixel on MacCmd+shift+arrow keysto nudge the hot spot in increments of 10 pixels on Mac- Alternatively, toggle the
Set Hot Spotmode via the toolbar and click anywhere on the canvas.
Using Image Capture Shortcuts
You can modify the following shortcuts, unless otherwise specified,
by running the >Preferences: Open Keyboard Shortcuts command in the
Command Palette and searching for eggplantteststudio.imageCapture.
or you can click on the keyboard shortcut in the top right corner
of the Connection Viewer panel.
If you had set custom shortcuts prior to version 0.14, you will need to set them once more due to the underlying shortcut IDs changing.
Please ensure the tab is in focus for your custom shortcuts to work. If the SUT window is in focus, keybindings will be sent to it instead.
Quick Selection Shortcuts
Quick selection shortcuts allow you to quickly perform toolbar actions and return back to having the Capture Area focused in the default Crop Selection mode.
Wherever omitted in the following tables, the shortcuts on Mac are the same as those for Windows and Linux.
| Windows/Linux | Mac | Description |
|---|---|---|
Shift+Click | [Not modifiable] Quick selection shortcut that enables panning the Image Capture canvas by clicking and dragging it. | |
Ctrl+Click | Cmd+Click | [Not modifiable] Quick selection shortcut that enables setting the Hot Spot at the click location. |
Alt+Click | Option+Click | [Not modifiable] Disables magnetic snapping while drawing a new Capture Area rectangle. Note: You can press Alt or Option after you start drawing the rectangle. |
Shift+Space or 1 | Toggle Capture mode (in Live mode) Enables the image capture functionality. | |
1 | Toggle Live mode (in Capture mode) Enables interacting with the System Under Test. | |
2 | Enable Crop Selection Selects the currently drawn Capture Area rectangle, if any, allowing you to interact with it. In order to draw a new Capture Area, press the Backspace or Delete keys to remove the current one. Drawing the Capture Area automatically snaps around an image using edge detection once the selection is drawn, unless the Alt or Option keys were pressed. | |
3 | Enable Moving Canvas Allows you to freely pan the canvas by clicking and dragging the mouse on it. | |
4 | Enable Setting Hot Spot Allows you to freely set the Hot Spot location by clicking on the canvas. If no Capture Area exists, clicking and dragging will switch to the Crop Selection mode and draw a Capture Area instead. | |
MouseWheel | Pans the canvas vertically. | |
Shift+MouseWheel | Pans the canvas horizontally. | |
Ctrl+=, Ctrl+MouseWheel | Cmd+=,Cmd+MouseWheel | Zooms in. |
Ctrl+-, Ctrl+MouseWheel | Cmd+-,Cmd+MouseWheel | Zooms out. |
Ctrl+Shift+R | Cmd+Shift+R | Resets the Image Capture view back to its initial state. |
Escape | Exits from capture mode and returns to live mode. | |
Backspace or Delete | Removes the current crop box that has been drawn. | |
Ctrl+arrow keys | Cmd+arrow keys | Nudges the Hot Spot 1 pixel. |
Ctrl+shift+arrow keys | Cmd+shift+arrow keys | Nudges the Hot Spot in increments of 10 pixels. |
- Note that you can also use a touchpad to pan and zoom.
Capture Area Shortcuts
| Windows/Linux | Mac | Description |
|---|---|---|
Alt+Click | Option+Click | [Not modifiable] Disable magnetic snapping while drawing a new box. |
↑ / ↓ / ← / → | Nudge Capture Area 1 pixel in the given direction. | |
Shift + ↑ / ↓ / ← / → | Move Capture Area 10 pixels in the given direction. | |
Alt + ↑ / ↓ / ← / → | Option + ↑ / ↓ / ← / → | Resize Capture Area 1 pixel in the given direction. |
Shift+Alt + ↑ / ↓ / ← / → | Shift+Option + ↑ / ↓ / ← / → | Resize Capture Area 10 pixels in the given direction. |
Hot Spot Shortcuts
| Windows/Linux | Mac | Description |
|---|---|---|
Ctrl+Click | Cmd+Click | [Not modifiable] Quick selection shortcut that enables setting the Hot Spot at the click location. |
Ctrl + ↑ / ↓ / ← / → | Cmd+ + ↑ / ↓ / ← / → | Nudges the Hot Spot 1 pixel in the given direction. |
Ctrl+Shift + ↑ / ↓ / ← / → | Cmd+Shift + ↑ / ↓ / ← / → | Moves the Hot Spot 10 pixels in the given direction. |
Further Reading
For more information, see Image Capture Best Practices.