Using Eggplant Functional with Visual Studio
Eggplant provides two ways to perform Eggplant Functional tests from within Microsoft Visual Studio:
- Running Eggplant Functional Scripts from Visual Studio: Use the information shown here to configure Eggplant Functional test scripts to run a basic unit test from a Visual Studio test project.
- Using the Eggplant Integrations for Visual Studio: Use the information shown here to install and configure Eggplant Integrations for Visual Studio to run Eggplant Functional test scripts as generic tests from a Visual Studio test project. The Eggplant Integrations for Visual Studio is only available for Visual Studio 2013 Premium or Ultimate edition.
Running Eggplant Functional Scripts from Visual Studio
The Eggplant Functional application provides two available integration approaches, command line and XML-RPC using Eggdrive, which you can use to run Eggplant Functional scripts from Visual Studio and other test execution tools. Use the information shown here to configure a Visual Studio test project to run Eggplant Functional scripts using Eggplant's command line or XML-RPC interfaces.
Adding Tests to Visual Studio
You must create a test project in Visual Studio to run Eggplant Functional tests:
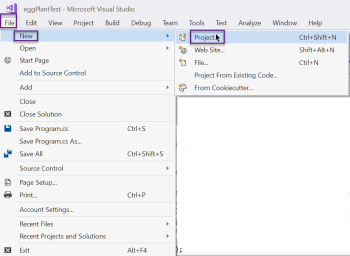
- From the main menu, select File > New > Project.
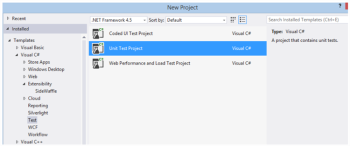
- In the left sidebar of the New Project dialog box, select Visual C# > Test.
- In the main window, choose Unit Test Project.
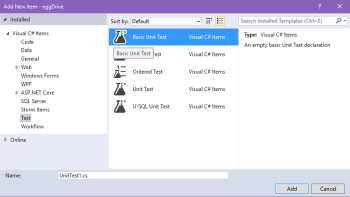
- Make the selection shown below to create a new Basic Unit Test item in Visual Studio:
- After the project is created, delete the generated UnitTest1.cs file.
Read the following information to help you decide which integration approach is right for you:
-
Integration Option 1: Command Line
- It uses standard command line syntax.
- It is available for all Eggplant Functional license types.
- It automatically starts and stops the Eggplant process as at the beginning and end of the script execution.
- It assumes that you installed Eggplant Functional on the same machine as Visual Studio.
Use C# code similar to the code shown below to locally execute Eggplant Functional’s runscript.bat script. Then check the standard output of the execution to determine whether the Eggplant Functional script passed or failed.
Use the script shown below as an example to follow as a starting point. Customize the script path, the command line flags (-host, -password, and others) and other coding areas as required within the script and the command line call. See Running from the Command Line for more information about creating command line calls.
Example:
using System;
using Microsoft.VisualStudio.TestTools.UnitTesting;
using System.Diagnostics;
namespace Eggplant // change the namespace to meet your needs
{
[TestClass]
public class MobileTest
{
[TestMethod]
public void runeggPlantScript()
{
var UniqueFolderName = string.Format(@"C:\Users\Carrie\Desktop\" + DateTime.Now.Ticks); // Change the directory path to meet your needs
Process p = new Process();
p.StartInfo.FileName = @"C:Program Files\Eggplant\runscript.bat"; // This is the default install location for Eggplant Functional's runscript.bat. Change the path if required
p.StartInfo.Arguments = @"C:\Users\Carrie\Documents\demo.suite\scripts\test.script -host 192.168.120.128 -password eggplant -GlobalResultsFolder " + UniqueFolderName; // Change the path to point to the Eggplant script you want to execute. Specify the necessary command line flags and values to meet your needs.
p.StartInfo.CreateNoWindow = false;
p.Start();
p.WaitForExit();
int eggPlantExitCode = p.ExitCode;
Console.WriteLine(UniqueFolderName); // You can leverage the UniqueFolderName to copy or upload the script results to the desired location
Console.WriteLine(eggPlantExitCode);
if (eggPlantExitCode == 0)
{
Console.WriteLine("eggPlant script passed."); // Change the message to meet your needs
}
else if (eggPlantExitCode == 1)
{
Console.WriteLine("eggPlant script failed.");
throw new Exception("There was a failure in the eggPlant script."); // Change the message to meet your needs
}
}
}
}
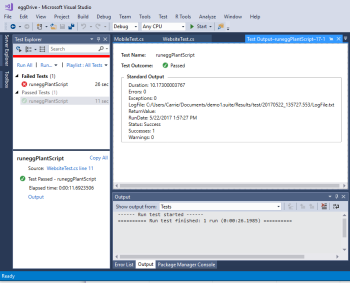
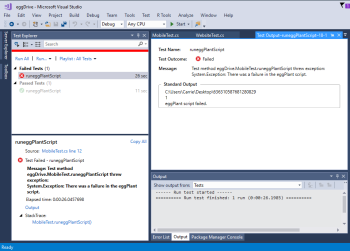
Executing the code shown above as a unit test in Visual Studio results in an output similar to the one shown below, where the results folder path, exit code, and custom log message are displayed.
-
Integration Option 2: XML RPC using Eggdrive
- It leverages XML-RPC libraries to interface between Eggplant Functional and your test execution harness/tool. XML-RPC libraries are available for most popular scripting languages, including C#, Ruby, Java, Python, and more.
- It is available with Team Eggplant Functional licenses or Eggdrive-enabled node-locked licenses.
- It runs as a web service on your internal network and can be leveraged by a test harness that runs on a machine that is separate from Eggplant Functional.
- The Eggplant Functional application must be running in Eggdrive mode for the test harness and tool to communicate with it.
Use the script shown below as an example to follow as a starting point. Update the Eggdrive URL, suite path, and execute commands as required in your environment.
Example:
using System;
using Microsoft.VisualStudio.TestTools.UnitTesting;
using CookComputing.XmlRpc;
namespace eggPlant // Change the namespace to meet your needs
{
[TestClass]
public class WebsiteTest
{
[TestMethod]
public void runeggPlantScript() {
IProxy eggDriver = XmlRpcProxyGen.Create<IProxy>();
// Default eggDrive URL: http://localhost:5400
try {
eggDriver.Url = "http://localhost:5400";
eggDriver.StartSession(@"C:\Users\Carrie\Documents\demo.suite"); // Change the suite path to meet your needs
eggDriver.Execute("Connect \"Windows VM\"");
eggDriver.Execute("RunWithNewResults \"mytest\"");
XmlRpcStruct XMLresult = eggDriver.Execute("put the result");
XmlRpcStruct eggPlantResult = (XmlRpcStruct) XMLresult["Result"];
foreach (String s in eggPlantResult.Keys) // Parse the property list to access information about the results location, script status, and more
{
Console.WriteLine(s + ": " + eggPlantResult[s]);
}
}
catch (CookComputing.XmlRpc.XmlRpcFaultException ex) {
Console.WriteLine("There was an issue with the eggDrive calls.", ex); // Change the message to meet your needs
throw;
}
finally
{
eggDriver.EndSession();
}
}
public interface IProxy : IXmlRpcProxy
{
[XmlRpcMethod("StartSession")]
void StartSession();
[XmlRpcMethod("StartSession")]
void StartSession(string RemoteScriptPath);
[XmlRpcMethod("EndSession")]
void EndSession();
[XmlRpcMethod("Execute")]
XmlRpcStruct Execute(string Command);
}
}
}
Executing the code shown above as a unit test creates an output similar to the one shown below, where each property in the property list is displayed.
Using the Eggplant Integrations for Visual Studio
Only use the Eggplant Integrations for Visual Studio if you plan to integrate Eggplant Functional with Visual Studio version 2013.
Use Eggplant Integrations for Visual Studio, an extension to Visual Studio, to run Eggplant Functional test scripts as generic tests from a Visual Studio 2013 test project. Teams that use the Microsoft application lifecycle management (ALM) systems of Team Foundation Server (TFS) or Visual Studio Online can install this extension, then execute Eggplant Functional tests from Microsoft Test Manager or from a Visual Studio build.
Integrate the Visual Studio generic tests that call Eggplant Functional scripts into the standard Microsoft ALM workflows in the same way as any other Microsoft ALM automation test. For information about running Visual Studio tests, see the Microsoft documentation:
- Running Tests in Microsoft Test Manager
- How to: Run Tests from Microsoft Visual Studio
- Setting Up Test Machines to Run Tests or Collect Data
Requirements for Eggplant Integrations for Visual Studio
Make sure your system meets the minimum requirements to run Eggplant Integrations for Visual Studio:
- Visual Studio 2013 Premium or Ultimate edition
- Other requirements as necessary to run an appropriate version of Visual Studio; check Microsoft’s Visual Studio website for information.
Note: Visual Studio Professional, Express Editions, Community Editions, or Microsoft Test Professional do not support creating generic tests.
インストール
Download Eggplant Integrations for Visual Studio from the Eggplant downloads page. As a user with local administrator permissions, execute Eggplant IntegrationsVS_setupX.exe (where X is a version number), then follow the steps in the Setup wizard. On the final screen, make sure you allow the wizard to install the Visual Studio Packages on completion.
By default, Eggplant Integrations for Visual Studio is installed to C:\Program Files (x86)\Eggplant Visual Studio Integration. However, you can change this location in the Setup wizard. The Visual Studio package installer is copied to the same folder in which you install the application. Manage packages from the main menu in Visual Studio by going to Tools > Extensions and Updates. The Extensions and Updates dialog box lets you disable or uninstall packages.
Adding Tests to Visual Studio
You need to create a test project in Visual Studio to run tests. From the main menu, select File > New > Project. In the left sidebar of the New Project dialog box, select Visual C# > Test, and in the main window, choose Unit Test Project. You can also select Visual Basic, but not C++. When the project is created, you can delete the generated UnitTest1.cs file.
Creating a new test project in Visual Studio
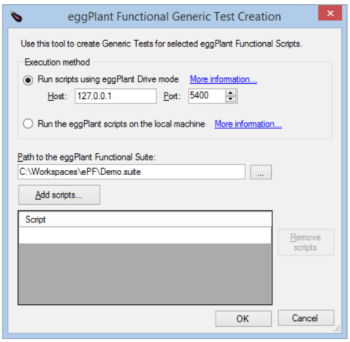
After you open the project, select Tools > Eggplant Functional Tests from the main menu. The following dialog box is displayed:
If you select Run scripts using Eggplant Drive mode and a Host that is a remote machine, then the suite path browse button and Add scripts button are disabled. With this setup, you must manually enter the scripts and suite path on the remote machine. Selecting the option to run Eggplant Functional scripts on the local machine uses command-line execution of Eggplant Functional.
To add scripts to a test, click the Add scripts button. You can also click in the bottom blank row of the Script list, then type a new script name. To edit an existing script, double-click a row in the Script list. You need to enter only the name of the script in the suite.
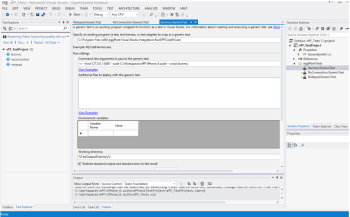
The dialog box saves the selected settings for the user between sessions. After you select the suite and scripts and click OK, a generic test is created in the project for each script:
To open the Test Explorer window, select Test > Windows > Test Explorer from the main menu. The Test Explorer window opens in the left sidebar of Visual Studio.
Open or double click a generic test in the Solution Explorer in the right sidebar to view or edit the command-line arguments for RunEPFScriptVS.exe, which is the process that executes the script and collects the results.
If you have a host:port specified, the execution uses Eggdrive. Otherwise, it runs Eggplant Functional through the command line on the local machine.
When you’re running through eggDrive, RunEPFScriptVS.exe uses XML-RPC to connect to Eggplant Functional. It selects the suite and calls RunWithNewResults scriptName.
If a host argument is not given, the script executes by calling RunScript.bat with the command line arguments:
runscript.bat "fullScriptPath" -GlobalResultsFolder Results [optional other parameters]
Running Tests
To begin execution of your test, right-click a test in the Test Explorer window or use one of the Run menu items.
The Eggplant Functional script log output is translated into the Visual Studio format and copied to the Visual Studio test location. Click the Output link at the bottom of the Test Explorer window to see the results, errors, and any screenshots. The results files created by Eggplant Functional are not deleted, so you can still view script results in the Eggplant Functional UI as well.
To run tests from Microsoft Test Manager, you must set up a test controller and test agents as described in the Microsoft documentation, Setting Up Test Machines to Run Tests.
