Resources Pane(リソースペイン)
The Resources pane appears in the lower left corner of the Suite window. Add any files you want to store with your suite in this pane. For example, if you use data-driven tests, add the comma-separated values (CSV) files for those tests in the Resources pane.
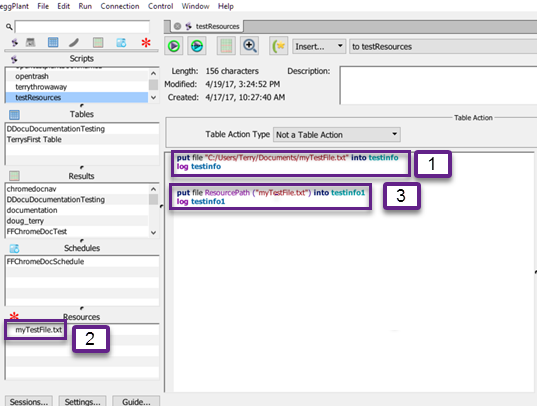
The following example and graphic shows you how to use the Resources pane to make a script more portable.

- Notice the line of code located next to callout 1 in the above graphic. Here the SenseTalk script calls the myTestFile.txt file that is located on the local file system. If that same file is not located on the local file system of a system to which you want to copy this suite, the script will not function correctly.
- In the Resources pane, shown next to callout 2 in the above graphic, the myTestFile.txt file is also located in the Resources pane.
- In the SenseTalk script, next to callout 3 in the above graphic,the SenseTalk script calls the myTestFile.txt file using the ResourcePath("myTestFile.txt") syntax. See ResourcePath Function for more information.
The suite containing this script and the myTestFile.txt file can now be copied onto another system and function correctly without you needing to copy the myTestFile.txt file to the local file system.
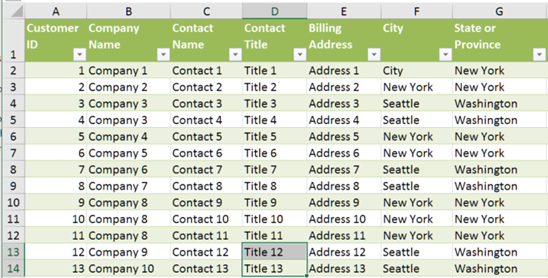
For this example, consider that you have an Excel file, MyCustomers.xlsx, that stores customer information:

You have a SenseTalk script, located in a suite named CustomerSuite, that updates the MyCustomers.xlsx file:
set fileToRead to "MyCustomers.xlsx"
set myExcelDB to (type: "excel", file: ResourcePath("MyCustomers.xlsx"))
set myRecords to the records of myExcelDB
Repeat for each item of myRecords--iterate through the table
put the "company name" of it into myCompany
put the "contact name" of it into myContactName
put the "contact title" of it into myContactTitle
put the "billing address" of it into myAddress
put the "city" of it into myCity
put the "state or province" of it into myState
put myCompany
put myContactName
put myContactTitle
put myAddress
put myCity
put myState
put " ------------------"
end repeat
Notice that the second line of the script shown above references the MyCustomers.xlsx file using the ResourcePath function. For this script to function correctly, you must complete the following steps to add the MyCustomers.xlsx file to the Resources pane:
- Open a Suite window for the CustomerSuite. See Suite Window for more information.
- Click inside the Resources pane.
- Right-click, then choose Add from the pop-up menu to open a file browser.
- Select the MyCustomers.xlsx file and follow the interactive instructions.
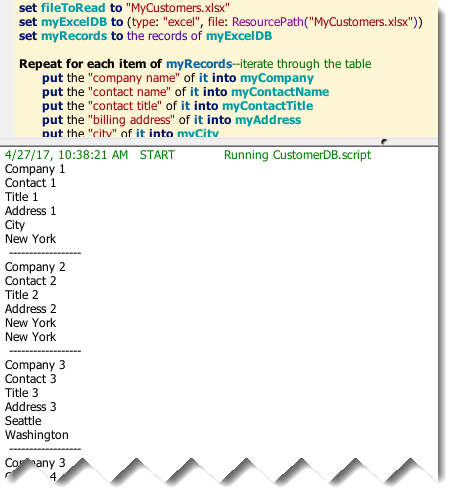
The script can now access the MyCustomers.xlsx file, located in the Resources pane, and process that information as shown below:

Adding or Removing Resource Files within a Suite
Use the information in this section to add files to or remove files from the Resources pane within a suite.
Step by Step: Adding a File or Files to the Resources Pane
- Open the suite window to which you want to add the file. See Suite Window for more information.
- Click inside the Resources pane.
- Right-click, then choose Add from the pop-up menu to open a file browser.
- Select the file you want to add to the resource and and follow the interactive instructions.
Step by Step: Removing Resource Files from a Suite
Use the steps shown below to remove a file from the Resources pane.
- Open the suite window to which you want to add the file. See Suite Window for more information.
- Click inside the Resources pane.
- Right-click the file you want to remove.
- Select Delete and follow the interactive instructions to remove the file from Resources pane.
Step by Step: Opening Files from the Resources Pane
Use the following steps to open a file from the Resources pane within a suite.
- Open the suite window to which you want to add the file. See Suite Window for more information.
- Click the file in the Resources pane that you want to open.
- Right-click that same file, then select Open.
Step by Step: Searching Your Existing Resources
Use the following steps to search for a specific resource in your suite:
- Open the suite window to which you want to add the file. See Suite Window for more information.
- Type part of a resource name in the search field above the Scripts list. Note: This search function searches all the panes in the left sidebar simultaneously.
- Optional step: To set a search filter, click the magnifying glass beside the Search field and choose Search All, Search Names, or Search Contents from the drop-down list.
For complete information about using the search and replace function in the Suite window, see Using the Search Filter.