After you create a test in Eggplant Manager, you can build the test by adding executables to it. Executables can include:
- Eggplant Functional scripts
- Eggplant Functional keyword-driven tests (tables)
- Eggplant Functional schedules
- Gherkin features written in Eggplant Functional
- API tests written in Eggplant Functional
- Other executable files, such as shell or batch files
Your test can include a single executable that runs one time, or it can consist of multiple executables that run in sequence. You can also set executables to run multiple times in a single test run.
Step by Step: Adding an Executable to a Test
The following steps describe how to add scripts and other executables to a test in Eggplant Manager.
- Navigate to the page for the test you want to update. When you create a new test, that test's page opens automatically. Otherwise, you can go to Tests > All Tests and click the appropriate test from the list in the Tests table to open the test page. The test page shows the details for your test.
- In the Scripts section of the test page, click New Script. Note: The Scripts section is collapsible, so you might need to click the title bar to open it before seeing the New Script button.
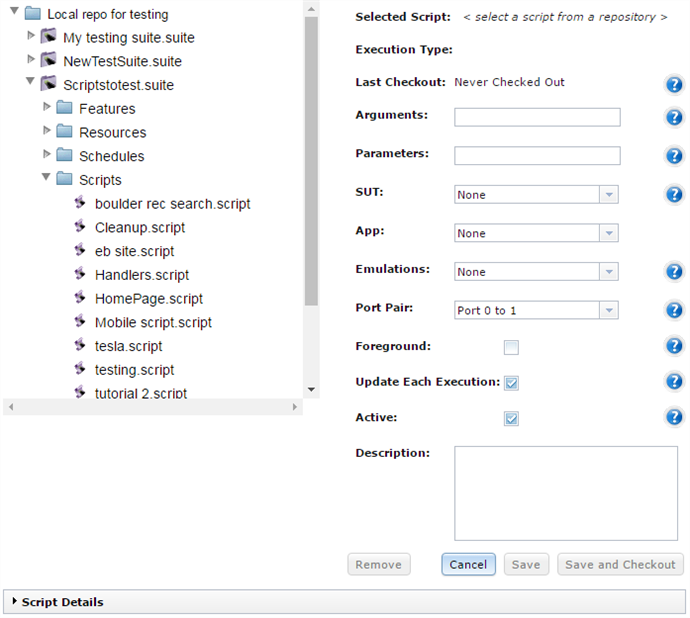
- On the left side of the New Script dialog box, use the file browser to select the Eggplant Functional script, table (for keyword-driven testing), Eggplant Functional schedule, Gherkin feature, API test, or other executable file that you want to add to the test.

The New Script dialog box
Note: The file browser displays only the repositories you've created in the Admin section of Eggplant Manager (Admin > Repositories). Therefore, any scripts or other executables you want to use in tests must be accessible in these repositories. Shell and batch files cannot be located in the root folder of a repository; they must be contained inside a subfolder or .suite folder. For information about creating repositories, see Creating a Repository in Eggplant Manager.When you select a script in the browser, the Script Details section becomes active at the bottom of the dialog box. Click the title bar to open a pane with information about the selected script or executable. You can use this information to make sure you select the correct version of your script.
- On the right side of the New Script dialog box, fill in any relevant information. The rest of the form is optional, determined by the specific test you want to create.
- Selected Script: This field is not editable. It shows you the script, table, schedule, or other executable you selected from the file view on the left. You must select an executable before the save buttons (described below) become active.
- Execution Type: This field is not editable. It shows you the type of executable you have selected.
- Last Checkout: This field is not editable. It shows the date of the last checkout for this script or table. See step 5 below to read about checking out scripts and executables.
- Arguments: Specify any arguments that you want passed to your test. You can include any command-line argument that Eggplant Functional accepts, as specified in Eggplant Command Line Options and Runscript Command Line Options.
- Parameters: Specify any parameters that you want passed to your script or table.
- Tags: (Gherkin Features only) For Gherkin .feature files, you can specify tags instead of parameters. (The Tags field replaces the Parameters field when you select a Gherkin Feature from the file browser in the left column.) Tags let you filter to run only specific elements within the Feature. Any tags you've defined in the Feature are available to select from the drop-down list. To add multiple tags, you need to enter them manually into the Tags field. Note that when you include multiple tags, they follow the standard tag logic. For more information about Gherkin tags, see Advanced Gherkin Techniques.
- SUT: Specify a SUT that the script will execute against. SUTs you have defined in the Admin section of Eggplant Manager (Admin > SUTs) are available in the drop-down list. Default is None. However, a SUT can be specified on a schedule or at the test level as well; see SUT Priority for Eggplant Manager Tests for complete information about which SUT specification takes priority. Note: Both fixed SUTs and rule-based SUTs show in the list of options. Remember, however, that with rule-based SUTs, the specific SUT isn't chosen until runtime, based on the criteria set in the SUT setup. If your test needs to run against a specific SUT, be sure to select the specific SUT rather than using the rule-based option.
- App: Specify an app to test. Apps you have defined in the Admin section of Eggplant Manager (Admin > App Management) are available in the drop-down list. Default is None.
- Foreground: Select this checkbox if you want to launch Eggplant Functional in the foreground on the machine where the agent is configured. If you select this option, the instance of the Eggplant Functional GUI that is launched requires a development license. Note: If you want the Eggplant Functional GUI to run in the foreground on Windows, you need to modify the Eggplant Manager configuration file (em_config.yml), which is installed in C:\TestPlant\cache by default, as follows:
:user_mode_agent: true
:process_to_start: server
You must stop and start the agent manually using the start_agent.bat file command for these changes to take effect. The agent will not start automatically with this configuration. See Starting and Stopping Eggplant Manager on Windows if you need instructions for starting and stopping Eggplant Manager.
- Update Each Execution: Select this checkbox to check out the script before each execution. To read about checking out scripts, see step 5 below. This option is selected by default. Note: If you are using more than one script in your test, make sure that all of those scripts are set the same (either to update or not to update) to prevent resource allocation problems.
- Active: Scripts are active by default. You can clear this checkbox to make the script inactive. If a script is inactive, it won't run when the rest of the test does; however, any scripts in the test that are active still run.
- Description: Add a description of the script if desired. (Optional.)
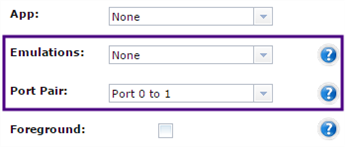
Note: If you're using Eggplant Manager with Eggplant Network, two additional fields appear on the New Script dialog box, Emulations and Port Pair.
See Integrating Eggplant Network with Eggplant Manager for information about using these fields.
- You have two options to save the executable:
- Save: This option adds the script to the test, but does not get the latest version of the script until it needs to run a test.
- Save and Checkout: This option adds the script to the test and gets the latest version of that script from the repository at the same time.
Note: Save and Checkout is recommended when first adding an executable to a test. Remember, the latest version of the executable will be fetched from the repository with each test run if you select the Update Each Execution option.
After you save, your executable is added to the table in the Scripts section on the main test page:
Ordering Executables in Your Test
When you add a script to a test, it appears at the bottom of the Scripts list. You can sort the table by clicking any of the column headings; however, changing the table view doesn't change the run order of executables in the test.
The Order column shows the order in which executables will be run. To change the run order, click Script Order. In the Script Order dialog box, drag scripts up or down until they are in the order you want them to run, then click Save.

The Order column on the main test page shows the new order you've set for the test.
Editing Existing Executables
To edit a previously added executable, double-click it in the list, or select it and click Edit Script. The Edit Script dialog box looks just like the New Script dialog box and lets you alter your previous settings, check out your executable, remove it, and re-save.

