Most of the actions that you can perform in the Eggplant Manager user interface (UI) can also be automated by using the REST API. This ability could be useful if you want to automate the process of running tests or generating user data reports. For example, you could use the REST API to integrate Eggplant Manager into a continuous integration (CI) environment. There are many REST API methods available.
The example on this page shows how to create a test, add a script to the test, execute the test, and check the status of the test run.
Authorization
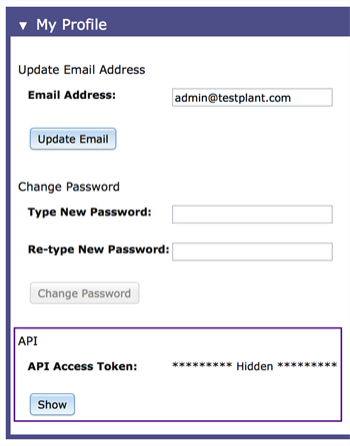
The REST API uses HTTP basic authorization. You can use Eggplant Automation Cloud or Eggplant Manager user credentials, or the API token found at Account > Account Settings in Eggplant Manager. When using the API access token instead of username and password, replace the username with the token, and the password should be randomly generated (or blank).

The API Access Token on the Eggplant Manager Account Settings page.
Note that the API Access Token field is hidden by default. To view this field, click the Show button. When the API Access Token field is visible, the Show button changes to a Reset button. If you click the Reset button, Eggplant Manager revokes the previous access token, then generates and displays a new token.
If you're using cURL to run the API using the examples in the documentation, the access token must be base64 encoded. If you use Eggplant Functional, this script generates the access token in the appropriate format. Replace <token_string> in the script below with your API access token.
set mytoken to"<token_string>"
put base64encode(mytoken & ":")
The following script is an example of base64 encoding the username and password:
set username to "<username>"
set password to "<password>"
put base64encode(username & ":" & password)
Create a Test
To create a test:
Use these headers:
The request body is a JSON-encoded version of the following. The name is required.
{
name: "<name>",
description: "<description>",
...
}
This returns a JSON object:
{
...,
_id: "<test id>",
name: "<test name>",
...
}
Create a Test Execution
A Test execution is what is referred to as a “script” in the GUI. One or more test executions must be added to a test before a test can be executed. To create a test execution:
Use these headers:
The request body is a JSON-encoded version of the following. The script path is required.
{
...,
test_id: "<test id>",
script_path: "<path to script>",
...
}
This returns a JSON object:
{
...,
_id: "<test execution id>",
script_path: "<script path>",
...
}
Execute a Test
To execute a test, send a GET request:
This returns a JSON object:
{
"_id": "<test_run id>",
"test_run_number": <test run number>,
"test_id": "<test id>",
...
}
Check Test Run Status
Use the test run id from the previous execute request to check the test run status. Send a GET request:
This returns a JSON object:
{
"_id": "<test run id>",
"test_id": "<test id>",
"status_code": "<status code>",
"test_run_instances": [
{
"_id": "<test run instance id>"
}
],
"test_cases": [
{
"_id": "<test case id>",
"duration": 4.197,
"error_count": 0,
"exceptions": 0,
...
},
...
}
]
}