Using Jenkins with Eggplant Functional and Eggplant Manager
You can use Jenkins to run Eggplant Functional scripts or use Eggplant Manager to complete a Jenkins test run, then poll that test run for a final status. The following information explains how to use these Eggplant solutions with Jenkins:
Using Jenkins with Eggplant Functional
You might be using Eggplant Functional with a source control management (SCM) tool such as Subversion or Git. If your environment also includes a Jenkins automation server, you might want to use Jenkins to run Eggplant Functional scripts. Use the following example to create a new Jenkins project that runs Eggplant Functional scripts.
Creating a New Project
Use the following steps to create a new project:
- From the Jenkins UI, select New Item.
- Enter the item name to name your new project.
- Click Freestyle project.
- Click OK to create your new project.
Configuring the New Project
Use the following steps to configure your new project:
- From the Jenkins UI, click the name of the project you just created.
- Click Configure.
- Click the General tab, then make any desired build configuration additions or changes.
- Click the Source Code Management tab, then select the SCM system, if any, that you plan to use. The selection you make here depends on your setup. You might be using Subversion, Git, or some other source code management system. For example, the following steps show one example of entries you might make to use Subversion as the source code management system:
- Click Subversion and several new fields open.
- Add the repository URL, which is the repository from which you check out tests. For this example consider the repository entry to be svn+ssh://svn.testplant.com/usr/local/svn/eggplantTests/trunk
- Add the Local module directory information. This entry is the name of the folder to store your checked out tests. Jenkins automatically creates this folder.
- Select the Check-Out Strategy you plan to use. This selection determines how you want to manage workspace updates.
- Click the Build Triggers tab, then select how you want Jenkins to trigger a build.
- At this point, do the following to add a build step that runs your test:
- Click the Build Environment tab.
- Click the Add build step button.
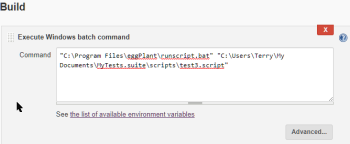
- Choose the kind of command you are going to be sending. For this example, choose Execute Windows batch command and use the script shown below as a guideline.
See Runscript Command Line Options for more information.
- Click the Post-build Actions tab and, if desired, select a post-build action.
- Save your work.
Using Jenkins with Eggplant Manager
The following information explains one example of integrating Eggplant Manager and Jenkins using the command line tool and library for transferring data with URLs (cURL). It also explains a way to complete a Jenkins test run, then poll the test run for a final status using Eggplant Manager.
Integrating Eggplant Manager and Jenkins
The information shown below explains an example that uses Jenkins running on a Windows 7 machine. Complete the following steps:
- If cURL is not installed, download and extract it from the cURL download site.
- After extracting the downloaded file, add its location to the system environment variables so you can use the cURL command without providing its full path.
The Eggplant Manager API test execution ignores the supplied configuration. So the example explained here uses a REST endpoint to start the test, the same way as Eggplant Manager does when you click Run Now as explained in Running Eggplant Manager Tests. As shown in the following example, you need to do it the same way the browser UI does:
- Run the following command from a command line for curl to log in to the server and get a session cookie:
curl --cookie-jar em_session.cookie "http://<server IP address>/rest2/auth_user" -H "Content-Type: application/json" --data-binary "{\"user_name\":\"<user name>\",\"password\":\"<password>\"}" - Run the following command to create a new 'on demand' schedule using curl:
curl --cookie em_session.cookie "http://<server IP address>/rest2/TestSchedule/method/create" -H "ContentType: application/json" --data-binary
"{\"options\":{\"test_id\":\"5936a4cb656767021c000015\",\"schedule_type_id\":\"579b60f06567670a89000005\",\" licenses_to_use\":6,\"execution_configuration\":\"5936afba656767021c000024\"}}"After an on-demand schedule gets created, the scheduler automatically begins running it. Your test starts shortly after this request finishes.
Note: To confirm the scheduler is running the schedule, check the Runs section in the relevant Test page in Eggplant Manager. - Run the following command from a command line to delete the em_session.cookie file. Doing so prevents any unexpected behavior during subsequent runs: del em_session.cookie
- Using the information shown in Using Jenkins with Eggplant Functional, add the above information into a build step in Jenkins using the Execute Windows batch command in Windows command field.
Here is an example of the information you'll need from step 2 to create this build step:
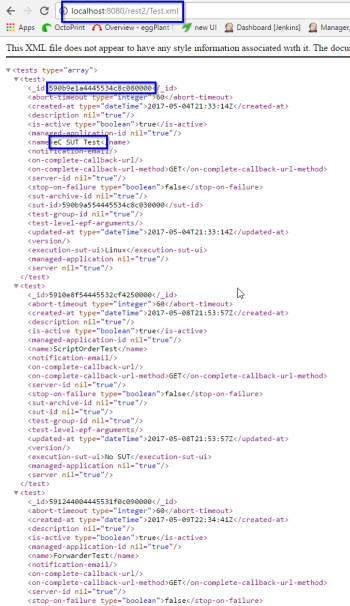
"test_id\":\"5936a4cb656767021c000015\"
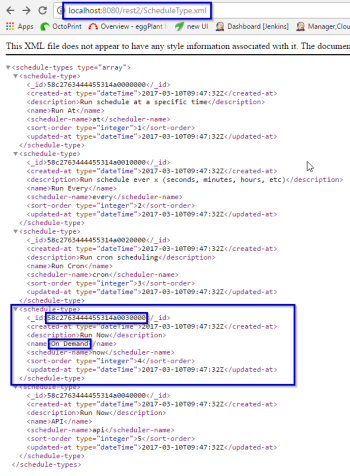
"schedule_type_id\":\"579b60f06567670a89000005\"
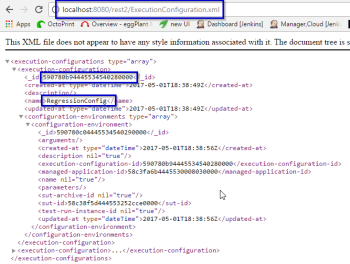
"execution_configuration\":\"5936afba656767021c000024\"}}"
Review the following examples to see how to find the values for the test_id, schedule_type_id, and execution_configuration using a browser. It is important for the schedule_type_id to use the ID of the Schedule Type where the name is On Demand as show in the Schedule Type example.
Checking a Jenkins Test Run with Eggplant Manager
When using the information here, refer to the Ruby example for executing a test by name in Jenkins, waiting for it to finish, then exiting with an error if the test run didn't pass.
These instructions explain a back-door way to trigger a test execution. They explain how to create an on-demand schedule similar to how it's done in Eggplant Manager, with the difference being that Eggplant Manager does not need the status.
The information shown below explains an example that uses Jenkins running on a Windows 7 machine. The usage sample used here had the following configuration:
- Jenkins was installed on a 64-bit Windows machine.
- Eggplant Manager
was installed separately on another machine within the network.
Complete the following steps:
- Download and install Ruby using the following URL: https://dl.bintray.com/oneclick/rubyinstaller/rubyinstaller-2.0.0-p648-x64.exeNote: Obtain and install the same version of Ruby as the one shown in this step if you are using a Mac or any other system.
- Customize the following command according to your environment in the provided Ruby script:
# The following constants can be modified to match the local ePM configuration:
API_SCHEME = 'http' # http or https (depending on server configuration, http is default)
API_HOST = '127.0.0.1' # IP address of ePM server
API_PORT = 8080 # Port of ePM server
API_USERNAME = 'admin' # ePM user username
API_PASSWORD = 'admin' # ePM user password - Add a build step in Jenkins using the Execute Windows batch command in Windows command field:
C:\Ruby200-x64\bin\ruby C:\Test\api_execute_test_and_wait_for_result.rb --test-name “MyTest"
Modify the directory accordingly. The test-name should be the same name as in Eggplant Manager. - Run the test that contains the newly added build step. Jenkins returns a success or failure message after the test run completes.
Below is the mechanism for the Ruby example:
- The execute URL and the REST API both return a test run object containing the test run _id:: http://docs.testplant.com/ePM/api/api-get-test-id-execute.htm
- Using the test run _id, poll the test run for a final status: http://docs.testplant.com/ePM/api/apiget-test-run-id.htm
- A final status is provided when the status code attribute is greater than 199:
- 200-299 means Success
- 300-399 means Success (with warnings)
- 400-499 means Script Error
- 500+ means Execution Failure
- See Eggplant Manager Result Status Types for a list of all status codes and their descriptions.
#!/usr/bin/ruby
# standard library tools
require 'json'
require 'uri'
require 'net/http'
class ApiExample
# The following constants can be modified to match the local ePM configuration:
API_SCHEME = 'http' # http or https (depending on server configuration, http is default)
API_HOST = '127.0.0.1' # IP address of ePM server
API_PORT = 8080 # Port of ePM server
API_USERNAME = 'admin' # ePM user username
API_PASSWORD = 'admin' # ePM user password
BASE_URI = "#{API_SCHEME}://#{API_HOST}:#{API_PORT}"
API_URL_PREFIX = 'api'
TEST_RESOURCE_NAME = 'test'
TEST_RUN_RESOURCE_NAME = 'test_run'
CONFIGURATION_RESOURCE_NAME = 'execution_configuration'
EXECUTE = 'execute'
EXECUTION_POLL_DURATION = 5
def run
begin
test_name_index = ARGV.index('--test-name')
raise ArgumentError.new('--test-name argument is required!') if test_name_index.nil?
test_name = ARGV[test_name_index + 1]
configuration_name_index = ARGV.index('--configuration-name')
configuration_name = ARGV[configuration_name_index + 1]
# get tests
@tests = get_tests['tests']
# get test id for test matching supplied test name
selected_test = @tests.find{|test| test['name'] == test_name}
@configurations = get_configurations['execution_configurations']
selected_configuration = @configurations.find{|configuration| configuration['name'] == configuration_name}
raise "Test with name \"#{test_name}\" not found on ePM server." unless selected_test
test_id = selected_test['_id']
configuration_id = selected_configuration ? selected_configuration['_id'] : nil
test_run = run_test(test_id, configuration_id)
test_run_id = test_run['_id']
test_run_number = test_run['test_run_number']
status_code = test_run['status_code']
while status_code < 200
# sleep and check again in one second until status code is greater than 200
puts "#{Time.now.to_s} Test: #{test_name}, Run #: #{test_run_number} still running, checking again in #{EXECUTION_POLL_DURATION} seconds..."
sleep(EXECUTION_POLL_DURATION)
status_code = get_test_run(test_run_id)['status_code']
end
puts "Run completed, final status: #{status_code}"
exit 1 if status_code > 299
exit 0
rescue => e
STDERR.puts("Exception: #{e.message}")
STDERR.print(e.backtrace.join($/))
exit 1
end
end
def get_tests
# GET http://127.0.0.1:8080/api/test
request(:get, URI.parse([BASE_URI, API_URL_PREFIX, TEST_RESOURCE_NAME].join('/')))
end
def get_configurations
# GET http://127.0.0.1:8080/api/execution_configuration
request(:get, URI.parse([BASE_URI, API_URL_PREFIX, CONFIGURATION_RESOURCE_NAME].join('/')))
end
def run_test(id, configuration_id=nil)
# POST http://127.0.0.1:8080/api/test/<id>/execute
data = configuration_id ? {:execution_configuration_id => configuration_id} : nil
request(:post, URI.parse([BASE_URI, API_URL_PREFIX, TEST_RESOURCE_NAME, id, EXECUTE].join('/')), data)
end
def get_test_run(id)
# GET http://127.0.0.1:8080/api/test_run/<id>
request(:get, URI.parse([BASE_URI, API_URL_PREFIX, TEST_RUN_RESOURCE_NAME, id].join('/')))
end
def request(type, uri, data=nil)
Net::HTTP.start(uri.host, uri.port, :use_ssl => (uri.scheme == 'https')) do |http|
case type
when :get
request = Net::HTTP::Get.new(uri)
when :post
request = Net::HTTP::Post.new(uri, 'Content-Type' => 'application/json')
request.body = (data.to_json)
else
raise ArgumentError.new("Invalid request type: #{type.to_s}")
end
request.basic_auth(API_USERNAME, API_PASSWORD)
response = http.request(request)
result = JSON.parse(response.body) rescue {}
if result.keys.include?('status') && result['status'] == 'failed'
raise result['message']
end
if result.keys.include?('trace')
raise "#{result['name']}: #{result['message']}"
end
raise "HTTP Error: #{response.code}:#{response.message}" unless response.is_a?(Net::HTTPOK)
return result
end
end
end


