Custom Code Rule
How the Custom Code Rule Works
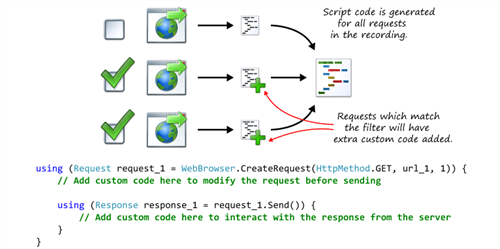
The following diagram illustrates how the Custom Code rule works:

Example Script Code Changes (Java)
The following example code shows the effect of applying a Custom Code rule:
Url url1 = new Url(protocol1, "www.example.com", "/");
QueryData queryData1 = new QueryData();
queryData1.add("sessionId", "12345678");
url1 = url1.withQuery(queryData1);
try (Request request1 = getWebBrowser().createRequest(HttpMethod.GET, url1))
{
....
try (Response response1 = request1.send())
{
....
}
}
Changes to the following:
Url url1 = new Url(protocol1, "www.example.com", "/");
QueryData queryData1 = new QueryData();
queryData1.add("sessionId", "12345678");
url1 = url1.withQuery(queryData1);
try (Request request1 = getWebBrowser().createRequest(HttpMethod.GET, url1))
{
writeMessage(String.format("Checking request %d", request1.getID()));
writeMessage(String.format(String.format("Url has value %s for key 'sessionId'", url1.getQueryData().getValue("sessionId"))));
....
try (Response response1 = request1.send())
{
writeMessage(String.format("Response returned code: %d", response1.getResult().code()));
writeMessage(String.format("Request index: %d", 1));
....
}
}
Generation Rules Wizard Pages
The pages you see in the Generation Rules Wizard vary depending on the type of rule you select and whether you are creating a new rule or editing an existing one. Following are the pages you see when you create or edit a Custom Code rule.
Select the Rule Type Page
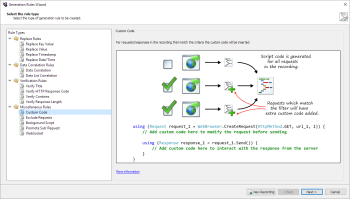
The first page you see when you create any new rule in the Rules Generation Wizard, is the Select the rule type page shown below.
In the Rule Types pane on the left side of the page, locate Miscellaneous Rules and then select Custom Code underneath. The diagram on the right changes to display an explanation of how the Custom Code rule works. The same diagram is shown at the top of this page.
The Enter code to execute Page
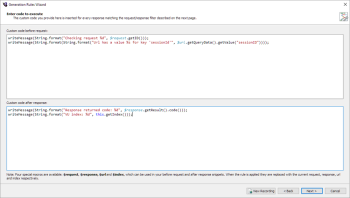
The second page you see when you create a Custom Code rule in the Rules Generation Wizard is the Enter code to execute page page shown below.
Specify the one or two blocks of code you want to insert and where you want to insert them next to each request that matches the filtering criteria in the top window on the Enter code to execute page. The code can either be placed before or after the request is sent, enabling the user to edit the request before it is sent, or interact with the response afterward. You can use macros in the Code to execute window. See Using Macros in the Code to Execute Window for information about these macros. Note that you must enter code in one of the windows on this page to enable the Next button on this page.
Create Request Filter Page
The third page you see when you create a Custom Code rule in the Rules Generation Wizard is the common Create Request Filter page.
Specify which requests to exclude from the main script on the Create Request Filter page. See the Create Request Filter for more information.
Rule Name Page
The fourth page you see when you create a Custom Code rule in the Rules Generation Wizard is the common Rule Name page.
Enter a name in the Rule name box, and a summary in the Summary box if you want. See the Rule Name and Summary page for more information about naming your rule and finishing the wizard.
Using Macros in the Code to Execute Window
You can use four special macros in the Code to execute... blocks of code, and the correct variable will be substituted for the macro when the script is generated. The context for these blocks of code is always the same: a Request object has been created using a particular Url object. In the Custom code after response box, Request.send() has been called and the resulting response returned as a response object.
Because these objects are stored in variables with different names depending on where they appear in the generated script, it is difficult to refer to them directly. Using the macros within the code blocks eliminates this difficulty:
- $url: replaced with current Url variable name.
- $request: replaced with current Request variable name.
- $response: replaced with current Response variable name.
- $index: replaced with the current request index (an integer literal).
You can use these macros anywhere you would normally use these variables, such as parameters to a method in your custom VU script.

