The API Test Editor in Eggplant Functional
The API Test pane in the Eggplant Functional (EPF) Suite window is where you create API tests. API tests open in the API Test Editor in the center pane of the Suite window. Each API test you create opens in its own tab in the editor, just as scripts do.
You can build API tests with a combination of parameters, snippets from the language browser, and SenseTalk scripts you write. You can run API tests in their own tab in the API Test Editor, and they can be called from SenseTalk scripts.
The API Test Editor Interface
On the Assets Toggle bar at the top of the Suite window sidebar, note the API Tests (globe) icon. Use this button to toggle the API Tests pane view on or off.

The Assets Toggle bar in Eggplant Functional
To create a new API test, right-click inside the API Tests pane, then select New API Test. The new test opens in its own tab in the API Test Editor view in the center pane. To open an existing test, select it in the list in the API Tests pane. Note that the test opens in preview mode initially (the tab closes if you select a different tab or object). To fully open the tab, click anywhere in the editor, or right-click on the test in the API Tests pane, then select Open.

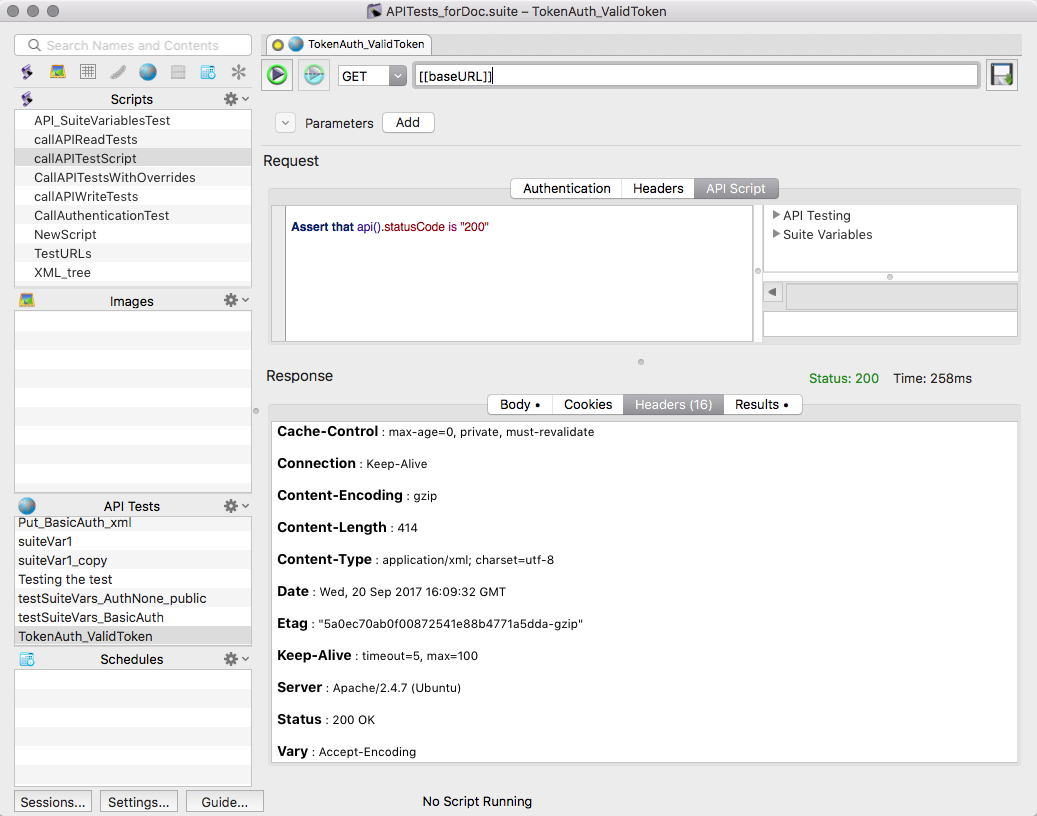
The API Test Editor in Eggplant Functional
Top Section
Run: Use this button to run the entire API test, including any script steps entered in the API Script section.
Run selection: Use this button to issue an API test request, then run the selected portion of an API script. This works like Run selection button in the main Script window.
Select HTTP Verb: Use this drop-down menu to choose the type of HTTP request to send to the API. The requests that you can send are determined by the API you're testing. Requests supported by Eggplant Functional are:
- GET: Returns header and body data.
- POST: Sends data in the request body. This request is often used to create a new database record.
- PUT or PATCH: Updates an existing record. Your API determines which request to use.
- DELETE: Removes a record. Note that many servers will reject this request due to issues with permissions.
- HEAD: Returns header data. Typically this is used only for testing and troubleshooting.
Address bar: Enter the URL of the API you want to test. Optionally, you can add query strings here as well.
You can use suite variables in the address bar by using standard merge syntax. For example, if you created a suite variable called baseURL, you could substitute it in the URL string by using the following syntax: [[baseURL]]. When you run the test, the current value of baseURL gets read for that portion of the URL string.
Parameters: Add or remove query strings for the test. Click the Add button to create a new parameter. Each parameter consists of a key/value pair. As you enter parameters, they are automatically written to the URL string in the address bar. You can temporarily remove a parameter from the URL string by clearing its checkbox on the left side. To delete a parameter, click the Delete row button at the right. Note that you can use suite variable substitution to enter parameters.
If you enter parameters directly in the address bar as part of the URL string, they are automatically added to the Parameters section as well.
Request Section
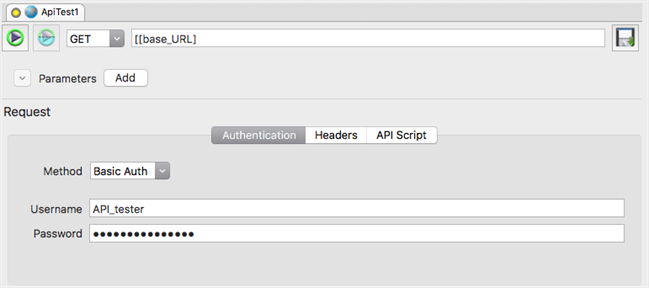
Authentication: If your API requires a username and password, you can select the authentication type, then enter credentials here. Supported authentication types are None, Basic Auth, and OAuth 1.0. You can pass credentials as parameters in the URL string or pass them directly in the headers instead. Your application determines what form you should use. Note that you can use suite variable substitution to enter authentication details.
Headers: Enter information about your request (e.g., content-type, token, API key). The headers you can use are defined by your API. Note that you can use suite variable substitution to enter headers.
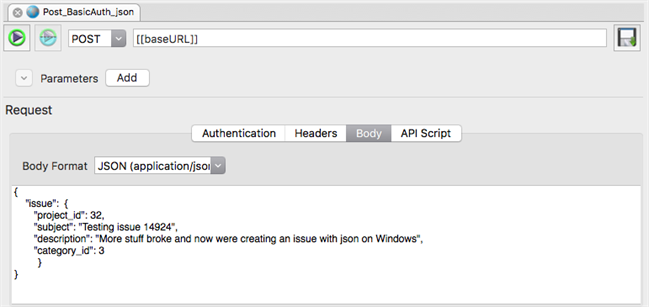
Body: This field is available for POST, PATCH, or PUT requests only. Select the content type from the Body Format drop-down list, then enter the content you want to send with the request in the field. Note that your content generally must be formatted correctly according to the body type you selected. Note that you can use the merge format with suite variables in this section.
API Script: Write SenseTalk code here to verify or work with results returned from the API request. This script is specific to the API test it's built in.
Language browser: This section appears on the right side of the scripting window when you select the API Script tab. Double-click an entry in the browser to insert that piece of code into your API script.
Test status: Returns server codes for the most recent test run. Text is green for all codes in the 200s and red for all other codes.
Test time: Returns the length of the most recent test run in milliseconds. If the request takes one second or longer, the display switches to seconds.
Response Section
Body: Displays the body of the response sent by the server the API request was sent to. Eggplant Functional can return this in XML or JSON format. Your API determines which will be returned.
Cookies: Displays session information sent by the server the API request was sent to. These are cleared after every execution.
Headers: Displays header information sent by the server the API request was sent to.
Results: Displays the results of the SenseTalk API script.
Step by Step: Send a GET Request
Here's how to send a simple GET request to an API. This example returns a list of the most recent 10 issues entered in an error tracking system.

Sending an API request in Eggplant Functional
-
Select GET from the Select HTTP Verb drop-down list.
-
Enter the address of the API you want to test. Remember, you can take advantage of suite variables, defined in the Settings tab, as you enter your address. For example, if you will have multiple tests calling the same URL, you might create a suite variable called
baseURLwhere the value is the URL. Then, in the address bar, you enter[[baseURL]]in the address bar, followed by other parameters and options. The example above might look like this:[[baseURL]]/issues.xml?limit=10 -
Enter any desired Parameters for the request. In this example, the number of entries we want the GET request to return is set to 10 (
?limit=10). -
If your API requires authentication, enter credentials in the Authentication section.
-
Click the Run button.
-
Choose the test results you want to view in the Response section of the test tab. Options are Body, Cookies, Headers, and Results. You might need to use standard SenseTalk commands and functions to parse the XML for further use.
Step by Step: Send a POST Request
Here's how to POST data to the server in the API Test Editor. This example posts a note reading "Trying to update" into the notes field of an entry in an error tracking system.

Example of a PUT request in the API tab in Eggplant Functional
-
Select POST from the request drop-down list.
-
Enter the address of the API you want to test. Remember, you can take advantage of suite variables, defined in the Settings tab, as you enter your address. For example, if you will have multiple tests calling the same URL, you might create a suite variable called
baseURLwhere the value is the URL. Then, in the address bar, you enter[[baseURL]]in the address bar, followed by other parameters and options. The example above might look like this:[[baseURL]]/issues/14919.json -
Enter any desired Parameters for the request.
-
If your API requires authentication, enter credentials in the Authentication section.
-
Choose a Body Format from the drop-down list, then enter the body of the request. This example uses JSON. Your API determines what format you should use.
-
Click the Run button.
-
Choose the test results you want to view in the Response section of the test tab. Options are Body, Cookies, Headers, and Results. You might need to used standard SenseTalk commands and functions to parse the JSON for further use.