Controlling Set-Top Boxes with LIRC
Set-top boxes like Roku and Xbox 360 typically ship with proprietary operating systems that can make automation and testing difficult. Many of these devices can be controlled using Linux Infrared Remote Control (LIRC), an open-source tool that's also available for Windows, as WinLIRC. This article gives step-by-step instructions for testing set-top boxes using LIRC.
Why Use LIRC?
LIRC decodes infrared remote (IR) signals either sent to or sent from an IR transceiver and lets you both control other devices from a machine running LIRC and control the machine running LIRC from a remote control. The first process can be used to automate set-top boxes for device or application testing.
While set-top boxes often ship with proprietary or complicated APIs that allow automation of the device OS and installed apps, sending real IR signals is an advantageous method for automation. LIRC simplifies your automation project and code, and it controls the device the same way a human user would, which allows for a more realistic test of the user experience of the device.
LIRC is a simple server that accepts socket connections and messages, which it interprets in order to send IR signals through an IR transceiver. SenseTalk includes the commands necessary to open and write to sockets, which means you can use Eggplant Functional (EPF) scripts to control your test device via IR signals. You can simultaneously validate the UI of the device by using Eggplant Functional image searches.
Combined, Eggplant Functional’s image-based automation approach and LIRC provide a highly flexible, universal, non-invasive method of automating testing of set-top boxes.
System Requirements for Integrating Eggplant Functional with LIRC
Software
We performed our internal testing against WinLIRC specifically. However, LIRC is well-supported, so it is a viable option for you to consider if you would like to use a Linux system as the host for LIRC.
Hardware
WinLIRC includes plug-ins for a number of different IR transceivers, but we recommend IguanaWorks, following our internal testing.
We performed our internal testing against the Dual LED model of the IguanaWorks IR Transceiver, but you might consider one of the other models so that you can leverage an IR emitter (blaster). We performed our testing with IguanaWorks on Windows, but Linux drivers are also available.
- 1 available USB port on the LIRC host machine
Setting Up IguanaWorks IR Transceiver and WinLIRC
-
Plug the IguanaWorks IR Transceiver into an available USB port on the WinLIRC host machine.
-
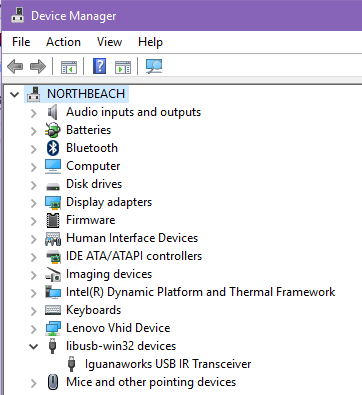
Install the IguanaWorks drivers (IguanaIR-x.x.x.exe). Confirm the IR Transceiver appears in the Device Manager as shown below.

Device Manager interface
-
Download the most recent WinLIRC.zip from the main WinLIRC web page.
-
Extract the .zip file into the desired location on the Windows machine. The extracted folder’s contents appear as shown below.
Extracted folder
-
Inside the extracted folder, right-click winlirc.exe, and select Properties.
-
On the Compatibility tab, click Change Settings for all Users.
-
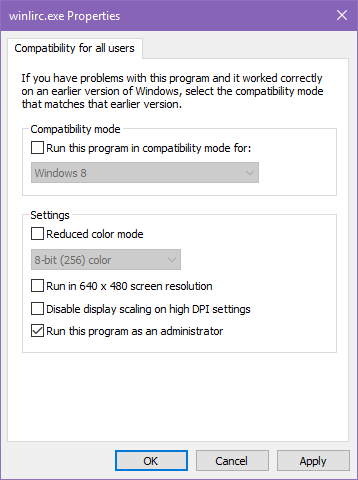
On the Compatibility for all users tab, select the Run this program as an administrator checkbox.

Compatibility properties panel
-
Click Apply, then OK, and OK, to dismiss the Properties panel.
-
In the WinLIRC extracted folder, double-click on winlirc.exe and choose to run the unverified application. The error dialog “WinLIRC failed to initialize” should pop up. Click OK to change the configuration.
WinLIRC error pop-up
-
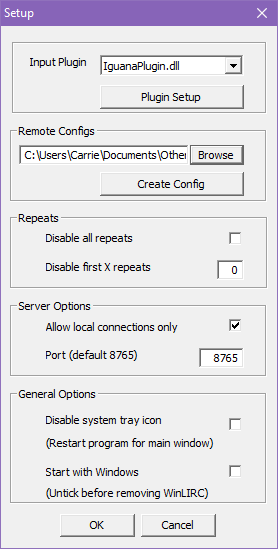
From the Setup panel, select the IguanaPlugin.dll and point to a remote configuration file. Configuration files are available for dozens of remotes in the LIRC remotes database. Find the appropriate configuration file for your device or remote, then download it on the LIRC host machine. You might need to experiment with different configuration files before finding the correct one for your device. For more information on setup and configuration files, see the WinLIRC Usage Guide.
noteThe server runs on port 8765 by default, as shown on the Setup panel. Make note of this port number, which you will need for opening the necessary socket from Eggplant Functional.

Setup panel
-
After you select the Iguana plug-in and the desired configuration file, click OK on the setup panel. WinLIRC will continue to run in your system tray.
noteWhen you subsequently run winlirc.exe, a command prompt flashes on the screen, but no GUI launches. WinLIRC opens in the system tray by default after it's configured with a plug-in and remote configuration file.
-
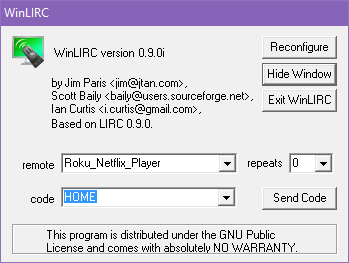
Right-click the tray icon, then click Toggle Window to launch the WinLIRC GUI. This GUI lets you test functionality between WinLIRC, IguanaWorks IR Transceiver, and your test device. Make sure WinLIRC is functioning properly with your test device before trying to control it from Eggplant Functional.
-
Physically align the IguanaWorks IR Transceiver and IR emitters (if applicable) with the front of your test device, select your remote (as named in the remote configuration file) from the drop-down menu, and select an action from the code drop-down menu. Click Send Code and confirm that the desired action occurs on the test device.

The WinLIRC GUI panel, where you can send test codes and reconfigure your setup
Test the other codes as well to confirm desired functionality. If Send Code causes no change on the test device, double-check your setup. Try clicking Reconfigure on the WinLIRC GUI and selecting a different remote configuration file from the WinLIRC host machine.
-
After you confirm that the WinLIRC GUI is functioning properly and sending codes to your device, you can click Hide Window to send WinLIRC to the tray. WinLIRC continues to run in the background as a server.
Sending Messages to the WinLIRC Server from Eggplant Functional
When sending IR signals, you use the irsend program within LIRC. The LIRC server expects messages for irsend in the following format:
Command RemoteName ButtonName TimesToRepeat
There is a list of available commands for irsend, but we will use SEND_ONCE in order to control the test device from Eggplant Functional.
The RemoteName and ButtonName values come from the remote configuration file. The example below shows the contents of a remote configuration file where the RemoteName is Roku_Netflix_Player and ButtonNames include HOME, RIGHT, and others.
TimesToRepeat is the number of times to repeat sending the IR signal, in hex. In most situations, a value of 00 is appropriate, but you can adjust this value as required by your automation.
Controlling Your IR-Compatible Test Device from Eggplant Functional
After you confirm that WinLIRC operates properly with your test device, and you retrieve the RemoteName and ButtonNames used by the configuration file for your remote, you are ready to control your test device with Eggplant Functional. Create a new Eggplant Functional script with code like this:
Params RemoteName, ButtonName
-- Store IP and port of the LIRC server in a variable.
-- In this case, the LIRC host and Eggplant Functional host are the same machine, so localhost is appropriate
put "localhost:8765" into mySocket
write "SEND_ONCE" && RemoteName && ButtonName && "00" &return to socket mySocket
Log ButtonName && "sent to" && RemoteName -- Some custom logging for more feedback from the script
Call the script (named “IRControl”) using the desired RemoteName and ButtonName. This example script automates selecting a top story from the news section of the Roku:
put "localhost:8765" into mySocket
open socket mySocket
repeat until imagefound(image:"HomeMenu_Selected",waitFor:0)
  IRControl "Roku_Netflix_Player", "HOME"
  wait 2
end repeat
repeat until imagefound (image:"NewsMenu_Selected",waitFor:0)
  IRControl "Roku_Netflix_Player", "DOWN"
  wait 2
end repeat
IRControl "Roku_Netflix_Player","OK"
WaitFor 5, "TopStories_Selected"
IRControl "Roku_Netflix_Player","OK"
WaitFor 10, "SelectedStory"
close socket mySocket -- Close the socket when finished
Note the alternating IRControl and WaitFor commands.