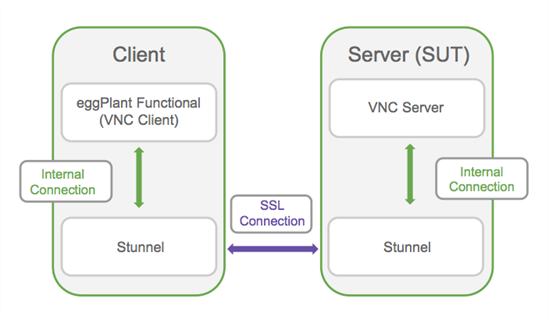
Stunnelを使用した暗号化されたVNC接続
Eggplant Functionalとテスト対象システム(SUT)間の暗号化された通信を実装するために、私たちはwww.stunnel.orgからstunnelの使用を推奨します。Stunnelは、クライアントとサーバーの両方に透明なVNC接続のためのSecure Socket Layer(SSL)暗号化ラッパーを作成します。
StunnelにはWindows用のバイナリインストーラーやスタンドアロン実行ファイルがあり、テキスト設定ファイルがあります。Linux、Unix、またはMacプラットフォームでは、ソースからビルドできますが、SSHトンネリングを使用することを好むかもしれません(以下のTunneling Using SSHを参照)。
StunnelはGNU GPL2の下でリリースされたフリーソフトウェアなので、商用利用に関する制限はありませんが、特定の地域でセキュリティアルゴリズムに制限がある場合があります。詳細はthe stunnel license pageをご覧ください。
Stunnelの操作
VNC接続は、クライアントとサーバー間に直接暗号化されていない接続を作成するのではなく、クライアントがローカルのstunnelインスタンスに接続するように設定されています。このstunnelは次に、テスト対象システムで実行しているstunnelに対して暗号化された接続を作成します。その後、VNC接続は暗号化された接続を通じてトンネル化され、結果としてサーバーのstunnelとVNCサーバー間でさらなるローカル接続が生じます。

クライアントのstunnelは、クライアントが複数のサーバーに接続できるように設定することができます。
ステップバイステップ:Stunnelの設定
-
www.stunnel.orgからstunnelインストーラーをダウンロードします。
-
Eggplant Functionalシステムでインストーラーを実行するか、7zipのようなツールを使用してフォルダーにファイルを展開します。また、SUTにもstunnelファイルをインストールするかコピーします(または、共有ネットワークフォルダを使用することもできます)。
インストールフォルダには、サンプルのstunnel.confファイルが含まれています。
-
Eggplant Functional PC上のstunnel.confファイルを編集し、次の行を追加します:
[SUT1]client = yesaccept = localhost:5801connect = MY_SUT_HOST1:5901MY_SUT_HOST1をあなたのSUTホストま��たはIPアドレスに置き換えてください。ローカルポート5801は、任意の空いているローカルポートで構いません。セクション名(例:[SUT1])はファイル内でユニークであるだけで大丈夫です。各SUTごとに繰り返します。例えば、[SUT2]client = yesaccept = localhost:5802connect = MY_SUT_HOST2:5901 -
各SUTのstunnel.confファイルを編集して、次の行を追加します:
[VNC]accept = 5901connect = 5900これは、あなたのVNCサーバーがデフォルトのポート5900を使用していることを前提としています。
-
コマンドウィンドウから実行する場合は、各マシンで“tstunnel.exe”を実行します。それは自動的に同じフォルダのstunnel.confを読み込みます。インストーラーを使ってstunnelをインストールした場合は、Windowsスタートメニューにstunnel.exeを使ってGUIとして起動したり、サービスとして起動したりするためのさまざまな起動オプションがあります。
-
ステップ3のように、ローカルアドレスとポートを指定して各SUTの接続リストエントリを追加します。例えば、
SUT1, Host=localhost Port=5801SUT2, Host=localhost Port=5802
上記の設定は、stunnelのすべてのデフォルト設定を使用しています。セキュリティと独自の証明書の使用などのための数多くのオプションがあります。stunnelのドキュメントやウェブ上のさまざまな記事を参照してください。
SSHを使用したトンネリング
安全な接続トンネリングの代替手段としてSSHの使用があります。これは上記と同じ接続アーキテクチャを使用していますが、stunnelの代わりにSSHクライアントとサーバを使用しています。
SSHは、通常SSHクライアントとサーバを標準で含んでいるMAC、Linux、またはUnixを使用している場合に、より適したアプローチとなるかもしれません。
Windowsでは、puttyは一般的に使用されるオープンソースのSSHクライアントですが、Windows上のSSHサーバの可用性は限定的で、特に非商用オプションが限られているため、Windowsではstunnelが推奨されています。
SSHトンネリングについてインターネット検索を行うと、数多くの記事やガイドが返ってきます。