A model in Eggplant DAI can be connected to a suite in Eggplant Functional, and the interactions with your system under test (SUT) can be handled by SenseTalk code snippets. An execution environment comprises an agent, an Eggplant Functional software instance, and a system under test (SUT). It lets you manage the interaction between Eggplant DAI and Eggplant Functional. You can access the Eggplant DAI server from any connected machine on your network with a supported browser.
What Is the Agent?
The agent is part of an execution environment, which enables you to establish a connection between the Eggplant DAI web application and Eggplant Functional. The execution environment name you enter in the Execution Environment dialog box can be used in Eggplant DAI to choose where tests will be run. With the agent software running and the execution environment connection active, you can attach SenseTalk snippets to actions and states in any Eggplant DAI model that's associated with the agent. Running the model then executes the SenseTalk snippets against a SUT connected via the agent, and the results can be viewed in the console in Modeler.
The agent can run on the same machine as the Eggplant DAI server, or any local or hosted machine that can connect to the Eggplant DAI server via the network.
Downloading and Installing the Agent
The agent is available as a Windows .exe file, a Mac app, and Linux binaries for CentOS/Red Hat and Ubuntu/Debian. Go to File > Manage Execution Environments in Eggplant DAI to open the Manage Execution Environments window. Select the appropriate button for your platform to download the agent:
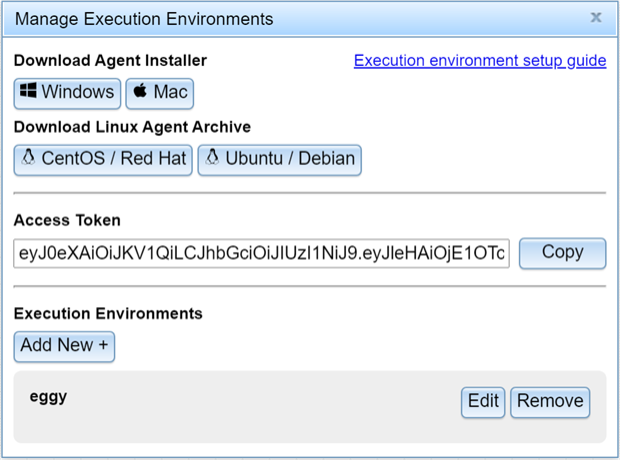
Download Agents and manage Execution Environments
When you create and save execution environments, they appear in the Manage Execution Environments window. You can edit or remove execution environments from this window as well. Note that you can view and edit any agents created in any groups you belong to from the Manage Execution Environments window.
Supported OS Versions
The following versions are supported for the DAI Agent:
- Windows: 64-bit Windows 7/10, Server 2012/2016/2019
- macOS: Mac OS 10.12/10.13/10.14/10.15 (Note: Big Sur is not supported yet)
- Linux:
- RedHat 7, CentOS 7
- Ubuntu 16 64-bit
New Feature: The Linux agents are available in Eggplant DAI 4.2 and later.
Windows
- In Modeler, go to File > Manage Execution Environments and select Windows Installer. The eggplantAIagent.exe file is saved to your Downloads folder.
- Open eggplantAIagent.exe, then follow the prompts to complete the installation. The installer saves a shortcut to Eggplant DAI Agent on the Start menu.
Mac
- In Modeler, go to File > Manage Execution Environments and select Mac Installer. The eggplantAIagent.dmg file saves to your Downloads folder.
- Double-click to open eggplantAIagent.dmg.
- Drag eggplantAIagent.app into your Applications folder.
Linux
Note: The steps for extracting and running the agent are the same across different Linux platforms, although the name of the archive file may differ.
- In Modeler, go to File > Manage Execution Environments and select CentOS / Red Hat or Ubuntu / Debian depending on your requirement. The eggplantAIagent-CentOS-RedHat.tar.gz file or eggplantAIagent-Ubuntu-Debian.tar.gz is saved to your Downloads folder.
- Extract the .tar.gz file to your preferred directory. Alternatively, use the following script to extract the file contents.
cd ~
mkdir eggplant
tar -xzf eggplantAIagent-CentOS-4.2.0.tar.gz -C "$HOME/eggplant"
Optionally, add export PATH="$PATH:$HOME/eggplant" to your .bashrc or .zshrc file so you can run eggplantAIagent directly from the command line, or else use the following commands:
Note: If you're on an older version of Eggplant DAI and you need to run the Agent on a Linux OS, see the Raw Python Agent section for more information.
Entering the Execution Environment Connection Details
You must configure the execution environment in Eggplant DAI before setting up the agent. You define execution environments on the New Execution Environment dialog box, which can be accessed from the File > Manage Execution Environments menu in Modeler.
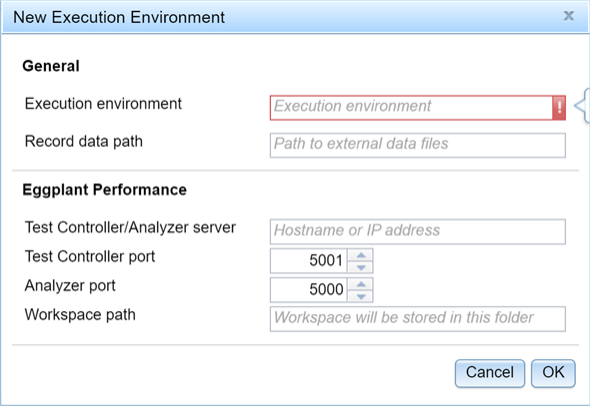
The Execution Environments dialog box is divided into the following two sections:
General
This section is where you enter the information that is required for Eggplant DAI, through the agent, to connect to Eggplant Functional for automation.
- Execution Environment: Enter a name to identify your execution environment when running tests in Eggplant DAI. This must be the same name you enter when setting up the agent, explained below.
- Record data path: (Optional) Enter the full path to access the .CSV files for using with code snippets in the suite, e.g., for a .CSV file located on your desktop, enter C:\Users\Eggy\Desktop\.
Eggplant Performance
You need to enter information in this section only if you use Eggplant DAI to do performance testing with this agent:
- Test Controller/Analyzer server: Enter the host address.
- Test Controller port: Specify the port number of the Test Controller server. By default, 5001 is entered when creating a new agent.
- Analyzer port: Specify the port number of the Analyzer REST API server. By default, 5000 is entered when creating a new agent.
- Workspace path: Specify a location to create a workspace in Eggplant Performance when a performance test is run.
Click OK on the New Execution Environment dialog box to save the execution environment configuration information.
Running the Agent Locally
You can launch the Eggplant DAI Agent from the Start menu on Windows or from the Applications folder on Mac. Alternatively, you can also run the agent from the command line without a UI.
Windows
Open eggplantAiagent from the Start menu. The Eggplant AI Agent login screen appears.
Mac
Launch the eggplantAiagent from the Applications folder. The Eggplant DAI Agent login screen appears.
Linux
The Eggplant DAI Agent can be launched from the terminal, whichever Linux platform you are using:
- Open a command prompt.
- Locate the directory where you extracted the .tar.gz file, e.g.:
- Run the Eggplant DAI Agent by entering the following command:
./eggplantAIagent
The Eggplant DAI Agent login screen opens.
Configuring and Starting the Agent
After launching the Eggplant DAI Agent, you must configure the connection details in order to start using it with Eggplant DAI.
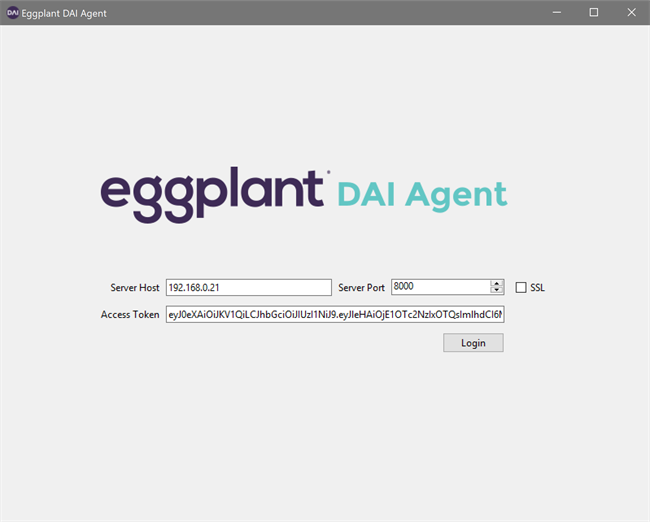
Follow these steps to configure the Eggplant DAI Agent:
- Enter the connection details of the Eggplant DAI server to which you want to connect.
- Server Host:The server address should be the same URL that you use to access the Eggplant DAI web app but without HTTP://, HTTPS://, or port number information.
- Server Port: The port number you use to access Eggplant DAI. The default port is 8000. However, most SSL enabled Eggplant DAI configurations (including the hosted Eggplant DAI server) use port 443 and need the SSL checkbox checked.
- SSL: Select this checkbox to enable SSL connections.
- Access Token: Copy the Access Token from the Manage Execution Environments window in Eggplant DAI and paste it here.
- Click Login. The Eggplant DAI Agent screen appears.
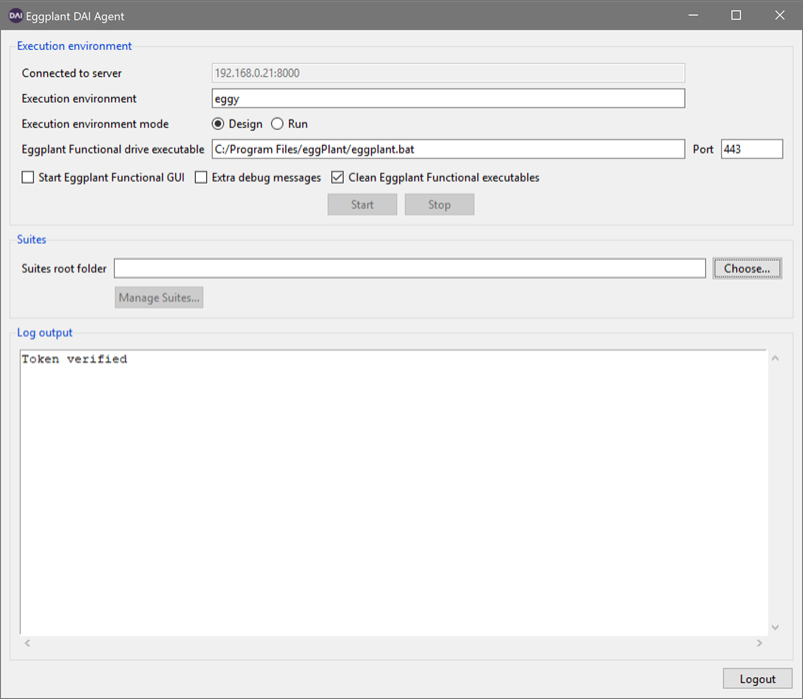
- Enter connection information and preferences:
- Connected to server: The address of the Eggplant DAI server you're connected to.
- Execution Environment (previously Connection name): A name for the execution environment. This name must be the same name you enter when you connect a suite in Eggplant DAI.
- Execution mode: Select your preferred mode of execution for the agent:
- Design: To use while authoring a model, i.e., to execute tests in the Modeler UI and Designer (Capture) view only. The execution environments in your group are also visible in the Modeler UI. In addition, you must use this option if you're authoring in a hosted cloud SUT environment, i.e., the Cloud... button in Eggplant Functional's Connection List is only available in the Design mode.
- Run: To use for executing scheduled and immediate test configuration runs from the Eggplant DAI Runner page.
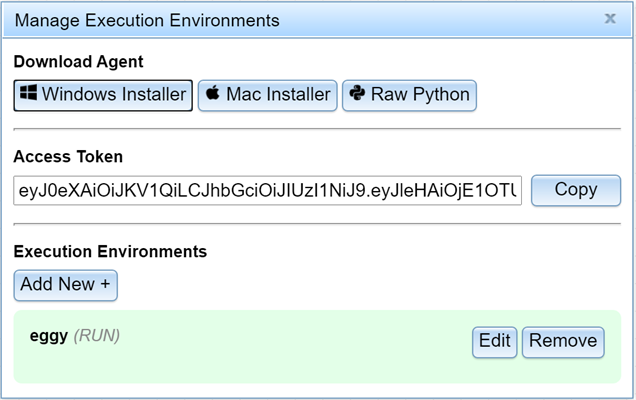
The active agent appears highlighted in green in the Manage Execution Environments window.
- Eggplant Functional drive executable: The location of the runscript.bat file on your system, and an open port for connecting. The default port is 5400.
- Start Eggplant Functional GUI: Clear this checkbox to run Eggplant Functional in drive mode.
- Extra debug messages: When selected, displays more in-depth log messages.
- Clean Eggplant Functional executables: When selected, clears binary executables if Eggplant Functional does not shut down properly.
- Click Start. Eggplant Functional opens, as does the command prompt.
- Click Choose to browse to and select the root folder that contains the Eggplant Functional suites and SenseTalk code snippets. See Manage Suites to learn how to upload and download subfolders in this directory.

Managing Suites
Use the Suites section of the agent to upload and manage suites associated with your models. As soon as you upload your local suites to the remote folder, the state of suite version is updated. Suites uploaded to Eggplant DAI can be downloaded into another execution environment on a different computer, either automatically when running a scheduled test configuration, or manually if you wish to edit snippets or images in a suite.
Prerequisite: Make sure you've set the root folder path to where all your Eggplant Functional suites are located as described in step 5 of the previous section.
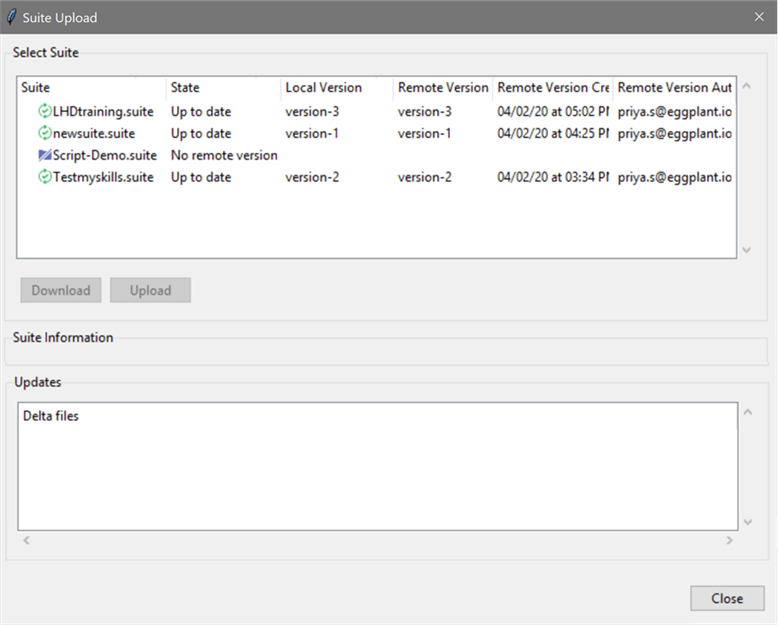
- Suite: All suites that are available in your instance of Eggplant DAI are presented in the same format they appear in your Eggplant Functional Suites root folder. The suite status can also be interpreted by checking the icons displayed on the left:
- Blue: Indicates the suite hasn't been uploaded.
- Green: Indicates that both remote and local versions are up-to-date.
- Amber: Indicates that the local and the remote versions don't match.
- State: Displays the status of both the remote and the local suite versions, and reports if one of them is missing. No local version status displays if a local version is missing, and No remote version status displays if a remote suite folder is missing.
- Local Version: The local version name of the suite folder.
- Remote Version: The remote version name of the suite folder.
- Remote Version Created At: The date and time at which the suite files were uploaded.
- Remote Version Author: The username of the current user account.
- Download button: Lets you download a local version of the selected suite. This button is enabled only if there are updated files available to download, i.e., if the remote suite folder is more up to date than the local version, or if a local suite folder is deleted but available on the remote.
- Overwrite checkbox: Select this checkbox to discard any local changes and update the local suite to have the same up to date content as the remote suite. Leaving the box unchecked preserves local changes. Note that only files that haven't been modified locally will be updated to match the remote suite. You may wish to do this and then upload a new version with your local changes.
- Upload button: Lets you upload a new suite to either remote or local directory. You'll be prompted to upload if you've made changes to your local files. This button is disabled if the selected suite is up to date in both local and remote locations.
- Upload version: Specify a version name of your choice while uploading suites for ease of identifying them.
Note: If a suite is uploaded without helper suites and modified later to refer to Helper suites, then you must follow this sequence when uploading Eggplant Functional suites that are dependent on helper suites:
- Delete the main suite that has a dependency on the helper suite.
- Add/Upload the helper suite.
- Upload the main suite back.
- Updates panel: Shows which files have been added, updated, or deleted.
Eggplant DAI Agent FAQs
- I get the following error when trying to upload my suite:
- Where can I find the Eggplant DAI Agent log files?

Make sure you have uploaded your helper suite first and then re-upload the main suite. Also, you must delete the main suite that has a dependency on the helper suite > upload the helper suite > re-upload the main suite. Uploading helper suites in this order will automatically create the dependency on the helper suite.
The Agent log files are located here:
Windows: %LOCALAPPDATA%\eggplant\agent\Logs
Mac: ~/Library/Logs/agent
Linux: ~/.cache/agent/log