Use the SUTs tab to manage system under test (SUT) connections in Eggplant DAI to automate testing on remote systems. You can also view, add, edit, and delete SUTs and connection types here. The SUTs list is updated dynamically as connections are added, deleted, or modified. You can have any number of SUTs connected at any given time. A SUT appears locked if it is being used by another user or by a test run in progress. Locked SUTs cannot be used for any other purpose until they are unlocked.

The following columns are displayed on the SUTs tab:
- Name: The display name of the SUT.
- Description: A description of the SUT.
- Criteria Tags: Any criteria tag defined for the selected SUT that you're viewing. A SUT can have one or more criteria tags.
- Connection Types: The connection types defined for a SUT. It could have one or more of the following connection types: VNC, RDP, Web driver. However, note that VNC and RDP connection types do not work together.
- Status: Indicates the availability of the SUT. The options are: Available, Disabled, Locked.
Click the Actions menu  to View Details, Edit, Delete, or Unlock a SUT and its associated connection types.
You can filter the SUTs view by clicking Filter All to filter by All, Available, Locked, and Disabled.
Note: You need to have Administrator permissions to be able to edit, delete, or unlock SUTs in Eggplant DAI.
Adding SUT Connections
Note: If you're using DAI Eggplant Cloud (previously called Hosted DAI), you don't need to register or add SUTs manually as Cloud SUTs will automatically be allocated during test execution.
Follow these steps to add a new SUT connection:
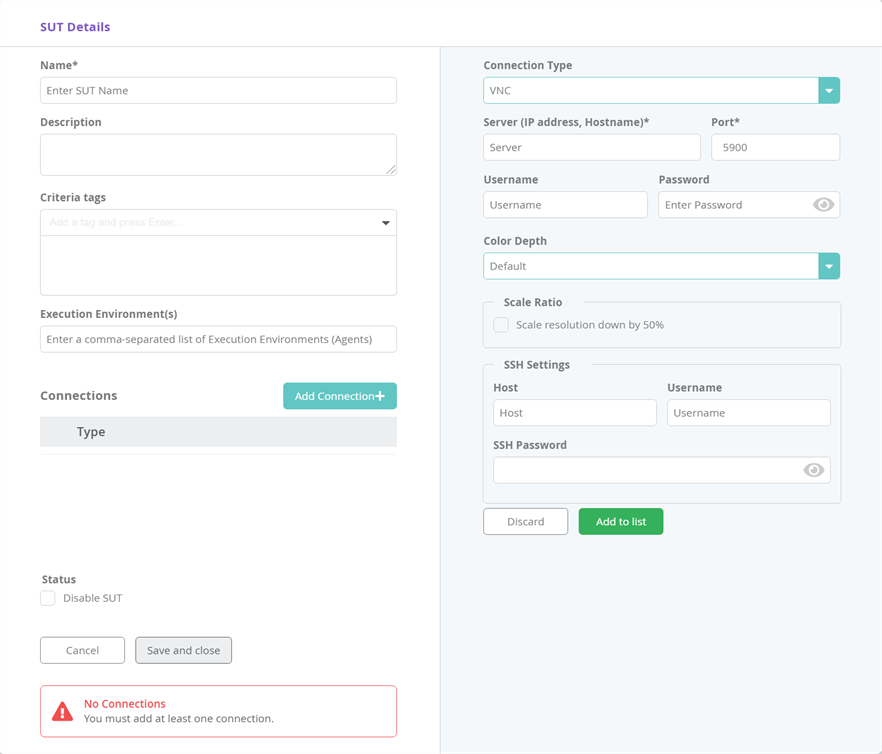
- Enter the display Name and Description for the SUT as you want them to appear in the SUT list in the SUTs tab.
- Add Criteria tags by entering a name for the tag and pressing Enter. You can add any number of criteria tags, which can be used for selecting a SUT to use in a test.
- Add the Execution Environment(s) to be used for this SUT by typing a name for it and pressing Enter. You can add multiple execution environments by entering names separated by a comma, e.g., Exec01, Exec02. If a SUT is only accessible from particular Execution Environments (Agents), then specify them here. When this field is left blank, any available execution environment will be used to connect to the SUT when a test is run.
- (Optional) Select the Disable SUT checkbox to disable this SUT if necessary. This will prevent the SUT from being used when running tests.
- Click Add Connection to define a Connection Type for your SUT. The SUT Details slider pane extends further for entering connection type information.
- Enter the following information under Connection Type, as necessary:
- Connection Type:
Select the required connection type. You can define one or more connection types. See the referenced sections below for adding each of the connection types in detail.
- RDP: Select for connections via RDP.
- VNC: Select for connections via VNC.
- Webdriver: Select for connections using Selenium WebDriver.
Note that VNC and RDP connection types should not be defined together.
- Server (IP Address, Hostname): Enter the SUT's IP Address or Hostname.
- Port: The port number used to connect to the SUT.
- Username: See below for requirements for VNC or RDP connections.
- Password: See below for requirements for VNC or RDP connections. You can click the
 toggle icon to reveal the password.
 - Optional settings: The following settings are available for VNC and RDP connection types only.
- Color Depth: The depth of color with which the RDP and VNC sessions open. To increase the speed of your connection, you can decrease the color depth by selecting a lower depth from the options available in the drop-down list:
- Default: Select this to draw the SUT with the same color depth you see on its native display.
- Millions (32-bit): Select this to increase the color depth of the SUT by millions of colors that are otherwise not visible to the human eye.
- Thousands (16-bit): Select this to decrease the color depth of the SUT to 65,536 colors.
- 256 (8-bit): Select this to decrease the color depth of the SUT to 256 colors.
- Width and Height: The width and height at which the RDP session window must open.
- Scale Ratio: Select the option to scale VNC servers by 50 percent in each dimension. This option provides better performance when you are using mobile devices with large screens or high resolution.
- SSH Settings (VNC only): Secure Shell (SSH) is a network protocol that uses data encryption to transfer information securely.
- Host: The host name or IP address of the computer that hosts an SSH tunnel for the SUT’s secure connections.
- Username: The account name with which the SUT user logs into an SSH host. You can click the toggle icon to reveal the password.
- Password: The password with which the SUT user logs into an SSH Host.
- Color Depth: The depth of color with which the RDP and VNC sessions open. To increase the speed of your connection, you can decrease the color depth by selecting a lower depth from the options available in the drop-down list:
- Discard: This button lets you discard changes and go back to the SUT Details tab.
- Add to list: This button saves the current Connection Type settings.
- Connection Type:
Select the required connection type. You can define one or more connection types. See the referenced sections below for adding each of the connection types in detail.
- Click Save and Close. The newly added SUT connections appear in the SUTs tab.

Step by Step: Entering VNC Connection Details
- Open the SUT Details slider pane to add or edit a Connection Type.
- Select VNC in the Connection Type drop-down list.
- Enter the IP address or Hostname of the SUT you want to connect to. The VNC connections default to port 5900, but you can change this if necessary.
- For VNC connections, the Username and Password fields refer to the VNC server on the SUT. If this information is required to connect to the VNC server, enter it here. On Windows, enter your SSH key in the Password field.
- Add the required SSH Settings for this connection, then click Add to list to save the details to the Connection Types list.
Step by Step: Entering RDP Connection Details
- Open the SUT Details slider pane to add or edit the Connection Type.
- Select RDP in the Connection Type drop-down list.
- Enter the IP address or Hostname of the SUT you want to connect to. The RDP connections default to port 3389, but you can change this if necessary.
- For RDP connections, the Password and Username fields refer to the Windows user account you are connecting to. This information is always required for RDP connections.
- Specify the Width and Height at which the RDP session window must open.
- Click Add to list to save the connection details to the Connection Types list.
Note: For RDP connection to work, your SUT must be configured to accept the connection.
Step by Step: Entering WebDriver Connection Details
- Open the SUT Details slider pane on the right to add or edit the Connection Type.
- Select Webdriver from the Connection Type drop-down list.
- Enter the IP address or Hostname of the SUT you want to connect to. WebDriver connections default to port 4444, but you can change this if necessary.
- Select a Browser from the following options:
- Chrome
- Firefox
- Safari
- Microsoft Edge
- Internet Explorer
- None
- Add any desired WebDriver Capabilities as key value pairs, using JSON format.
- Click Add to list to save the connection details to the Connection Types list.
Note: If your test uses a browser that is not listed in the Browser drop-down list above, then select None and enter browserName: <your browser> as one of the key value pairs in the Capabilities field.
Note: Any WebDriver devices configured to use this SUT will automatically connect when running tests. You can use WebDriver() functions in your SenseTalk snippets to get access to this connection and perform actions against it.
Editing SUT Connections
To edit an existing connection, select a SUT from the list, then from the Actions menu, select Edit. Both the New Connection and Edit Connection panes include the same fields for entering the SUT information.
Viewing SUT Connections
To view an existing SUT connection, select a SUT from the list, then from the Actions menu, select View. The SUT Connection sliding pane opens displaying the Status details, i.e., available or locked. If the SUT is locked, you can Unlock from the Actions menu.
![]() Eggplantsoftware.com | Documentation Home | User Forums | Support | Copyright © 2022 Eggplant
Eggplantsoftware.com | Documentation Home | User Forums | Support | Copyright © 2022 Eggplant