The Eggplant AI web app includes several functions that are available only to users with the Admin role. Administrators on the system are able to approve new users, create groups and manage group membership for users, configure custom coverage type models, and manage licenses for Eggplant AI.
Eggplant AI has two user roles: Admin and User. The Admin role grants access to administrator features in the UI as well as the ability to create models, run tests, and view results. Users with the User role have the full capability to build models, run tests, and view results, but the administrator functions won't appear on the menus for these users.
Admin users can perform these management tasks, each described below:
- Managing Sessions
- Managing Users
- Managing Models
- Managing Licenses
- Configuring Coverage models
- Setting Up Email
Managing Sessions
You can perform all your session related activities in the Account menu. For example, you can change your password, log out of an active session, or delete all sessions, if necessary.
Logout
Click the Account > Logout option to log out of the active session in Eggplant AI.
Changing Password
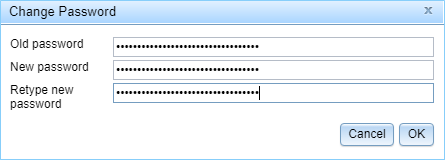
- To change your current password, click Account > Change Password. The Change Password dialog box appears.
- Enter your old password, then enter the new password twice and click OK.
Delete All Sessions
Use Delete All Sessions to remove all the existing sessions from the database and log out of Eggplant AI. This is particularly useful if you need to free up the licensing slots in Eggplant AI that are being consumed by inactive users. However, this does not log out other active users from Eggplant AI; instead a new session is automatically created each time a users interacts with Eggplant AI.
Managing Groups
In Eggplant AI, you can use groups to share models among multiple users. Admin users can create groups and add users to groups.
To create a group:- Go to Account > Manage Groups to open the Manage groups dialog box.
- Click New. A new group called New Group (1) is added to the list.
- Double-click the name to select it so that you can customize the group name.

To add a user to a group:
- Go to Account > Manage Users to open the Manage users dialog box.

- In Groups, add the group name for any new group you want to add for the user. Multiple groups can be added as a comma-separated list.
To rename an existing username, in the Manage Users dialog, simply click User Name and edit it.
To access shared models through the Open Model dialog box, click the Open Model button on the toolbar or click File > Open Model.
Managing Users
When you log in to Eggplant AI for the first time after installation, you will be prompted to create an account on the system. This account will be set with the Admin role, which lets you approve new users on the system and set their user role, including creating additional Admin roles.
For more information about completing your initial login, see Initial Login and Licensing.
New User Access
New users to Eggplant AI must request access to the system by following these steps:
- Users can register for an account by accessing the server in a browser from a locally connected machine as follows:
- To display the login from the computer on which the Eggplant AI server is running, enter http://localhost.
- To display the login from a remote computer, enter http://<serverIPaddress> where <serverIPaddress> is the Eggplant AI server's IP address or fully qualified domain name.
The administrator needs to let users know the appropriate URL to use to access Eggplant AI in their environment.
When you access the Eggplant AI server, the Log In dialog box displays:

- Click Register to request access as a new user. If you have an account, you can log in.
- In the Register For An Account dialog box, enter an email address and password, then click OK.
If email settings have been configured for Eggplant AI, the Admin user receives an email message when a new user has registered.
The new user must wait for an Admin to approve the account request. After the request is approved, the user can return to the login screen and access Eggplant AI.
Approving New User Requests
Each new user request must be approved by an existing user with the Admin role by following these steps:
- Log in to Eggplant AI with an Admin user account.
- Open the Manage Users dialog box by going to Account > Manage Users.
- Select the user that you want to approve from the list on the left. Notice the Role field on the right is set to None, indicating the user is not enabled in the system yet.
- In the Role drop-down list, select either Admin or User.
- Click Save. When you've set the user access level for any waiting users, you can close the Manage users dialog box.
After the email settings have been configured in Eggplant AI, the users receive an email message confirming about their roles.
At this point, new users are able to log in to Eggplant AI with the email address and password they entered to request access. However, note that the administrator needs to inform users of their access level and when access is available.
Managing Models
The Manage Models dialog box lets you manage the existing models in the Eggplant AI application. For example, you can view which models are part of which user groups, open an existing model, and delete a model, if required.
- Go to Account > Manage Models to open the Manage Models dialog box.
- To open a model in the Editor view, select the checkbox against the desired model, then right-click and select Open model.
- To delete a model, select it and right-click to select Delete selected (cannot be undone).
- To bulk delete models, select the required models and right-click to select Delete selected.
- To change the group of your model, in Groups, click the existing group and then select your preferred group.

Managing Licenses
You can view your current licenses as well as enter new license keys within Eggplant AI. To view the licenses currently installed for Eggplant AI, go to Account > View Licenses from the main menu to open the View your licenses dialog box:

Note: Running a submodel within a model doesn’t count towards concurrent license executions.
This view lets you see what licenses are installed, when each license expires, and additional information.
If you need to add a new license, go to Account > Add License on the main menu. On the Add a license to your account dialog box, paste your license key into the Enter a license key field, then click OK.

Typically, you will get your license key from Greenhouse, Eggplant's web portal where you can review and create available licenses as well as download generated licenses for your account.
You should receive your Greenhouse login information from your account manager. If you've lost or forgotten your password for the Greenhouse site, you can use the link on the login page to have a password resent to you. If you don't have a password, you'll need to contact your account manager or sales@testplant.com.
Setting Up Email
Eggplant AI can send automated email messages to administrators and users for registrations steps, provided you set up an email account for sending mail. To set your mail credentials for Eggplant AI, go to Account > Mail Settings to open the SMTP Settings dialog box:

Fill in the information for the email account you want to use. You might need to consult your email or IT administrator to ensure you include the correct information for SMTP mail setup.
When your email settings are configured through Eggplant AI, the following automated email messages are generated by the system:
- Admin receives a message when a new user requests access to the system.
- Users receive a message when their user role is set or changed (which includes the initial approval of new users).
Configuring Coverage Models
You configure Coverage Models that are available on the Eggplant AI from the Account menu. You can use Coverage Models to see when specific coverage targets are met. When adding a new coverage model type, it's helpful to provide a meaningful name.
The following default coverage models are available in Eggplant AI:
- All nodes
- All paths
- Extended
- Full Exploratory
The configuration setting applies to all groups and models across the selected instance of Eggplant AI Server.
To add Coverage Models:- Click Account > Manage Coverage Models. The Manage Coverage dialog box appears.
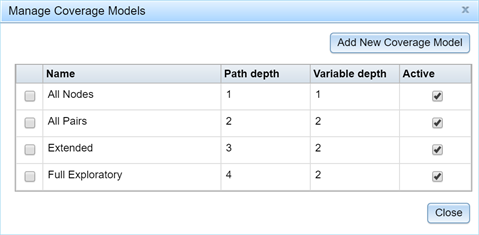
- Click Add New Coverage Models. A new model is added to the list. Provide a meaningful name for the newly added model by clicking in the name field.
- To modify the Path depth and Variable depth values, simply edit each of the columns. The path depth can be edited using values 1-5 and variable depth from values 1-2. Path depth refers to the number of consecutive actions used in the calculations. For example, if a path depth of 3 is selected then unique combinations of 3 consecutive actions will be considered. A variable depth on the other hand represents the number of variables involved in cross combinations when creating a coverage report. Currently, it is recommended to limit variable depth to values 1-2 to prevent excessive memory usage. For more information on Cross type values, see Using the Eggplant AI Coverage Report.
- Select Active to make the newly added model available in the Coverage Report tab > Coverage Type drop-down list.
- To delete a Coverage Model type, select a model and then click Delete Selected. The model is deleted from the list.
After you add a Coverage Model type, it is available in all the places that Coverage models are used, such as the Coverage Report tab and Coverage Insights report.
![]() Eggplantsoftware.com | Documentation Home | User Forums | Support | Copyright © 2022 Eggplant
Eggplantsoftware.com | Documentation Home | User Forums | Support | Copyright © 2022 Eggplant