Indirect Android Connections
You use the Viewer window and Connection List in Eggplant Functional to view and manage your connections, letting you create tests against Android devices in the same manner that you would with any other SUT.
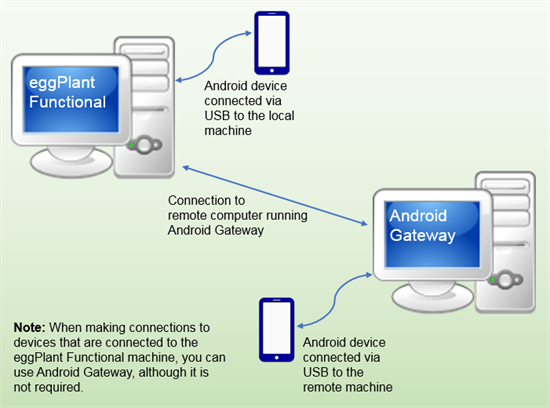
以下は、Android Gatewayを使用して構成可能な環境アーキテクチャの高度な概要図です。

Android Gatewayのシステム要件
Android Gateway is a free application. You can download it from the Testplant downloads page.
Supported operating systems
Windows:Windows 7以降、Windows Server 2008以降
Mac:Mac OS X 10.9.5以降
Android Gateway can be used to connect to Android devices running Android OS 4.1.1 and later.
手順説明:Android Gatewayをインストールする
To install Android Gateway, follow the steps below:
- Download the Android Gateway application for the appropriate platform from the Mobile Gateways Downloads page on the Eggplant website.
- To install Android Gateway, double-click the install package.
- On Mac, drag the Android Gateway application into the Applications folder.
- Windowsの場合、Setup(設定)ウィザードのオンスクリーン指示に従いインストールを完了してください。
- Launch Android Gateway.
この時点で、Androidデバイスに接続を行う準備ができていなければなりません。接続手順については、Android Gatewayを使用するをご覧ください。
Android Gateway UI

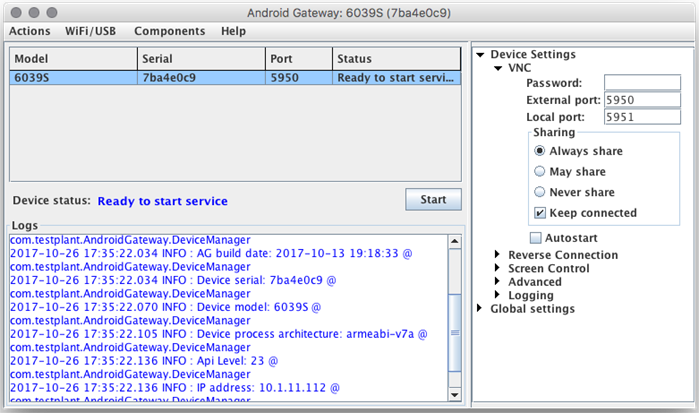
The Android Gateway UI consists of five sections, each with different functions:
- Device Table: This section shows a list of any detected Android devices. The table displays the model, serial number, connection port, and connection status of each device.
- Device status: This area shows the connection status for the device currently selected in the table.
- Start: This button lets you start the connection service for the selected device. See Using Android Gateway for detailed information about connecting to devices.
- Logs: This area displays the event log. イベントログメッセージは色分けされています。赤で表示されるメッセージは、エラーです。接続確立の問題がある場合、通常これらのエラーメッセージは問題のトラブルシューティングの役に立ちます。オレンジのメッセージは、実際の問題となる可能性のある警告を示します。情報目的のメッセージは青または緑で表示されます。
- Device Settings: The sidebar section is where you set configuration and connection preferences as well as where you can enable special connection scenarios. See Android Gateway Settings for information about settings options.
In addition to the three sections, you'll find useful options on the main menu under Actions and Help.
The Actions menu lets you perform the follow tasks:
- Reboot Device: Reboots the attached Android device.
- Clear Logs: Clears the Logs area on the UT screen. Note that the saved log file is not changed or deleted.
- Save Shared Settings: Saves any settings that are shared between devices.
- Save Device Settings: Saves settings for the selected device.
- Reset Settings: Returns all settings to their defaults for the selected device. Settings for other devices remain unchanged.
The WiFi/USB menu has the following options:
- Switch to Wi-Fi mode: Switches the device into wireless debugging mode.
- Connect via Wi-Fi: Allows you to enter the IP address of an Android device, and then connect to it over Wi-Fi.
- Switch to USB mode: Switches the device into USB debugging mode.
- Connection List: Shows a list of connected devices. You can add or remove devices here.
The Components menu has the following options:
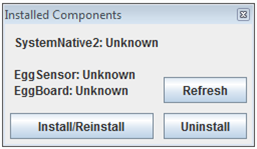
- Installed Components: Choosing this option opens a window where you can install or uninstall the VNC server components on the selected Android device and verify version information for the currently installed VNC server. If you've attached a device but haven't started the service, the SystemNative2 and EggSensor versions show as Unknown. Click Refresh to have Android Gateway query the device and update the displayed information.If the required components aren't installed, Android Gateway installs them automatically when you start the connection service. However, you can use the Install/Reinstall button to install the VNC server components manually. Click Uninstall to remove the VNC server from the device.

The Installed Components window in Android Gateway
The Help menu has the following options:
- Online Help: Opens the online documentation for Android Gateway in your browser.
- Custom Parameters: Opens a new window that lists the parameters you can enter in the text box at Device Settings > Advanced > Custom Parameters.
- Credits: Displays Android Gateway version information and copyright, along with development credits.