Before installing any app on an iOS device for testing, the app has to be code signed for development use (also called developer signed).
The signing process outlined below can be used whether you're signing your own app to install on the device or you're testing with the iOS Gateway Springboard.
Signing Requirements
In order to sign an application, you need the components listed below:
- An .ipa file: This file is the iOS application archive of the app to be signed.
- Development certificate: This is a code signing certificate for development use that is issued through the Apple Developer portal website or Xcode. For instructions on creating a signing certificate, see Getting Your Development Signing Certificate.
- App ID: This identifier is associated with the app you want to sign and is required for creating the development provisioning profile that is created in the Apple Developer portal website. For instructions on creating an App ID, see Creating an iOS App ID.
- Development provisioning profile: This profile allows the signed app to run with Xcode for development use that is created through the Apple Developer portal website or Xcode. For instructions on creating a provisioning profile, see Getting a Development Provisioning Profile.
In addition, to install the app after you have signed it, you need a developer-enabled iOS device that is listed in your Apple developer portal.
After you have all of the required components, go to Apps > Sign Helper App in iOS Gateway to sign the app.
Signing Apps with the Signing Utility in iOS Gateway
To install an app on the developer-enabled iOS device running iOS 9 or iOS 10 for use with iOS Gateway, you need to code sign the app. If you need to sign your own app for installation on the device, you will need the .ipa file for your app.
To sign an app for use with iOS Gateway, follow the instructions below:
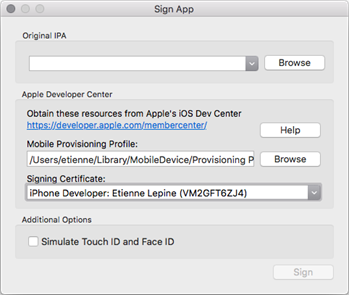
- In iOS Gateway, go to Apps > Sign App to open the Sign App panel:

- Specify the path to the .ipa file of the application to be signed in the Original IPA field. You can drag-and-drop your application file into the field, or use the file browser to locate your file.Note: To sign eggOnLauncher.ipa or eggOnAgent.ipa, select them from the drop-down list.
- Specify the path to your development provisioning profile in the Mobile Provisioning Profile field. You can drag-and-drop the application file into the field, or use the file browser to locate the file.
- Use the drop-down list to select the appropriate Signing Certificate to be used for signing this app.
- Click Sign. A copy of the .ipa file specified will be saved with -resigned added to the name, in the same location as the original .ipa file.