Assigning Data Sources to Eggplant Performance Tests
- Test level: Data sources bound at this level are accessible to all virtual user groups for that test. Note, however, that when you create a data binding, you can choose to include only select VU groups.
- VU group level: Data sources bound at this level are accessible only to a single virtual user group.
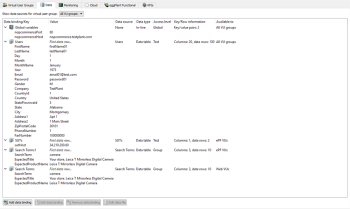
As a reminder, you create data sources through the Data Sources node in the Project tree. Data binding is done on the Data tab of a test's detail view. To see this information, select a test in the Tests node of the Project tree, then select the Data tab in the Viewer pane.
Data Sources
The following data source types can be assigned at the test level:
- Global variable (formerly, in-line data dictionary)
- Data dictionary file
- Data table file
The data table file is the only type of data source you can assign at the VU group level.
For more information about data sources, see Using Data Sources in Eggplant Performance. For more information about troubleshooting scripts that use data sources, see Troubleshooting Scripts by Logging Data Values.
Step by Step: Creating a Data Binding
To create a data binding, follow these steps.
- On the Data tab, click Add data binding to launch the Create a data binding wizard.
- On the Choose a data source page, select the data source for which you want to create a binding. The table shows all the data dictionaries and data tables you currently have defined for the project. When you select a data source, its name is entered in the Data binding name field, but you can customize the name for the data binding if you choose. Then click Next.
The wizard pages that follow are different depending on the type of data source you choose. Follow the appropriate steps below.
If your data source is a data dictionary, continue with these steps:
- On the Select virtual user groups page, choose either
- Make data available to all groups: This option lets you use the data across all VU groups.
- Make data available to selected groups: With this option, you select specific VU groups from the list below, and only those groups have access to the data.
- Click Finish to complete the data binding.
If your data source is a data table, continue with these steps:
- On the Select virtual user groups page, choose either
- Create a binding to a single virtual user group: With this option, you have more control over how data is allocated and selected by each VU.
- Create a binding to multiple virtual user groups: This setting assigns a single row from the data table to each VU in the selected groups. Note that you have the option to use all groups or to include only specific groups, which you select from the available list. If you make this choice, skip to step 5.
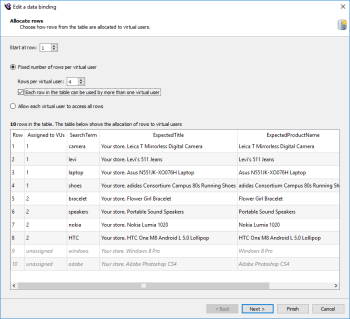
- (Only for single VU group binding) On the Allocate rows page, set options for how VUs access the rows of data in the table:
- Start at row: This value defines which row within the data table file the VU group uses as the first data row. By default, this value is set to 1. (Row 0 contains the column headers.)
- Fixed number of rows per virtual user: With this option, the rows of data are preassigned to each VU in the group. When you select this option, you can also adjust these additional settings:
- Rows per virtual user: Use this setting to determine how many rows of data each VU can access.
- Each row in the table can be used by more than one virtual user: If you clear this checkbox, the rows of data cannot be repeated for different VUs.
- Allow each virtual user to access all rows: With this setting, all VUs can access all rows of data in the table.
As you make adjustments to these settings, the Assigned to VUs column in the table updates to reflect how table rows are allocated.
When you're satisfied with your row allocation settings, click Next.
- (Only for single VU group binding) On the Row selection page, choose how each VU selects from the rows that have been allocated to it.
- Rows are accessed in order: With this option, the rows allocated to each VU are used in order. The Reuse rows if number of iterations is greater than number of rows checkbox is selected by default. You can clear this checkbox if you don't want data to be reused.
- Rows are accessed at random: Use this option to let VUs select a row of data randomly on each iteration from among those that have been allocated.
For more precise control over row selection, click Advanced options to open the Advanced data binding options dialog box.
- (Optional; only for single VU group binding) Use the Advanced data binding options dialog box to control random row selection, the random seed, and row advancement:
- In the Random row selection section, you can choose between:
- Pick and replace rows: With this selection, on each iteration of the script, the VU picks a row at random from all the available rows.
- Pick and remove rows: With this selection, VUs also pick rows randomly on each iteration; however, no row can be reused until all rows have been picked.
- Select the Always use the same seed checkbox if you want the random sequence to be the same each time, beginning with the same seed. If you use this option, you can set a specific seed value in the Seed field, or click Set random seed to insert a random seed.
- For Row advancement, you can choose between:
- Automatically advance to the next row at the end of each iteration: This behavior is the default.
- Advance to the next row only when requested to by a script: With this option, you need to inlcude custom code in your script to cause row advancement.
Click OK when you're satisfied with your advanced settings options.
- In the Random row selection section, you can choose between:
- (Only for multiple VU group bindings) On the Data table options page, the Each row in the table can be used by more than one virtual user checkbox is selected by default. Clear this checkbox if you don't want the data rows to be used by multiple VUs.
- Click Finish to create the data binding. Note that you can click Back to return to previous screens to make adjustments before completing the binding if necessary.
Modifying Data Bindings
After you create a data binding, it appears in the data bindings table on the Data tab. To edit an existing data binding, select it in the table, then click Edit data binding. The Edit a data binding wizard generally provides the same options as the Create a data binding wizard. However, you cannot change the original data source, nor can you change the VU group of a single VU group binding.
To remove a data source binding, right-click the data source binding in the table, then select Remove data binding, or select the data source binding and click the Remove data binding button.
You can edit a data table file or data dictionary file from the Data tab as well. Select the data file you want to edit, then click Edit data file. The data file opens in the associated text editor.
Using Global Variables in Eggplant Performance Tests
Global variables are displayed on the data bindings table along with the other data files. You can use global variables in Eggplant Performance tests to override values in data dictionaries or data tables. Global variables are displayed as key/value pairs when you select the Data tab for a specific test in the Project tree.
Note: Global variables were previously referred to as in-line data dictionaries.
Step by Step: Add a Key/Value Pair to Global Variables
To add a key/value pair:
- Right-click Global variables in the data bindings table on the Data tab, then select Add new key/value pair.
- Enter a Key name and Value on the Add new key/value pair dialog box.
- Click OK.
The new key/value pair is added to the list under Global variables. The added key/value pair can now be accessed by all VUs within the test.
Note: A key name can begin only with an alphabetic character or an underscore (_), and can then be followed by any mix of alphanumeric characters and underscores. All other characters are disallowed. The value can contain any mix of characters. The length of the name is unbounded, but a suitably sized length of name should be used. The length of the value is similarly unbounded, but a limit of < 64k should be observed.
Modifying a Global Variable Key/Value Pair
To edit an existing key/value pair, right-click it in the data bindings table, then select Edit key/value pair. Make any desired changes on the Edit key/value pair dialog box, then click OK.
To delete a key/value pair, right-click it in the data bindings table, then select Remove key/value pair. You will be asked to confirm your choice.

