Before testers can access a system under test (SUT)
Using SUT Discovery to Add SUTs
Use the SUT Discovery feature on the SUTs administration page to find test environments and automatically add basic information about the environment. This method is a good choice for adding multiple SUTs as well as for adding mobile device SUTs because much of the information on the New SUT dialog box is filled in for you.
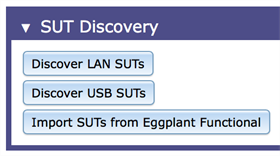
The SUT Discovery section of the SUT administration page in Eggplant Automation Cloud.
Choose Discover LAN SUTs, which locates any environment reachable via your LAN, or Discover USB SUTs, which locates mobile devices (Android or iOS) that are currently connected via USB, or Import SUTs from Eggplant Functional. Follow the appropriate instructions shown below to add SUTs with the automatic discovery feature.
Step by Step: Adding LAN SUTs with SUT Discovery
The following steps guide you through adding SUTs from your LAN by using the SUT Discovery feature:
- In Eggplant Automation Cloud, go to the SUTs page by choosing Admin > SUTs, then locate the SUT Discovery section.
- Click Discover LAN SUTs. Eggplant Automation Cloud searches for all environments reachable via the LAN. You'll see a progress bar during the search. When the search is complete, the Find LAN SUTs dialog box shows the list of SUTs available to add.
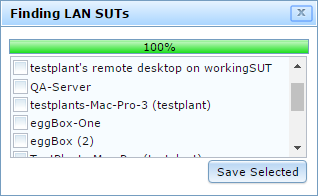
- Select the checkbox for the SUTs you want to add, then click Save Selected. The new SUTs are added to the SUTs list at the top of the page. The IP address is added automatically, and the connection type defaults to VNC. To add additional information or change any of the defaults from discovery, see the next step.
- Add or update information about the device in the Edit SUT dialog box, if necessary.
The SUT is now ready to be used for running tests.
Step by Step: Adding Mobile Device SUTs with SUT Discovery
The following steps guide you through adding a SUT for a mobile device using the SUT Discovery feature:
- Connect the mobile device via USB to the computer where your Eggplant Manager server is running.
- In Eggplant Automation Cloud, go to the SUTs page by choosing Admin > SUTs, then locate the SUT Discovery section.
- Click Discover USB SUTs. Eggplant Automation Cloud searches for any devices connected via USB. When it finds one, it creates a SUT for it and Eggplant Automation Cloud displays a message similar to this one: Found 1 new USB SUTs! Your new SUT is added to the SUTs list at the top of the page. Note: If more than one device is detected, a new SUT is added for each one.
- Add or update information about the device in the Edit SUT dialog box, if necessary.
The mobile device SUT is now ready to be used for running tests.
Step by Step: Importing SUTs from Eggplant Functional
The following steps guide you through adding importing SUTs from Eggplant Functional. You can import SUTs that you've defined or added in the Connection List in Eggplant Functional:
- Click Import SUTs from Eggplant Functional. The Import SUTs window opens.
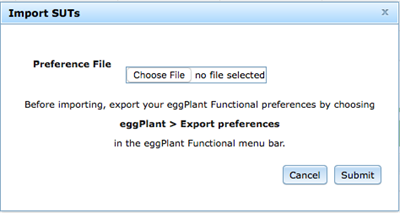
- Click Choose File to select your Eggplant Functional preferences file. Follow the instructions to export the preferences file if you haven't done so previously.
- Select the SUT you want to import, then click Submit. Your new SUT is added to the SUTs list at the top of the page.
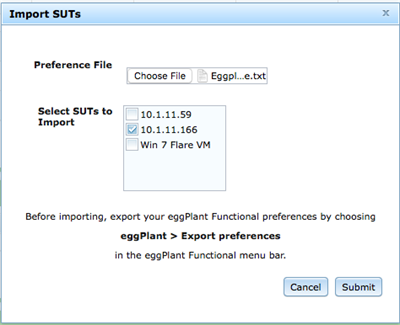
- Add or update information about the SUT in the Edit SUT dialog box, if necessary.
The imported SUT is now ready to be used for running tests.
Manually Adding SUTs
When you have individual SUTs to add, use the New SUT dialog box on the SUTs administration page. This method requires you to input all the details for the connection, and lets you customize all the information as you enter it. You must use the New SUT dialog box to create a rule-based SUT, as well as certain configurations for mobile device SUTs and VMs.
Step by Step: Adding SUTs with the New SUT Dialog Box
The following instructions guide you through adding a SUT.
- In Eggplant Automation Cloud, go to Admin > SUTs.
- In the SUTs section, click New SUT to open the New SUT dialog box.
- Select the type of SUT you're adding from the Type drop-down list. The next section changes depending on the SUT type you choose. Your choices are:
- IP Address: Enter the IP address or hostname of the SUT.
- Port: Specify the port for your connection. By default, 5900 is entered for VNC connections, and 3389 is entered for RDP connections.
- Username: (RDP only) Enter the Windows username needed for connections to this SUT, if one is required. (Optional)
- Password: Enter the password for this SUT, if one is required. (Optional)
- Screen Size: (RDP only) Enter the Width and Height for the RDP connection window. (Optional)
- Gateway: Choose iOS Gateway to connect to iOS mobile devices or Android Gateway to connect to Android mobile devices. Note: The appropriate application must be installed on the machine where Eggplant Automation Cloud is running for it to appear in the list.
- SUT Identifier: Enter the Unique Device ID (UDID) for iOS devices or the serial number for Android devices. You should be able to find this information through iOS Gatewayy, Android Gateway, or through the device's settings.
- VM Template: Choose a VM from the drop-down list. This list shows all available appliances (VMs) that are currently in VirtualBox.
- Connection: Select the connection method, either Auto RDP, VNC, or RDP, from the drop-down list. Note, however, that you won't have the Auto RDP option unless you have installed the VirtualBox Extension Pack. With Auto RDP, VirtualBox makes the connection to the SUT, so no further information is required. The following fields are enabled only if you select VNC or RDP.
- IP Address: Enter the IP address or hostname to connect to this VM.
- Port: Enter the port over which you connect to this VM. By default, 5900 is entered for a VNC connection, and 3389 is entered for an RDP connection.
- Password: Enter the password for this SUT, if one is required.
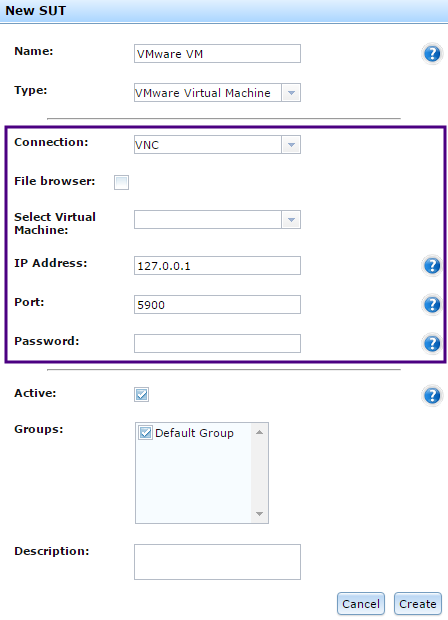
- Connection: Select the connection method, either VNC, or RDP, from the drop-down list. Note that VMware virtual machines feature a built-in VNC server.
- File Browser: Selecting this box adds the Virtual Machine Directory Path field to the New SUT window. Click the folder to navigate to the location of your VMware virtual machine. Note that you can also enter this path in Admin > System Preferences.
- IP Address: Enter the IP address or hostname to connect to this VM.
- Port: Enter the port over which you connect to this VM.
- Password: Enter the password for this SUT, if one is required.
- Select the Active checkbox if you want this SUT to be available to run tests. If the checkbox is not selected, the SUT definition remains but the SUT is unavailable for tests. Default: selected.
- Set group membership in the Groups box. When you add new SUTs, the Default Group is automatically selected. Be sure to remove SUTs from this group and add them to your own groups if you intend to use groups to control user access to specific SUTs. For information about using groups to manage access, see Working with Eggplant Automation Cloud Groups.
- Enter descriptive text in the Description field, if desired. This field is optional. However, you can use it to provide additional information about the SUT.
- On the right side of the New SUT dialog box, fill in the additional information about the SUT. These fields include:
- Manufacturer
- Model
- OS
- Version
Note: Although these fields are optional, you should fill them all in if you plan to use Test Advisor to determine coverage.Note: If your SUT is a mobile device connected using VNC, click Poll Data to have Eggplant Manager automatically populate these fields.
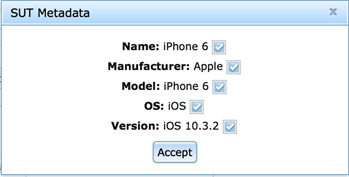
If you have custom SUT Tags in your environment, they also appear here. Although these fields are optional, any information you enter can be used for filtering the SUTs list, so it's a good idea to include as much information as you can.
- When you finish filling in the information for your new SUT, click Create. Your new SUT appears in the SUTs list.
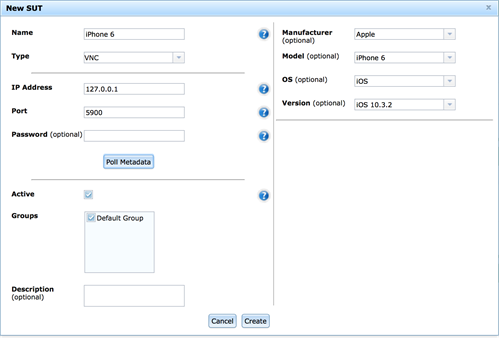
The New SUT dialog box in Eggplant Automation Cloud.
These two SUT types are closely related. Typically, you use these SUT types for environments, which can be physical machines or virtual machines (VMs), that you connect to via a specific IP address or hostname and on a specific port.
Complete the following fields to add either a VNC SUT or an RDP SUT:
Use the Mobile SUT option to add Android and iOS device SUTs. For Eggplant Automation Cloud to connect to these devices, you also need to install the appropriate support application (Android Gateway or iOS Gateway). With a properly configured mobile device SUT, Eggplant Automation Cloud launches the support application, makes the connection to the device, and then runs the test.
Complete the following fields to add a mobile device SUT:
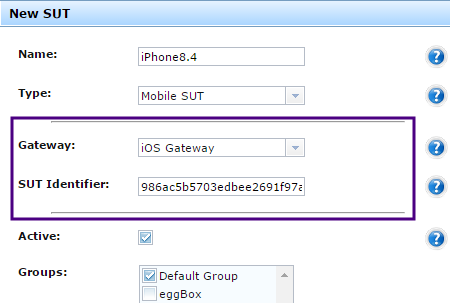
Adding a new Mobile SUT for an iOS device in Eggplant Automation Cloud.
This SUT type requires that you use Oracle VM VirtualBox for the VMs you wish to manage with this method.
The VMs can run Windows, Mac OS, or Linux operating systems, and you can set the connection type as either VNC or RDP. If you install the VirtualBox Extension Pack, you also have the Auto RDP connection option, which lets VirtualBox make the connection to the virtual environment.
Complete the following fields to add a VirtualBox Virtual Machine SUT:
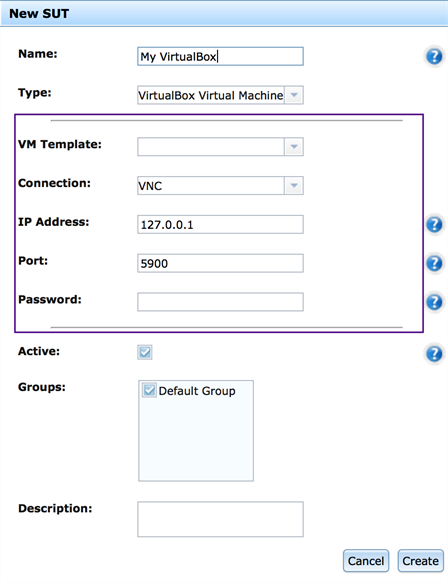
The Virtual Machine section of the New SUT dialog box in Eggplant Automation Cloud.
When you add a VirtualBox Virtual Machine SUT, a clone of the appliance is created in VirtualBox after you click Create (step 9 below). The new SUT is added to the SUTs list but will be marked Inactive until the cloning is complete, when it switches to Active.
Note that you can create multiple SUTs from the same VM Template (appliance). However, each SUT you add creates a clone of the original appliance, so you will want to watch the amount of disk space you are using.
This SUT type requires that you use VMware Fusion or Fusion Pro (Mac) or Workstation Pro (Windows or Linux) for the VMs you wish to manage with this method. These VMs can run Windows or Mac operating systems, and you can set the connection type as either VNC or RDP.
Complete the following fields to add a VMware virtual machine SUT:
Note: Your list might also include Mobile Emulator. This SUT type for Android and iOS mobile emulators is available only if you have enabled experimental features on the System Preferences page. Each emulator platform has additional requirements as well.
After a SUT is added, it shows up in the list on the SUTs page.
Editing and Removing Devices
With an administrative account, you can remove SUTs or edit SUT information at any time.
To alter a SUT's information, double-click the SUT in the list or select the SUT in the list and click the Edit SUT button to open the Edit SUT form. This form displays the current information for the SUT. Make any modifications necessary, then click Update to save your changes.
Click Remove on the Edit SUT form if you want to permanently delete the SUT from Eggplant Automation Cloud. If you want to temporarily remove the SUT from availability without deleting it, you can clear the Active checkbox to disable the SUT, as described above. While disabled, a SUT appears on the SUTs page with a status of Inactive, but it won't be available to any users for reservations on the Reservations page.
Filtering
At the top of the SUTs list, you'll see the Filter area:

You can apply filters to the list of SUTs to view only SUTs with specific characteristics. Select which filter to apply from the drop-down list in the Filter field, then enter text to filter by in the Value field. The filter is applied in real time as you type.
If you want to filter by additional attributes, click the green plus (+) button to add another filter line. To remove filters, click the red X button.
Creating SUT Tags
If you want to record additional information or attributes for your SUTs, create SUT tags. SUT tags are custom fields that, when created, display on the Create and Edit SUT panels. For example, you might add a field named Device to indicate the type of device as shown in the sample screen below. You can also create SUT tags to add criteria you can use for matching your rule-based SUTs.
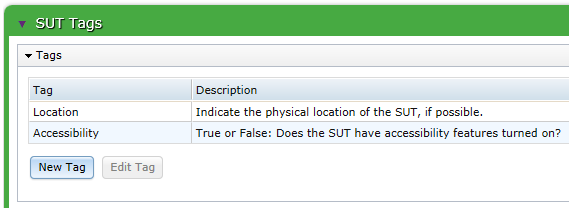
Click New Tag to open the New Tag dialog box:
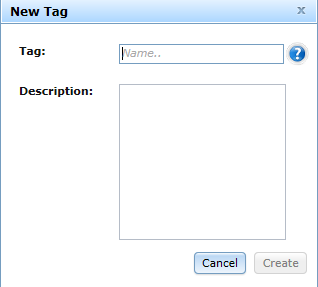
The name you enter for the tag appears in the drop-down list of filters. You can also include a description to explain what the tag is used for and any specific information about how information should be entered. For example, you might include a tag such as Accessibility where you want the information stored as a Boolean, true or false, to indicate whether the SUT has accessibility features turned on.
When you have SUT Tags defined, they appear as fields when you add or edit SUTs:
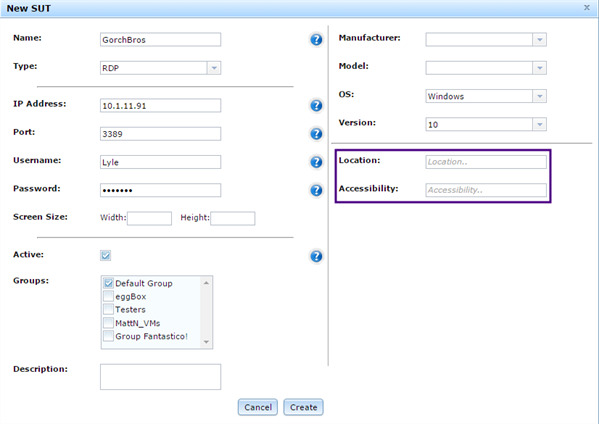
The value you enter in the tag field becomes something you can use as a filter. For example, if you defined a Location filter, the value you entered in the field might correspond to the physical location of the SUT. So if you selected Location from the Filter drop-down list, you could enter server room in the Value field to find only SUTs entered with that location.