You can use groups in Eggplant Automation Cloud to give users access to specific sets of systems or devices. In fact, different users can be limited to different testing pools. You could also create super users who are members of multiple groups and therefore have access to more systems under test (SUTs) and regular users who are restricted to a single group and its systems.
When you first launch Eggplant Automation Cloud, you'll automatically have a Default group. All new users and SUTs are assigned to the Default group, which means that all users have access to all SUTs. However, if you want to use groups to limit or control access to SUTs, you can create your own groups and remove users from the Default group.
You manage group membership on the User/SUT Groups page in the Eggplant Automation Cloud web interface. You can access this page by navigating to Admin > Access Groups.
Additionally, you can assign groups when you create new users or add SUTs to Eggplant Automation Cloud, provided you've first created the groups on the User/SUT Groups page.
Step by Step: Creating Groups in Eggplant Automation Cloud
To create a group, follow the step-by-step instructions below:
- Go to Admin > Access Groups page in Eggplant Automation Cloud.
- Click New User Group or New SUT Group.
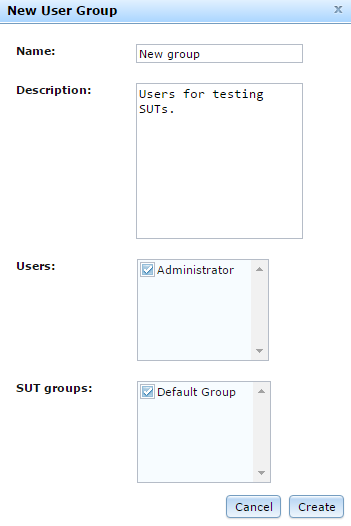
- To create a New User Group, fill out the appropriate fields of the New User Group form:

- Name: Give a name to the group.
- Description: Use this field to describe the purpose of the group.
- Users: All current users appear in the list of users. To add a user to the group, select the checkbox beside the user's name. To read about how to create new users, see Creating Users in Eggplant Automation Cloud.
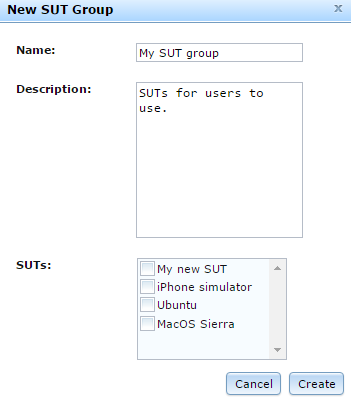
- To create a New SUT Group, fill out the New SUT Group form:

- Name: Give a name to the group.
- Description: Use this field to describe the purpose of the group.
- SUTs: All current SUTs appear in the list of SUTs. To add a SUT to the group, select the checkbox beside the SUT's name. To read about how to create new SUTs, see Adding Test Systems in Eggplant Automation Cloud.
As you see, you can add users and SUTs to a group at the time you create the group. However, it's also possible to add users to groups when you create the users, or add SUTs to groups when you create the SUT. To enable such a workflow, define and create your groups before you create users and add SUTs to Eggplant Automation Cloud. You'll be able to select groups as you add new users and SUTs on their respective tabs.
Edit or Remove a Group
To edit an existing group, double-click the group in the either the User Groups or SUT Groups list or select the group in the list and click Edit User Group or Edit SUT Group. You can add or remove users and SUTs from groups as well as changing the group name or description. You can also click Remove to delete the group.
Note, however, that you can't delete the Default group, nor can you change its name.
Limit Access with Groups
What's important to keep in mind is that every group contains both users and SUTs. Users can access or reserve a SUT only if the SUT belongs to a group to which the user also belongs.
However, both users and SUTs can belong to more than one group. Therefore, it's important to use care in assigning groups to make sure you're managing access in the way you intend.
Also remember that all new users and new SUTs get assigned to the Default group. Be sure to remove them from this group if you intend to use groups to control user access to specific SUTs.
