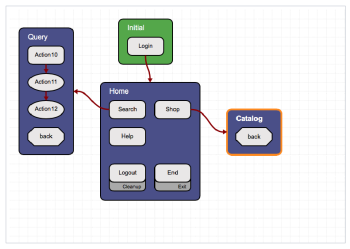
An Eggplant DAI model is a simple visual representation of the application, interface, or website that you want to test. The model helps you coordinate test activity and includes representations of the aspects the UI that you're testing. Note that models don't have to be complete or complex to be useful.
Alternatively, if you prefer running tests via scripts, then you might want to skip this section and follow the script based execution method.
This page describes the basics of model creation, versioning, and manipulation.
What Is a Model?
Visually, an Eggplant DAI model resembles a flowchart, but functionally, it's more like a road map. User journeys can go in any number of directions to, from, and between the states and actions you define. When you run your model, user journeys are defined on the fly by Eggplant DAI algorithms.
States and Actions in the model represent UI elements and transitions. States are things such as screens in your application, pages on a website, or even dialog box windows. Actions take place within states, and also can move users between states. When you run the model, Eggplant DAI automates possible user journeys through the states and actions you've set up.
Outline a Model
Before you build a model in Eggplant DAI, consider the parts of the interface that you want to test, and how those parts are connected. Making a brief outline or sketch of the possible states and actions encountered by users in your interface helps organize your model. You can do this initial planning in the Eggplant DAI workspace.
The granularity of your model is up to you. You can have a single Login action that performs all the steps a user takes to log in—enter username, enter password, click OK—or you can make a separate action for each of those steps. Things that aren't new screens or pages, such as panels in wizards and hover-over menus, can be considered states, too.
If you're testing a travel website, for example, a user might first connect to the website. When a user connects, the first page they see is the home page. From the home page, there are several places a user can visit next: search, my account, cars, flights, hotels, and restaurants. From any of those pages, a user might choose to return to the home page, or move to a different page. At some point, the user exits the site.
Step by Step: Build a Model
Each page or screen a user can visit is a state in your Eggplant DAI model. Use actions to represent clicks or taps or other activities a user can perform in the state or that take users between states in the model.
Although all element names must be unique, you should establish a consistent and meaningful naming convention for your elements. For example, an action called home might take users to a state called Home page, and an action called flights would take users to a state called Flights page.
Follow these instructions to build your model in Modeler:
- Go to File > New Model to create a new model. A new model begins with one state that has the type Start and is named Initial. You can change the name of this state in the State properties tab in the right pane.
 Note: When you're trying to create a brand new model in Modeler, the Model tab display a new model with the Initial state. You can use this model to begin developing rather than creating a new model.
 - Click Save Model in the toolbar (disk icon
 ) or go to File > Save Model to save the model and assign it to a group. Groups allow different users to access a model.
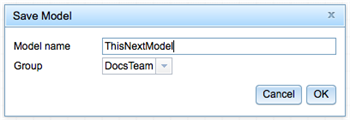 Note: You can't run a model until you've saved it. The model name can't contain spaces and the only permitted special characters are
 - To add a new state, right-click in the workspace, then select New State from the context menu. You can also click the New State button (
 ) in the toolbar or go to Edit model > New Action. Normal states have purple backgrounds.
 - To add an action to a state, select the state, right-click inside it, then choose New Action from the context menu. You can also click the New Action button (
 ) in the toolbar or go to Edit model > New Action. Normal actions have gray backgrounds.
 - Repeat steps 3 and 4 to create as many states and actions as you need.
- Connect actions to states by using the Action Properties tab. Select an action, then connect it to the appropriate state by selecting a checkbox in the Connections from action menu.

Connect actions to states using the Connections from action menu in Modeler.
You can also have global actions in your model. Global actions are actions that could be performed at any point during a user journey, such as a rotate on a mobile device or a search on a shopping website. For information about global actions, see Create Global Actions.
- To model an action that returns a user to the previous state, create a new action. With that action selected, choose Previous from the Type drop-down list in the Action Properties tab. The shape of the action changes to an octagon when the Previous type is chosen.
- Define an exit point for the model by associating an action with the predefined Exit state in the Connections from action menu.
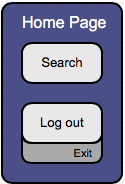
- Save the model.
When you are ready, click Play ( ) on the toolbar to run your model. However, note that until you connect SenseTalk snippets to your actions, the model won't be working against your actual system under test (SUT).
Note: If you're a new user, you might want to create a model using the Models tab in Designer.
Adding Complexity to a Model
The complexity of the model you build can change as your testing requirements change. You can add representations of user actions like entering passwords and making selections on a page, or add variables to states or actions. For example, if you're testing a mobile app with a swipe action, you can define the directions in which that swipe can occur using variables.
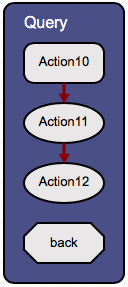
If two or more actions must occur in a certain order, you can make them sequent. In the Action Properties tab, set the type for the first action in the series to normal. Set the type for all subsequent actions that need to execute in order to sequent. Connect those actions in the order you want them to run. When you change an action's type to sequent, the action's shape changes to an oval. You also can use sequent actions to create loops.
In this example, Action10 executes before Action11, which then must execute before Action12 can execute.
You can define the importance of states and actions in a model by adjusting their weights in Eggplant DAI. When you run a test that has weighted elements, the learning algorithms in Eggplant DAI adjust to hit those actions and states more or less often in the test case, according to their weighting.
Using the predefined Exit state is the simplest way to end a test run, but you can define your own end points using things like action limits. A model will exit when it reaches a state with nothing left to do, excluding global actions. If all actions in a state fail the preconditions you've set for them, or all actions in a state have passed their execution limit (or a combination of these things), the model will exit.
Add Snippets to a Model
You can add snippets to your model if you've integrated Eggplant DAI with the Fusion Engine. Snippets are small pieces of SenseTalk code that you can associate with actions or states in your model. When you run an Eggplant DAI model that has associated Eggplant Studio snippets, the model executes on your system under test (SUT) as it runs in Eggplant DAI.
For complete information about using SenseTalk snippets, see Eggplant DAI Integration with Fusion Engine and Linking Eggplant DAI Models to Snippets.
Adding Breakpoints
You can introduce breakpoints to allow debugging of your model. For example, it can be used to check the value returned from Eggplant Functional or to check your application issues. You can set breakpoints on both action and state levels.
- Breakpoint at action level only applies to that action. However, if an action has a submodel attached, then the breakpoint also applies to that submodel.
- Breakpoint at state level is limited to only that state and all the actions within that state.
Step-by-Step: Adding a Breakpoint
To add a breakpoint in your model, follow these steps:
- Open the model that requires debugging.
- Right-click the action/state where you wish to add the breakpoint and select Break on selected from the context menu. A red dot appears on the selected action/state to indicate the break.
- Click Play to start the model execution. The model pauses when it reaches the action/state with the breakpoint. For example, if you added a breakpoint on Action 1, the model execution will pause when it reaches that action.
- Click the Step icon
 to step through the remainder of the test execution until it reaches the end. Each time you click the Step icon, the text execution will progress to the next action and then pause again. Alternatively, clicking Continue
 resumes the paused test execution and the test will continue to the next breakpoint or to its end if no more breakpoints are encountered.

To clear breakpoints for specific actions, right-click the action and select Remove breakpoint from the context menu. To remove all the breakpoints, e.g., when you have more than 1 breakpoint, select Clear all breakpoints.
Model Versioning
When you explicitly save a model (by clicking the Save button or going to File > Save Model) anytime after the initial save, you can create a new version name of the model. Add a tag name in the Create a version tag window. Click Cancel if you don't want to create a new version; when the model automatically saves, any changes you've made save to the active version.

You can revert to previous versions of models. Go to File > Model History to choose which version to open.
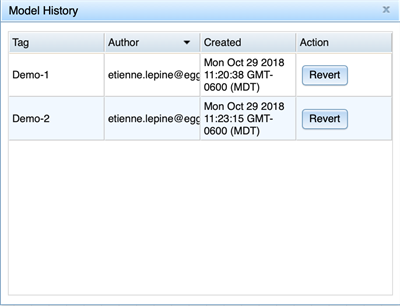
Versions are preserved when you switch between them; reverting to another version doesn't overwrite the version that you switched from.
Working with the Model Tree
The Model tree to the left of the workspace shows your model in tree form. Actions display below their associated states.
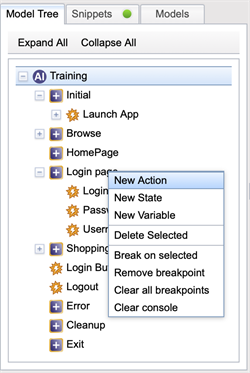
When you create a new model, the Model tree is automatically populated with four states:
- Initial state is the starting point of your model.
- Error state is called whenever the model detects an error. This might be caused by the failure of an in-model check or by a failure within a SenseTalk snippet.
- Cleanup state is the last state called in the model, which occurs after Exit or Error states. You can use the Cleanup state to tidy up the SUT prior to the next state, that is, for closing applications, etc.
- Exit state terminates the model.
You can use the Model tree to move an action from one state to another, or to move an action from a state to the main workspace, which makes it a global action. Select the action you want to move, then drag it to a new location. The highlight on the selected action turns green when you hover over a location where that action can be placed.
You can perform the same actions in the Model Tree that you perform in the workspace. Right-click in the Model tree to open the context menu, from which you can add actions, states, and variables to your model. You also can delete items, add or remove breakpoints and clear the console from the context menu.
