A model in Eggplant AI can be connected to a suite in Eggplant Functional, and the interactions with your system under test (SUT) can be handled by SenseTalk code snippets. The Eggplant AI agent manages the interaction between Eggplant AI and Eggplant Functional.
What Is the Agent?
The agent is a program that establishes a connection between the browser-based Eggplant AI web application and an Eggplant Functional suite. When the agent connection is active, you can attach SenseTalk snippets to actions and states in the Eggplant AI model. Running the model then executes the SenseTalk snippets on the SUT and reports the results to the console in Eggplant AI.
You can access the Eggplant AI server from any connected machine on your network with a supported browser. The agent can run on the same machine on which you run Eggplant AI, or on a hosted machine. All agent connections in your group are visible in the Eggplant AI interface.
Downloading and Installing the Agent
Important: The Agent for Eggplant AI is not compatible with Eggplant DAI, therefore you must download the Agent from Eggplant DAI URL. In general, to make use of the full capabilities of Eggplant AI, you should always use an agent that matches with the version of your software. For more information, see the documentation specific to Eggplant DAI.
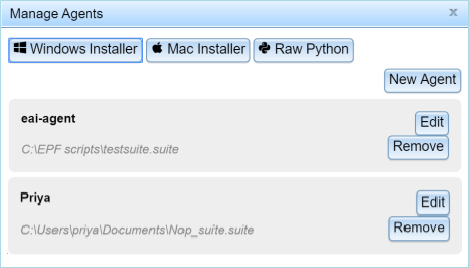
The agent is available as a Windows.exe file, a Mac app, or raw Python. Go to File > Manage Agents in Eggplant AI to open the Manage Agents window. Select the appropriate button for your platform to download the agent:

Download and manage Eggplant AI agents from the Manage Agents window
When you create and save agents, they appear in the Manage Agents window. You can edit or remove agents from this window as well. Note that you can view and edit any agents created in any groups you belong to from the Manage Agents window.
Windows
- Go to File > Manage Agents and select Windows Installer. The eggplantAIagent.exe file is saved to your Downloads folder.
- Open eggplantAIagent.exe, then follow the prompts to complete the installation. The installer saves a shortcut to Eggplant AI Agent on the Start menu.
Mac
- Go to File > Manage Agents and select Mac Installer. The eggplantAIagent.dmg file saves to your Downloads folder.
- Double-click to open eggplantAIagent.dmg.
- Drag eggplantAIagent.app into your Applications folder.
Python
- Go to File > Manage Agents and select Raw Python. The eggplantAIagent.zip file is saved to your Downloads folder.
- Extract the eggplantAIagent.zip file. The extracted file contents are saved in a folder named eggplantAIagent.
Configuring and Running the Agent Locally
You can launch the Eggplant AI agent from the desktop shortcut on Windows or from the Applications folder on Mac. You must use the command line to run the raw Python agent.
Windows
- Open Eggplant AI Agent from the Start menu.

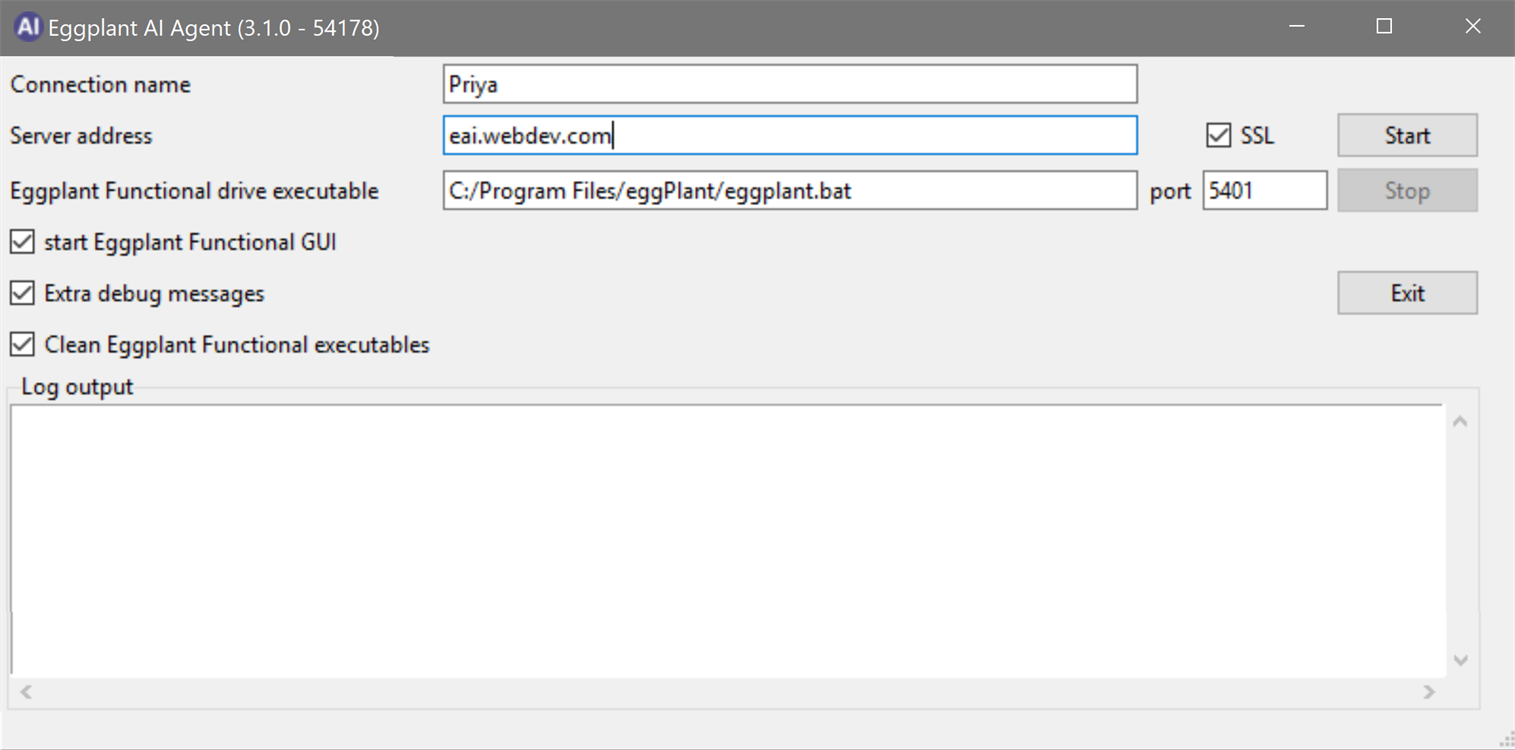
- Enter connection information and preferences:
- Connection name: A name of your choice, for your connection. This name must be the same name you enter when you connect a suite to a model in Eggplant AI.
- Server address: The location of the Eggplant AI server to which you want to connect.
Note: If you have configured the Eggplant AI server to run on a port other than 80, you must add that port number to the server address or the agent will not be able to connect. For example, to use the server address in the screenshot above with port 81, enter 34.248.117.57:81.
- Eggplant Functional drive executable: The location of the runscript.bat file on your system, and an open port for connecting. The default port is 5400.
- SSL: Selected by default. Clear this checkbox if the Eggplant AI agent can't connect to Eggplant Functional.
- Start Eggplant Functional GUI: Clear this checkbox to run Eggplant Functional in drive mode.
- Extra debug messages: When selected, displays more in-depth log messages.
- Clean Eggplant Functional executables: When selected, clears binary executables if Eggplant Functional does not shut down properly.
- Click Start. Eggplant Functional opens, as does the command prompt.
Mac
- Double-click the eggplantAIagent icon in the Applications folder. The Eggplant AI Agent GUI opens.

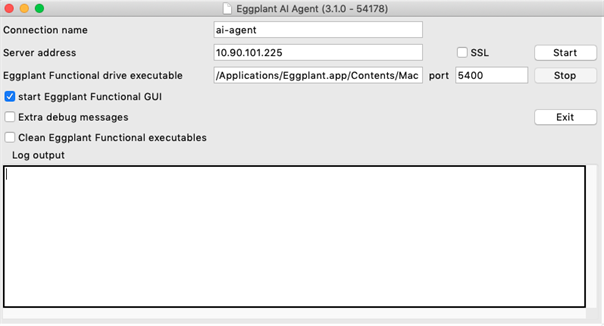
- Enter connection information and preferences:
- Connection name: A name, of your choosing, for your connection. This must be the same name you enter when you connect a suite to a model in Eggplant AI.
- Server address: The location of the Eggplant AI server to which you want to connect.Note: If you have configured the Eggplant AI server to run on a port other than 80, you must add that port number to the server address or the agent will not be able to connect. For example, to use the server address in the screenshot above with port 81, enter 34.248.117.57:81.
- Eggplant Functional drive executable: The location of runscript on your system. Leave this field blank unless the Eggplant Functional executable isn't in the default location on your machine.
- Port: An open port for connections. The default port is 5400.
- SSL: Selected by default. Clear this checkbox if the Eggplant AI Agent can't connect to Eggplant Functional.
- Start Eggplant Functional GUI: Clear this checkbox to run Eggplant Functional in drive mode.
- Extra debug messages: When selected, displays more in-depth log messages.
- Clean Eggplant Functional executables: When selected, clears binary executables if Eggplant Functional does not shut down properly.
- Click Start. Eggplant Functional opens.
Python
You must have installed all the Python packages that are listed as dependencies in the README.md file (packaged with the Eggplant AI installer).
To launch the Python agent, follow these steps:
- Open a command prompt and enter pip3 install -r requirements.txt from the extracted folder location. This installs the required dependencies to run the Python agent.
- Enter python3 agentgui.py and press Enter. The Agent GUI opens.
Note: For running the Python agent via non-GUI mode, refer to installation instructions in the README.md file packaged with the installer. To invoke venv commands, refer to Python documentation.
Entering Agent Connection Details in Eggplant AI
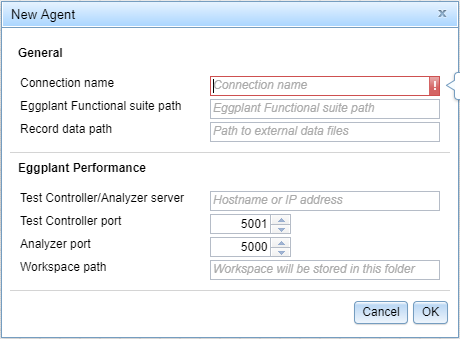
After you install and set up the agent, you must enter information about the agent in Eggplant AI. You define agents on the New Agent dialog box, which you access from the Manage Agents window (File > Manage Agents).

The New Agent dialog box is divided into the following two sections:
General
This section is where you enter the information that is required for Eggplant AI, through the agent, to connect to Eggplant Functional for automation.
- Connection name: Enter the same name you entered in the agent application Connection name field.
- Eggplant Functional suite path: Specify the full path to the suite (the .suite file) that contains the SenseTalk code snippets you want to use.
- Record data path: (Optional) Enter a full path to any external data files that are required by the code snippets in the suite. You can include multiple file paths in the field by using the pipe character (|) as a separator.Note: As a best practice, any files referenced within a SenseTalk script should be added to Eggplant Functional through the Resources pane in the Suite window. This method stores files to the Resources directory within the suite directory for the given suite. Although SenseTalk can access files stored elsewhere on the local file system, using the Resources directory provides additional capabilities. See the Resources Pane for more information.
Eggplant Performance
You need to enter information in this section only if you use Eggplant AI to do performance testing with this agent.
- Test Controller/Analyzer server: Enter the host address.
- Test Controller port: Specify the port number of the Test Controller server. By default, 5001 is entered when creating a new agent.
- Analyzer port: Specify the port number of the Analyzer REST API server. By default, 5000 is entered when creating a new agent.
- Workspace path: Specify a location to create a workspace in Eggplant Performance when a performance test is run.
Click OK on the New Agent dialog box to save the agent configuration information.
Running Eggplant AI Agent in command line mode
To configure and run the execution environment from the command line (without the interface), follow these steps:
- In a command prompt window, change the default directory to read the agent folder location followed by eggplantAIagentCMD.exe, and then press Enter. For e.g., C:\Program Files (x86)>eggplantAIagent\eggplantAIagentCMD.exe.
- You can also use from any of the optional arguments listed below:
| Optional arguments: | |
| -h, --help | Show the help message and exit. |
| -s SERVER, --server SERVER | The Eggplant AI server e.g., "server.mycompany.com".Default=eggplantai.testplant.com |
| -p PORT, --port PORT |
The port to run Eggplant Functional drive on default=5400 |
|
-e DRIVEEXEC, --driveExec DRIVEEXEC |
The location of the Eggplant Functional drive. Executable default=C:/Program Files/eggPlant/eggplant.bat |
| -n NAME, --name NAME |
A name for the agent connection to be used in Eggplant AI settings. If unspecified an IP address will be used. |
| --ssl | Use ssl connection to server (Default). |
| --no-ssl | Don't use ssl connection to server. |
| --epfgui |
Start the Eggplant Functional GUI. |
| --no-epfgui | Don't start the Eggplant Functional GUI (Default). |
| --debug | Run the agent in debug mode (more messaging). |
| --clean-epf |
Kill any struggling Eggplant Functional processes before starting new. |
|
--no-start-epf |
Don't start Eggplant Functional; expect it to be already running on the specified port. |