Running Performance Tests in Eggplant AI
You can create performance tests in Eggplant AI from your existing models. Eggplant AI works in combination with Eggplant Performance Test Controller and Eggplant Cloud to let you run performance tests on remote systems under test (SUTs). This integration reduces the challenge and effort required for setting up performance testing for your applications under test.
About Performance Tests
Performance testing helps you determine how your application and the servers it connects to perform under a particular load. You create performance tests in Eggplant AI from one or more test cases. When you run a performance test, the test case actions are performed on the SUTs, which are VMs in Eggplant Cloud.
For information about test cases and how to create them in Eggplant AI, see Using Eggplant AI Test Cases. For information about Eggplant Cloud, which provides hosted SUTs, as well as to acquire credentials, contact Eggplant sales or your account manager.
Prerequisites
Your models and test environments must meet the following prerequisites for running performance tests:
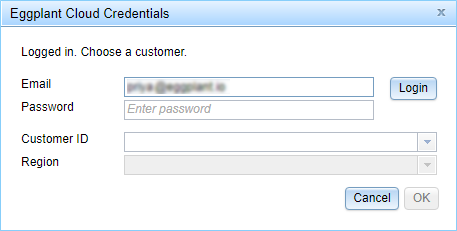
- Enter valid credentials for Eggplant Cloud in the Eggplant Cloud Credentials dialog box, which you access from the Account menu in (Account > Eggplant Cloud Credentials).
- Open or create a model that you have connected to an Eggplant Functional suite. Eggplant Functional snippets perform the test case actions during a performance test.
- Ensure that Eggplant Performance (which includes Studio and Test Controller) is installed on the same computer as the Eggplant AI agent. Note that the Eggplant AI agent can be installed on a different machine from the Eggplant AI server.
-
Make sure that the Eggplant AI agent is running. In addition, set up the Eggplant AI agent to point to Eggplant Performance (see Entering Agent Connection Details in Eggplant AI).
- Ensure that the Eggplant PerformanceTest Controller server is running. By default, testControllerServer.exe is found at C:\Program Files (x86)\eggPlant Performance\TestControllerServer\bin. If you installed Eggplant Performance to a custom directory, you will need to find the executable based on the appropriate path. Note that when you launch the Test Controller GUI by any means, it starts the server.
Note: If your model requires external data, you must define sufficient data to run the desired number of virtual users (VUs). For example, if a test step needs VUs enter login credentials 50 times, you need to define 50 usernames and passwords in the model.
Creating Performance Tests
You can create performance tests for the open model. The model needs to have at least one defined test case, which you can select when you create the performance test. The test case includes the sequence of actions you want to perform during the performance test. The model should also have snippets associated with any action you want to perform on the SUT.
After you have created a performance test in Eggplant AI, you can run your test by following the steps for running tests below.
Step by Step: Creating a New Performance Test
- Select the Performance Tests tab in the center pane of the Eggplant AI UI.
- Go to Account > Eggplant Cloud Credentials from the main menu to open the Eggplant Cloud Credentials dialog box, then enter your Email and Password for accessing Eggplant Cloud. After you have successfully logged in, select a Customer ID and Region, then click OK to close the dialog box.
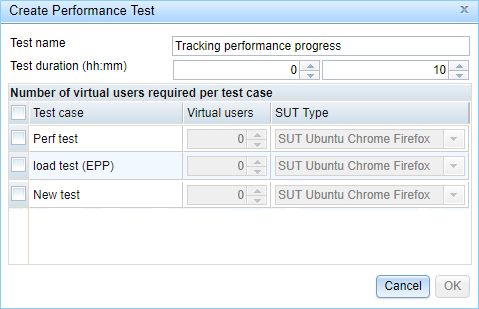
- Click Create on the Performance Tests tab. The Create Performance Test dialog box appears, displaying all test cases created for this model.
- Enter a name for your test in the Test name field, then set the Test duration (how long you want the test to run) by entering a number of hours (0-99) and number of minutes (0-59) for the test in hh:mm format.
- Select the checkbox for each test case you want to include in the test, then set the number of VUs you want to run for each test case you selected.
- Select the required SUT Type from the drop-down list for each test case in the test. By default, Ubuntu with Chrome and Firefox is selected for every test case. However, you can select Windows Server 2016 with Chrome, Firefox, and Internet Explorer instead.
- Click OK. The test is added to the Performance Tests tab.


Running Performance Tests
After you create tests on the Performance Tests tab, follow these steps to run performance tests in Eggplant AI.
Step by Step: Running Performance Tests
- From the Performance Tests tab, select the desired test definition, then click Open. A new page displaying the option to start the performance test appears.
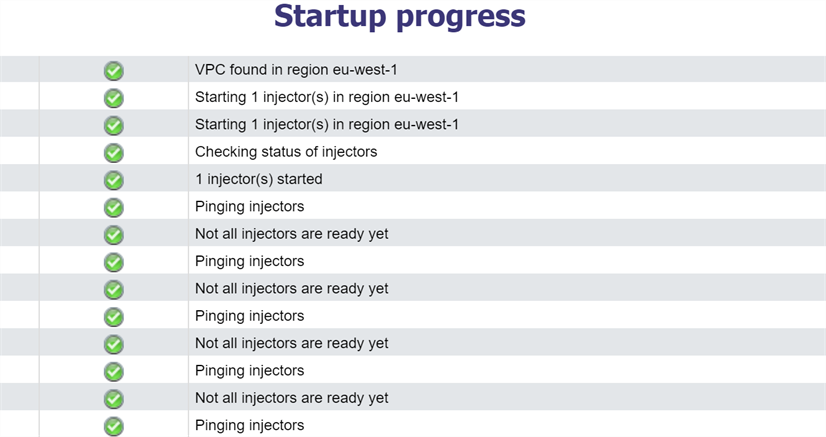
- Click Start the Test. The Startup progress page appears, indicating the progress of the validation checks that run prior to initiating the performance test.
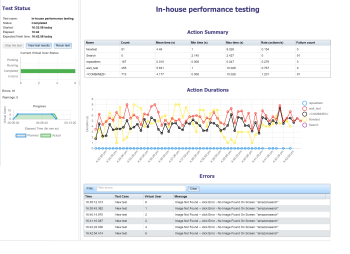
- Test Status: Displays the test status along with the options to stop the test (while it is running), and restart or view results when the test is complete.
- Action Summary: Provides the key performance metrics for each action in the test.
- Action Durations: Provides a chart view of the recent durations of each action plotted against time.
- Errors: Logs any errors that occur during the test.

When the initial test validation is complete, the performance test begins. The page changes to show charts and summary tables on a dashboard so that you can track the progress of that test as it runs.
The following panes appear on the dashboard:
To view the complete test results, click View test results on the left pane of the dashboard. You can also click Stop the test when it is in progress and Rerun test to run the test again after it completes.
In addition, you can analyze the results and view the summary of previous test runs. See Viewing Previous Runs for more information.
Editing an Existing Performance Test
You can view and edit your performance test definitions from the Performance Tests tab. To edit a test definition, select the checkbox in the left column, then click Edit on the toolbar or right-click the selected test in the list and choose Edit Performance Test from the drop-down menu.
The test definition opens in the Edit Performance Test dialog box. You can perform the same editing tasks at this stage as when you create a new test definition (steps 4, 5, and 6 above in Creating a New Performance Test).
Removing a Test Definition
If you need to remove an existing test definition, follow these steps:
- Select the Performance Tests tab in the center pane of Eggplant AI.
- Select the checkbox in the left column for the performance test definition you want to remove. Select multiple checkboxes to delete more than one test definition at a time.
- Click the Delete button on the toolbar to remove selected test definitions, or right-click and select Delete Performance Test.
Viewing Previous Runs
You can view detailed information about previous performance test runs in Eggplant AI. For any previous runs, you can choose to view a test summary or full results generated by Eggplant Performance Analyzer. To review previous test run data, click View Previous Runs on the toolbar. The Choose Previous Performance Test Run dialog box opens.

Select the test that you want to review, then click the required button from the following options:
View Summary: Presents the summary of the test results that you viewed after completing the performance test. Note, however, that some metrics, such as status reports, contain data only while a test is running. You can expand the test case in the Logs pane to view a summary of the test for each of the virtual users in a tabular format.
Analyze: Analyzes the test run using the Eggplant Performance Analyzer server and presents a detailed test run report. Note that this button is enabled only if you are running the Eggplant Performance Rest API server.
Delete: Removes the test run from Eggplant Performance.
Close: Closes the dialog box.
Managing Eggplant Cloud SUTs
Typically, Eggplant Cloud SUTs exist only for a limited time. That is, these SUTs are created when the performance tests are initiated and terminated soon after the tests are complete. Eggplant Cloud SUTs are VMs that run either Ubuntu or Windows Server.
You can manually create instances that you can remotely connect to for modifying or debugging tests. To create an authoring SUT in Eggplant Cloud, go to File > Manage SUTs to open the Manage Eggplant Cloud SUTs dialog box, then click New.
This dialog box lets you manage the remote SUT instances as well as provides a means of manually terminating any other SUT instances that were not terminated properly.
The following information is shown on the Manage Eggplant Cloud SUTs dialog box:
- ID: Displays the unique identity string of the SUT.
- Status: Displays the status of the SUT: running, shutting down, pending, terminated.
- Authoring: Displays Yes if the SUT is available for all users to connect to it and No if the SUT is private.
- Host: Displays the IP address of the SUT.
- RDP Username: Displays the username required to connect to the temporary SUT.
- RDP Password: Displays the password required to connect to the temporary SUT.
- Type: Displays the SUT Type, which can be either SUT Ubuntu and Chrome Firefox or SUT Windows Server 2016 IE Chrome Firefox.
- User: Displays the email address of the user registered with the Eggplant Cloud instance being used.
Use the buttons at the bottom of the window as follows:
- Refresh: Refreshes the list of SUTs that are connected and their statuses.
- New: Lets you create a new authoring SUT. After you click New, the New Eggplant SUT dialog box opens so that you can select the SUT type to create.
- Terminate: Shuts down the selected SUT.
- Close: Closes the dialog box.
