Advanced Gherkin Techniques
In addition to the basic Gherkin keywords that are required to define a Feature, Eggplant Functional (EPF) lets you take advantage of some additional keywords for more complete control over your Gherkin tests. These advanced Gherkin topics include the following, each of which is described in detail below:
For basic information about creating a Gherkin Feature in Eggplant Functional, see Creating Tests with Gherkin.
Backgrounds
A Background element can be used to define any Given steps that are consistent across every Scenario in a Feature. The Background is placed before the first Scenario in the Feature, and can include any number of Given statements. You can also use the And or But keyword aliases in place of Given.
An example Background definition might look like the following:
Background: app in focus
  Given that the Calculator app is running
  And that the app is in focus
When you run a Feature that includes a Background element, the Given steps outlined in the Background are run for each Scenario as it is run so that you don't need to include the steps within each Scenario.
Scenario Outlines
If you have a test case where you want to perform the same action multiple times with variable values, you can use a Scenario Outline instead of repeating a standard Scenario with hard-coded values. The Scenario Outline element lets you parameterize values within steps, and then reads values from a data table in a section titled Examples that follows it.
The steps you include within the Scenario Outline are the same as for a regular Scenario, as outlined in Definition of a Feature: Given, When, Then (including the And/But aliases as necessary). The variables are strings that you enclose in angle brackets, <var1>. You can include a variable on any step.
A Scenario Outline in a Feature might look like the following:
Scenario Outline: check multiplication function on Calculator app
  Given that the Calculator app is running and in focus
  And there is no current value in the calculator
  When I multiply <Number1> by <Number2> in the calculator app
  Then the app displays the correct <Answer>
For each step where you include a variable, the associated SenseTalk handler needs to include a params statement to receive the variable value from the data table. If the step includes multiple variables (as in the When statement above), the params statement needs a variable name for each one.
Example:
to handle I_multiply_VAR_by_VAR_in_the_calculator_app
  params Number1, Number2
You follow the Scenario Outline immediately with the Examples section, which is a data table that includes the values to substitute for your variables. The first line of the data table is the header row. Each item in the header row must match the name of a variable exactly. The rows following the header include the data. Separate items within a row with a vertical bar, or pipe, character (|).
An Examples section for the previous Scenario Outline might look like this:
Examples:
  | Number1 | Number2 | Answer |
  | 5 | 9 | 45 |
  | 5 | 10 | 50 |
  | 5 | 11 | 55 |
  | 5 | 12 | 60 |
You can follow this format to build your data tables with as many or few columns and rows as you need.
When you run a Scenario Outline, it iterates over the data table. That is, every step runs once for each row of data in the table, whether or not the step includes variable data. For example, if you have 10 rows of data (after the header), the Scenario Outline runs a full 10 times.
Data Tables on Steps
You might want to pass data to an individual step from a table without assigning specific variables within the step definition. In such cases, you can add a data table directly to the step so that all the data from the table gets passed to the associated handler when it's called.
You format the data table the same as for an Examples section, leaving off the Examples title. Although you don't use variables within the step text, the data table still includes a header row.
When I enter text in the page search field
  | searchterm |
  | Yellowstone |
  | Grand Canyon |
  | Disneyland |
  | Acadia |
Following this format, you can construct a data table with as many or few columns and rows as you need.
For data tables on steps, the data is sent to the handler all together, so the Scenario or the step doesn't iterate. The SenseTalk handler you write in the associated script should handle iterating the data.
The data table is received as a SenseTalk list of property lists. So, there will be one item in the list for each row of data. Each item in the list is a property list where the key (or keys) corresponds to the header and the value is the passed value for that row.
For more information about SenseTalk lists and property lists, see Lists and Property Lists.
Gherkin Tags
The Gherkin tags functionality lets you filter Gherkin test sections based on keywords, or tags, that you assign. You can assign tags to Scenarios, Scenario Outlines, and to Features globally. Based on tags, you can choose to include or exclude elements when you run your tests.
A tag can be any string, prefixed with @. (Space characters, however, are invalid in tag names.) To add a tag to a Feature, you insert it on the line above the element's name. For example, to apply a tag to a Scenario, you add it to the line above the Scenario line:
@regression
Scenario: Add two numbers on the Calculator app
You can add as many tags to an element as you want. Additional tags are separated by a space:
@regression @important @sanity
Scenario: Add two numbers on the Calculator app
Tag Logic
When you run your tests, you might want to filter with multiple tags. Therefore, it's important to understand how the logic works.
- Join tags with a comma to indicate OR (either one or the other condition must be met).
- Join tags with a space to indicate AND (both conditions must be met).
- When both AND and OR conditions are present, the OR is evaluated first.
The tag logic described here with commas and spaces describes how you enter tags in a run environment, either as part of a command line command or SenseTalk command. This use is different from how you enter tags in the Feature itself, where multiple tags on the same element are always separated by a space.
Example:
@a,@b //To run, the element must include either @a or @b.
Example:
@a @b //To run, the element must include both @a and @b.
Example:
@a,@b @c //To run, the element must include either @a or @b and it must also include @c.
@c @a,@b //Because the OR condition is evaluated first, this expression yields the same result as the one above.
Filtering Elements by Tags at Runtime
How you filter by tags varies depending on the method of test execution you're using. See Running Gherkin Tests for information about how to run your Gherkin tests from Eggplant Functional.
In order to include Feature elements with a specific tag, list the tag name (using the @ symbol to indicate that it is a tag) as a parameter with your feature call. Listing the tag name (i.e. @tagname) includes that tag. To exclude elements, you list the tag preceded by a tilde symbol (e.g., ~@tagName).
If you are running a Gherkin test from within Eggplant Functional, you can add tags in the Tag field above the editor before pressing the Run Script button:
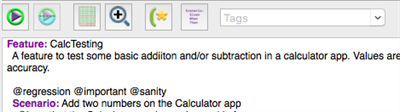
Tags you have added to the active Feature appear in the Tag field drop-down list. To add multiple tags, you need to enter them manually into the field. Multiple tags follow the logic outlined in Tag Logic: use a comma to indicate OR and a blank space to indicate AND.
If you use the RunFeature command to trigger a Gherkin test from a SenseTalk script, you can include tags as parameters to the command. You can place multiple tags inside a pair of quotes, using commas and spaces according to Tag Logic. They must still use the @TagName format. You can include tags in separate quotes to force an AND condition.
Example:
RunFeature "FeatureTest1", "@important,@regression" // Runs FeatureTest1, but only elements within it that are tagged with either the @important tag or the @regression tag
Example:
RunFeature "FeatureTest1", "@important ~@regression" // Runs FeatureTest1, but only including the elements within it that include tags indicated by the @ symbol, and exluding any tags indicated by the use of a tilde "~". In this case, the @important elements are included, and any tagged with @regression are excluded.
Finally, if you run your Gherkin tests from the command line, you can include tags as parameters to the runscript command. You can include multiple tags within a single -param statement, enclosed in quotes, in which case the elements follow the logic explained in Tag Logic: a comma to indicate OR, a space to indicate AND. Use a separate -param statement to force an AND condition.
The following command runs any elements tagged with @sanity in the CalcTesting Feature:
runscript CalcTesting.feature -param "@sanity"
You can take advantage of the logic conditions and careful tag placement to provide precise control over which elements you run. In the following example, the elements that run need to have the @billing tag and either the @over tag or the @rcvd tag:
runscript AccountingApp.feature -param "@over,@rcvd" -param "@billing"
If any tag is sent without the @ symbol indicator, it and any other tags passed within the same quoted string will be ignored. For example, in either of the examples below, both the tag "Apple" and the tag "@Orange" would be ignored, since the Apple tag is missing the @ symbol.
RunFeature someFeature, "Apple @Orange" // While SenseTalk sees this as valid syntax, the Apple tag is invalid so all tags will be ignored and someFeature will be executed without the specified tags.
The same goes for passing tags as parameters when running via the command line. In the below example, both tags "over" and "@rcvd" will be ignored since "over" is missing the @ symbol:
runscript AccountingApp.feature -param "over,@rcvd" -param "@billing"
Tag Inheritance
Tags are inherited from parent elements. That is, any element contained within another element inherits tags applied to the wrapping element. For example, if you add a tag to a Feature, every Scenario and Scenario Outline within that Feature is also assumed to have that tag.
It's important to keep this inheritance property in mind so that you can use your tags to filter effectively.
Event Hooks
You can define hooks for your Gherkin tests that automatically perform specific actions either before or after an event. Hooks can be associated with the Feature, with Scenarios, and with steps.
Hooks are created as handlers in the associated SenseTalk script. They aren't specifically referenced within the Gherkin Feature itself. If a handler of the appropriate name is in the SenseTalk script, it gets run when required. For example, to have a hook run before every Scenario is run, you would include a handler such as the following:
to handle hook_before_scenario
  params ScenarioInfo
  <enter your custom code here>
end hook_before_scenario
You can define any actions within the handler that you need, just as you do with other handlers attached to Gherkin steps. What's important for the hook is the name. In this case, hook_before_scenario must be the name of a handler that you want to run before each Scenario.
The available names for hook handlers are:
hook_before_scenariohook_after_scenariohook_before_featurehook_after_featurehook_before_stephook_after_step
Each hook receives a parameter in its params statement that is a property list with two properties. For Features and Scenarios, the property list includes the Feature or Scenario name and the description if there is one. For steps, the property list includes the name of the step (e.g., Given, When) as the first property and the text of the line as the second property.
For more information about SenseTalk property lists, see Property Lists.