Cross-Mobile Scripting
An Eggplant Functional (EPF) script (not including the images) can typically be used across all mobile devices with little or no modification. This is because the script simply describes the user workflow, and app creators try hard to keep this workflow consistent across all mobile devices.
Reference images can also often be re-used across different mobile devices and operating system versions, but sometimes references will have to be different for different devices. This document describes the situations in which different reference images will be required, and presents best practices for efficient cross-mobile scripting.
When Are Different Images Required?
There are three situations that typically lead to different reference images being required between two devices:
- Devices in different device families render images differently (e.g., with different smoothing effects), so different reference images are required.
- Devices in the same device family, but with different screen resolutions, will render images that include text differently. So if a reference image includes text, and two devices have different screen resolutions, then they will need to use different reference images.
- Major version changes of the operating system (OS) will often change the look-and-feel of native applications, like Settings or Messaging. So reference images related to native applications might have to be different for devices using different major OS versions.
Despite the above three situations, a huge amount of image re-use is possible, making cross-mobile scripting with Eggplant Functional very productive. For example, images for your application can typically be re-used across all OS versions within a single device family.
Device Families
Device families are sets of mobile devices that use the same basic OS and UI layer, and so render images the same way. They can re-use the same reference images unless the devices have different resolutions and the reference image includes text, or the reference image is for a native application and the devices have different major OS versions.
To make it easy to test against multiple devices and device operating systems, Eggplant Functional supports connections to Sauce Labs. Sauce Labs provides a virtual device compatibility lab so that you don't have to own the devices yourself. Click Here for more information.
The table below shows the most popular device families, further partitions these by resolution, and gives advice for re-using images.
| Family | Resolution | Devices | OS Version | Best Practice |
|---|---|---|---|---|
| Samsung Galaxy | 1080*1920 | S4, S5 | 4.1, 4.2, 4.4, 5.0, 5.1 | The same images can be used with tolerances raised slightly. Use images captured on the S5 for consistency. |
| 720*1280 | S3 | 4.1, 4.2, 4.4, 5.0, 5.1 | A single image can be captured for this device to work across all OS versions. | |
| 1440*2560 | Nexus 6 | 4.1, 4.2, 4.4, 5.0, 5.1 | The same images can be used, along with using scaling, as long as the images do not include text, where OCR can be used. Images should be captured on the Nexus 6 and scaled down for the Nexus 5. | |
| 1080*1920 | Nexus 5 | 4.1, 4.2, 4.4, 5.0, 5.1 | same as above | |
| iPad | 1536*2048 | Mini, 3, Air, Air 2 | 8.1, 8.2, 8.3, 8.4 | The same images can be used with tolerances raised slightly. Use images captured on the Air 2 for consistency. |
| iPhone | 1080*1920 | 6 Plus | 8.1, 8.2, 8.3, 8.4 | The same images can be used, along with using scaling, as long as the images do not include text, where OCR can be used. Images should be captured on the iPhone 6 Plus and scaled down for the iPhone 6. |
| 1334*750 | 6 | 8.1, 8.2, 8.3, 8.4 | same as above | |
| 640*1136 | 5S, 5, 4S | 8.1, 8.2, 8.3, 8.4 | The same images can be used with tolerances raised slightly. Use images captured on the 5S for consistency. |
Note again the huge amount of image re-use which is possible. Not only can you use the same images for all devices within a device family, you can also use the same images across all OS versions. This means that with just 8 reference images as shown above, you can cover 61 different combinations of device and OS version.
Best Practices for Cross-Platform Scripting
The remainder of this document presents best practices for efficient cross-mobile scripting:
- Use text searches (OCR) and search rectangles.
- Store images for each stream of devices in a separate suite.
- Separate out core code from OS-specific code.
- Run an environment setup script at the start of every test.
- Create a naming convention for devices.
- Create tests using the core code in a separate suite.
Use Text Searches (OCR) and Search Rectangles
One of the first things to do is start by using OCR. The OCR engine inside Eggplant Functional is independent of resolution, text size and color, so if any of these three things is different across your devices then you wont even need to re-capture any images.
To maximize the reliability and increase the speed of execution of the OCR, set the search rectangle around the area where you know the text is going to be. Below is some example code that sets the search rectangle in proportion to the resolution of the device, so the same code can be used among multiple mobile devices. Item 1 is referring to the x-coordinate and item 2 is referring to the y-coordinate.
set ScreenSize to the screensize of connectioninfo()
set the searchrectangle to (0,0.5* item 2 of ScreenSize,item 1 of screensize,item 2 of screensize)
If you know you are going to want to set lots of different rectangles throughout your test, use the code below, which allows you to easily set the rectangle to any area of the screen that you choose:
params TLx,TLy,BRx,BRy -- Values are between 0 and 1 and represent the proportion you want to go in the x and y direction for the top left and bottom right coordinates.
set the searchrectangle to (TLx * ConnectionInfo().ScreenSize.x,TLy * ConnectionInfo().ScreenSize.y, BRx * ConnectionInfo().ScreenSize.x, BRy * ConnectionInfo().ScreenSize.y)
You can also write it as a function so that you can use the search rectangle as part of other functions. Example code for the function below:
//Script called ScreenPart
params TLx,TLy,BRx,BRy -- Values are between 0 and 1 and represent the proportion you want to go in the x and y direction for the top left and bottom right coordinates.
return (TLx * ConnectionInfo().ScreenSize.x,TLy * ConnectionInfo().ScreenSize.y, BRx * ConnectionInfo().ScreenSize.x, BRy * ConnectionInfo().ScreenSize.y)
Example code to call the function is below:
Set the searchrectangle to ScreenPart( 0,0,1,1)
Moveto (Text:"Clock",searchrectangle:ScreenPart(0,0,0.5,0.5)) // This will only search the top left quarter of the screen
With the different screen sizes and resolutions of mobile, each mobile device has its own DPI and as such, you should set the DPI to the DPI of the device you are connected to to help increase the reliability of the OCR. You can do this by having a property list that sets the DPI depending on what device you are connecting to. Some example code is below:
//This code would be run at the very start of your test to set the DPI
set DeviceDPI to (iPhone_6S_91:"401","Galaxy_S6_51":"577")
set the readTextSettings to (DPI:DeviceDPI.(DeviceName))
The readTextSettings is a property list of the default settings used for the ReadText() and ReadTable() functions. After the above code sets the DPI, write your OCR code as usual. The following example uses the ReadText() function.
put (Readtext(0,0,1,1))
It might be that different screens and text work better with the DPI set and others with it not, so it is worth playing around to see what works best on each screen.
Store Images for Separate Streams of Devices in Separate Suites
As described in the above table, there will be cases where images do need to be re-captured for devices and the best way to organize these is to store the images for each stream in a separate suite and then set the InitialSuites which tells the script which suite to go and look for images in. This makes it easy to add new devices to a test set, by just capturing the images for that device, if they need to be captured at all. This also means that the images will have the same names within each suite. Some example code is given below:
set the initialsuites to "Path/To/My/Galaxy_S5_51/Images/Suite"
click "AppIcon"
set the initialsuites to "Path/To/My/iPhone_6S_91/Images/Suite"
click "AppIcon"
So, within both my Galaxy S6 suite and my iPhone 6S suite, the app icon for each device is called the same thing, AppIcon. This makes it really simple to go and add new images for a device; you just open up a suite, and capture all the images with the same name as you have in another suite, and then that device is ready to be tested.
Separate Core Code from OS-Specific Code
The vast majority of code will be able to be used across both iOS and Android, but there will be times when there are slight differences in the way that things work across iOS and Android. In a similar way to how we separate out images for iOS and Android, we should also separate out code when needed too, and use initial suites. This means that when we can use the exact same code for iOS and Android from the perspective of creating the test. Some example code is below, where I have also set the initial suites to our relevant image suite too.
Android:
set the initialsuites to ("Path/To/My/AndroidCode/suite", "Path/To/My/Galaxy_S5_51/Images/Suite")
click "AppIcon"
TurnOffWifi
iOS:
set the initialsuites to ("Path/To/My/iOSCode/suite", "Path/To/My/iPhone_6S_91/Images/Suite")
Click "AppIcon"
TurnOffWifi
Now, you will also want to have the first suite that Eggplant Functional checks in for code to be your core code suite, and if the function cannot be found in there then Eggplant Functional looks in the specific OS code suite. So, your code would like the below:
set the initialsuites to ("Path/To/Core/CodeSuite", "Path/To/My/AndroidCode/suite", "Path/To/My/Galaxy_S5_51/Images/Suite")
click "AppIcon"
VerifyPrice // This is within the core code suite
TurnOffWifi // This is within the OS-specific code suite
set the initialsuites to ("Path/To/Core/CodeSuite", "Path/To/My/iOSCode/suite", "Path/To/My/iPhone_6S_91/Images/Suite")
Click "AppIcon"
VerifyPrice
TurnOffWifi
Run an Environment Setup Script at the Start of Every Test
As we have gone through this document, you will notice that we have been setting quite a few parameters including the DPI, initial suites and as part of initial suites we are setting the OS specific code to iOS or Android. All of this code should be placed in a script that gets run before every test to set the environment up. Now, to make everything simpler, you should have the core code suite, the OS specific code suites, the device image suites and the environment setup suite stored in the same folder. This makes it easy to go and have everything set up and initialized. Your environment setup should look something like below. In this, we determine the path to the suites using the relative path of where the suite is, so even if the suites move, the code will still work.
set DeviceName to the name of connectioninfo()
set SuitePath to the folder of the folder of the folder of me

set DeviceDPI to (iPhone_6S_91:"401","Galaxy_S6_51":"577")
set the readTextSettings to (DPI:DeviceDPI.(DeviceName))

put (iPhone_6S_91:"iOS","Galaxy_S6_51":"Android") into DeviceOSList //Define which OS a device is to pick the correct device specific functions
set DeviceOS to DeviceOSList.(DeviceName)

put (iPhone_6S_91:"iPhone_6S","Galaxy_S6_51":"Galaxy_S6") into DeviceSuiteList //Define what suite of images a device should use
set DeviceSuite to DeviceSuiteList.(DeviceName)

//Set up path to core functions, OS functions and device images
set the initialsuites to (SuitePath & "Asset_" & DeviceSuite & "_Images.suite" ,SuitePath & "Asset_" & "Core_Functions.suite",SuitePath & "Asset_" & DeviceOS & "_Functions" & ".suite")
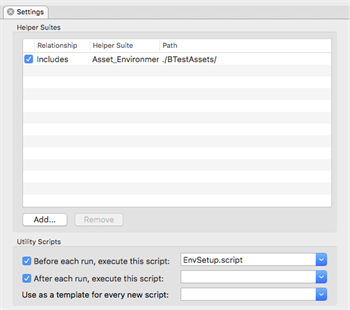
Now, we need to have the environment set up script run before each test we run. The easiest way to do this is to add the environment set up suite as a helper suite to all of your image and code suites. Then, you can have the environment setup script run before any script/image in that suite is picked. Below is in image showing where you can add the Helper suite and have the environment setup script run:

Add the helper suite
You can also set up your Helper suites using relative paths, so that if you happen to move your suites to a different paths, the helper suite paths are still valid. Information on how to do this can be found here.
Create a Naming Convention for Devices
To be able to determine what device we are connected to, the best thing to do is create a good naming convention for your device. This should take the following format: DeviceStream_DeviceModel_OperatingSystemVersion. This makes it simple for Eggplant Functional to determine what device we are connected to and then set up the environment accordingly. A few examples are given below:
iPhone_6S_91, where iPhone is the device stream, 6S is the model, and 9.1 is the version of iOS.
Galaxy_S6_51, where Galaxy is the device stream, S6 is the model, and 5.1 is the version of Android.
Create Tests in a Separate Suite
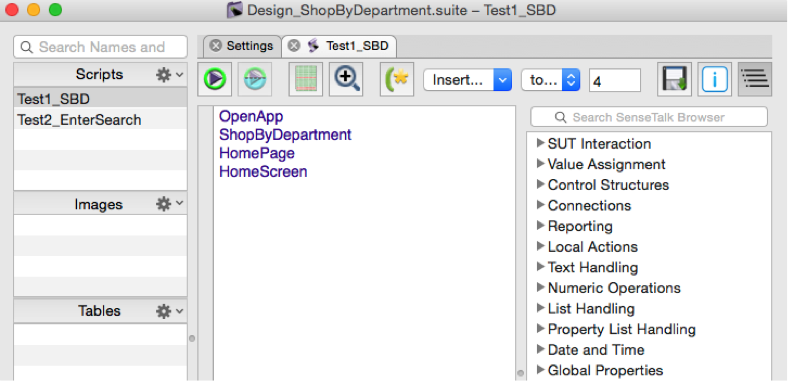
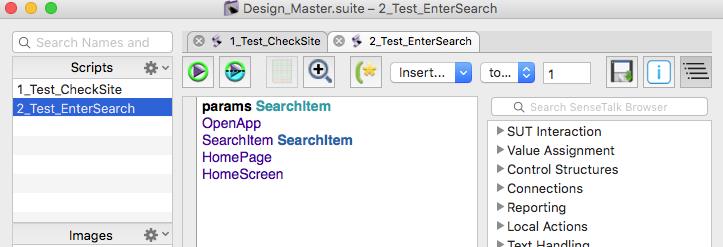
Now, you should create all of your tests from all of the core code which you have written in a separate suite. This makes maintenance easier in the future, and allows for the greatest re-use of code amongst large teams. For each test design suite that you make, you should add the environment setup suite as a helper suite, to set up all of the code paths. Your test design suites should then look quite flat, whereby you are just ordering the core functions you have written in the way you want. A few examples are shown below:

Test design example 1

Test design example 2