Creating Your First SUT Connection in Eggplant Functional
The simplest way to start testing with Eggplant Functional (EPF), is to set up a Windows machine to be both the Eggplant host machine and the SUT in "a single system model." This is the Eggplant setup described on the Getting Started with Eggplant Functional page.
While the single-system model is the simpler configuration, automated testing with Eggplant Functional was designed to work in a two-system model. This means that Eggplant Functional runs on one computer, and it can connect to any number of other computers or devices that have the systems or applications you want to test. The systems in a two-system model are as follows:
-
Eggplant machine: (sometimes called "the Eggplant controller machine") The system where you install and run Eggplant Functional. The Eggplant machine is where you have everything you need to run your test, such as the scripts and associated images. For detailed information about the systems where you can run Eggplant Functional, see the Prerequisites page
-
The system under test (SUT): The second system where the application you want to test is running. The SUT can be a wide variety of systems, including desktop machines, virtual machines, mobile devices, or even point-of-sale (POS) and Human Machine Interface (HMI) systems. To learn about the other types of SUTs you might use, see Connecting to SUTs. For information about prerequisites for SUTs, see System Under Test (SUT) Recommendations and Requirements.
Instructions for setting up your first SUT follow.
-
If you are running Eggplant Functional on Windows, you can use the single-system model to get started as described in Your First SUT Connection on Windows below.
-
If you are running Eggplant Functional on Mac or linux, we'll show you how to create VNC and RDP connections to a Windows SUT in Your First Connection on Mac or Linux below. The VNC and RDP connection types described below are for running Eggplant Functional in a two-system model. See Eggplant Functional Connection Types: VNC vs. RDP for information about these two connection types.
Using the Connection List
Eggplant Functional provides the the Connection List window for you to view and manage your connections. The Connection List is where you create and edit your connections. After you create and save your first connection, you can see it in the Connection List and view information about it, such as whether or not it is connected to a SUT. See Connection List for more information using the Connection List.
To open the Connection List, launch Eggplant Functional and choose Connection > Connection List from main Eggplant Functional menu.
When you create and save a connection using the Connection List, the connection is saved in your Eggplant Preferences. It will remain in your Connection List until you remove it. Connections you create this way are called "saved" or "permanent" connections. They will persist after you quit and restart Eggplant Functional.
Eggplant Functional also supports "temporary" connections. Temporary connections are connections that you create using the SenseTalk connect command during your script runs. These connections are not saved in your Preferences and do not persist when you quit and restart Eggplant Functional. See The Connect Command for information about using the connect command.
Your First Connection on Windows
The simplest way to start testing with Eggplant Functional, is to set up a Windows machine to be both the Eggplant machine and the SUT in the single system model configuration. This is the Eggplant setup described on the on the Getting Started with Eggplant Functional page.
Step by Step: Adding a Single System Connection on Windows
As mentioned above, this simpler single-system setup is described in Step by Step: Setting Up Eggplant Functional on the Getting Started page.
Your First Connection on Mac or Linux
The following instructions describe running Eggplant Functional on Mac or linux in a two-system model, where Eggplant Functional runs on a separate machine from the SUT. We'll show you how to create VNC and RDP connections to a Windows SUT. See Eggplant Functional Connection Types: VNC vs. RDP for information about these two connection types.
The following instructions assume you already installed Eggplant Functional on Mac or linux. See Installing Eggplant Functional for information about installing if you have not installed Eggplant Functional yet.
When you have your Eggplant machine and SUT systems set up, you can use the Connection List in Eggplant Functional to create a connection between them to begin your automated testing. Follow the instructions below to create your first SUT connection.
Step by Step: Adding a VNC Connection
-
Install and run a VNC Server on your SUT, such as UltraVNC. Note that if you configure your VNC Server to require a username and password, you will need to provide that username and password in your VNC connection in Eggplant Functional.
-
In Eggplant Functional on the Eggplant machine, open the Connection List by going to Connection > Connection List from the main menu. When no connections have been added, the Connection List looks like the sample window below:
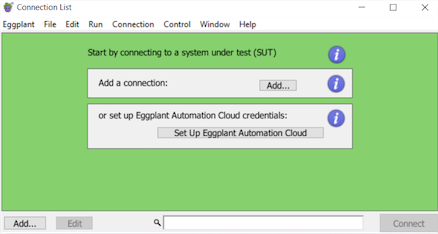
The Eggplant Functional Connection List when no connections have been added
-
Click Add to open the New Connection panel. You can use the Add button at the bottom of the Connection List window or in the Add a connection section. When the New Connection panel opens, you see that VNC Automatic is selected in the Connection Type drop-down menu by default. This setting is appropriate for most VNC connections.
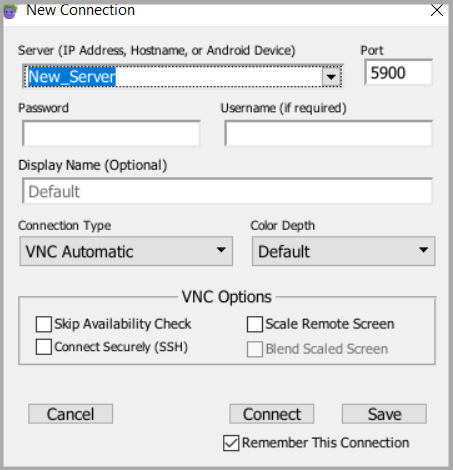
The New Connection dialog box for creating a VNC SUT connection in Eggplant Functional
-
Enter the IP address or hostname of the SUT in the Server (IP Address, Hostname, or Android Device) field. For VNC connections, the port is set to 5900 by default. You can change the value in the Port field if necessary.
-
Enter the Password and Username, if required. For VNC connections, these fields refer to the values for the VNC server on the SUT.
-
Enter a name for the connection in the Display Name field. Although this field is optional, it's useful to have descriptive text to identify the connection. If you don’t enter a display name, the value from the Server field is used as the name in the Connection List.
tipYou can use the display name in your SenseTalk scripts with the
Connectcommand to open specific connections and take advantage of the connection details you've defined. Therefore, as a best practice, consider keeping the display name short and memorable. -
Click Save to save the connection definition to the Connection List. You can set or change other connection options before you save, but for your first connection, the default settings should be fine.
The new connection is added to the Connection List, which now appears in the list as shown in the sample screen below:
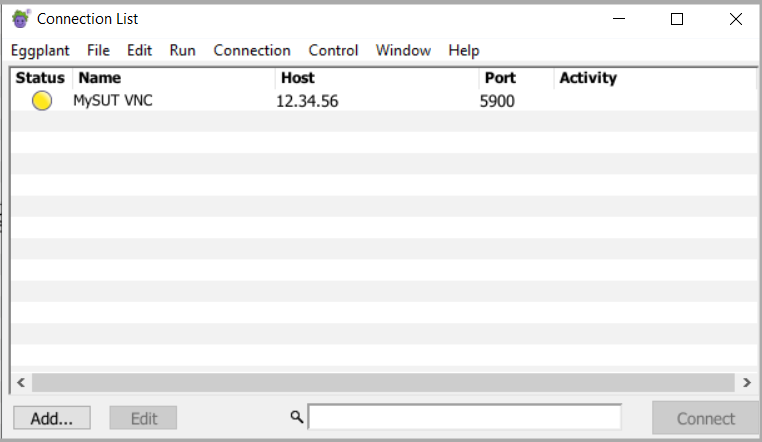
The Eggplant Functional Connection List with a defined VNC connection
Continue to Connecting to Your SUT for using your newly created VNC connection.
Step by Step: Adding an RDP Connection
-
Enable remote access on your SUT machine. For example, enable Remote Desktop on Windows.
-
In Eggplant Functional on the Eggplant machine, open the Connection List by going to Connection > Connection List from the main menu. If you haven’t added connections to the Connection List, the window should look like following sample window:
The Eggplant Functional Connection List when no connections have been added
-
Click Add to open the New Connection panel. You can use the Add button at the bottom of the window or in the Add a connection section.
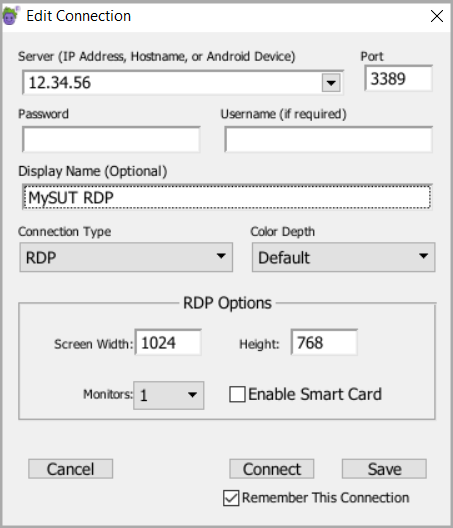
The New Connection dialog box for creating an RDP SUT connection in Eggplant Functional
-
In the Connection Type drop-down menu, select RDP to create an RDP connection.
-
Enter the IP address or hostname of the SUT in the Server (IP Address, Hostname, or Android Device) field. For RDP connections, the port is set to 3389 by default. You can change the value in the Port field if necessary.
-
Enter the Password and Username. For RDP connections, these are the Windows user account credentials for your SUT. This information is always required for RDP connections.
-
Enter a name for the connection in the Display Name field. Although this field is optional, it is useful to have descriptive text to identify the connection. If you do not enter a display name, the value from the Server field is used as the name in the Connection List.
tipYou can use the display name in your SenseTalk scripts with the
Connectcommand to open specific connections and take advantage of the connection details you've defined. Therefore, as a best practice, consider keeping the display name short and memorable. -
Click Save to save the connection definition to the Connection List. You can set or change other connection options before you save, but for your first connection, the default settings should be fine.
The new connection is added to the Connection List, which now appears in the list as shown in the sample panel below:
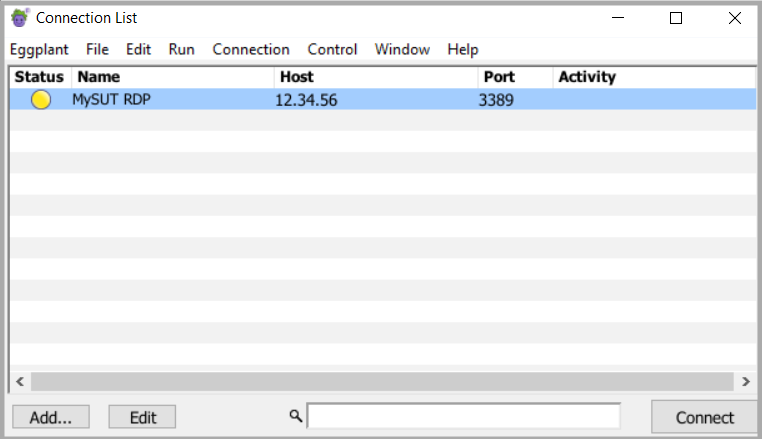
The Eggplant Functional Connection List with a defined RDP connection
Continue to Connecting to Your SUT for using your newly created RDP connection.
Connecting to Your SUT
After you define connections in the Connection List, you can use those connections to connect to your SUTs from this window as well.
To open a connection you can:
- Select the connection in the list, then click Connect
- Double-click the connection in the list
While Eggplant Functional makes the connection, the Activity column updates with information to indicate progress, and the colored dot in the Status column changes as well.
When the connection is established, the Eggplant Functional Viewer window opens showing the SUT desktop as shown below:
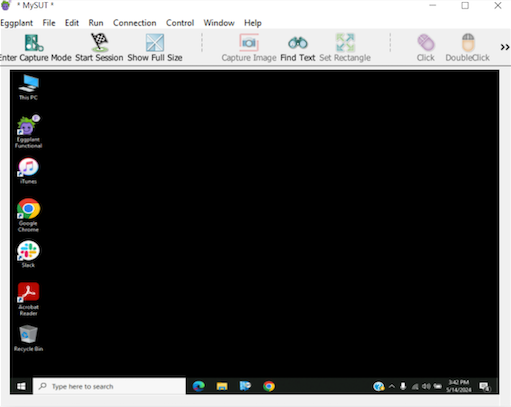
The Eggplant Functional Viewer Window Connected to a Windows SUT
You are now ready to start testing!
You can also use the Connect command in SenseTalk with the display name of a connection to take advantage of the defined details for a SUT. The following code line shows how you would connect to the RDP SUT defined above:
Connect "Windows2RDP"
To find our more about using this command, visit the Connect Command.