The Suite Window
The Suite window is where you manage scripts, images, and test run results within Eggplant Functional (EPF). It's the control hub for all of your testing operations.
Opening a New Suite
Before you can create any scripts, you must first create a suite. To create a suite, open Eggplant Functional and choose File > New Suite. A prompt opens for you to specify the location where you want to save the suite. After you've chosen the location, the new Suite window opens, showing the Guide tab.
On Mac and Linux, if a suite folder is locked in your file system, a lock icon appears in the top left corner of the Suite window. When a suite is locked, you can't add, remove, or edit any script resources. You can still run scripts, but run data isn't saved.
If you already have suites, you can choose File > Open Suite and select the suite you want. When you're working with multiple suites, you must open a separate Suite window for each one.
The Suite Window Panes
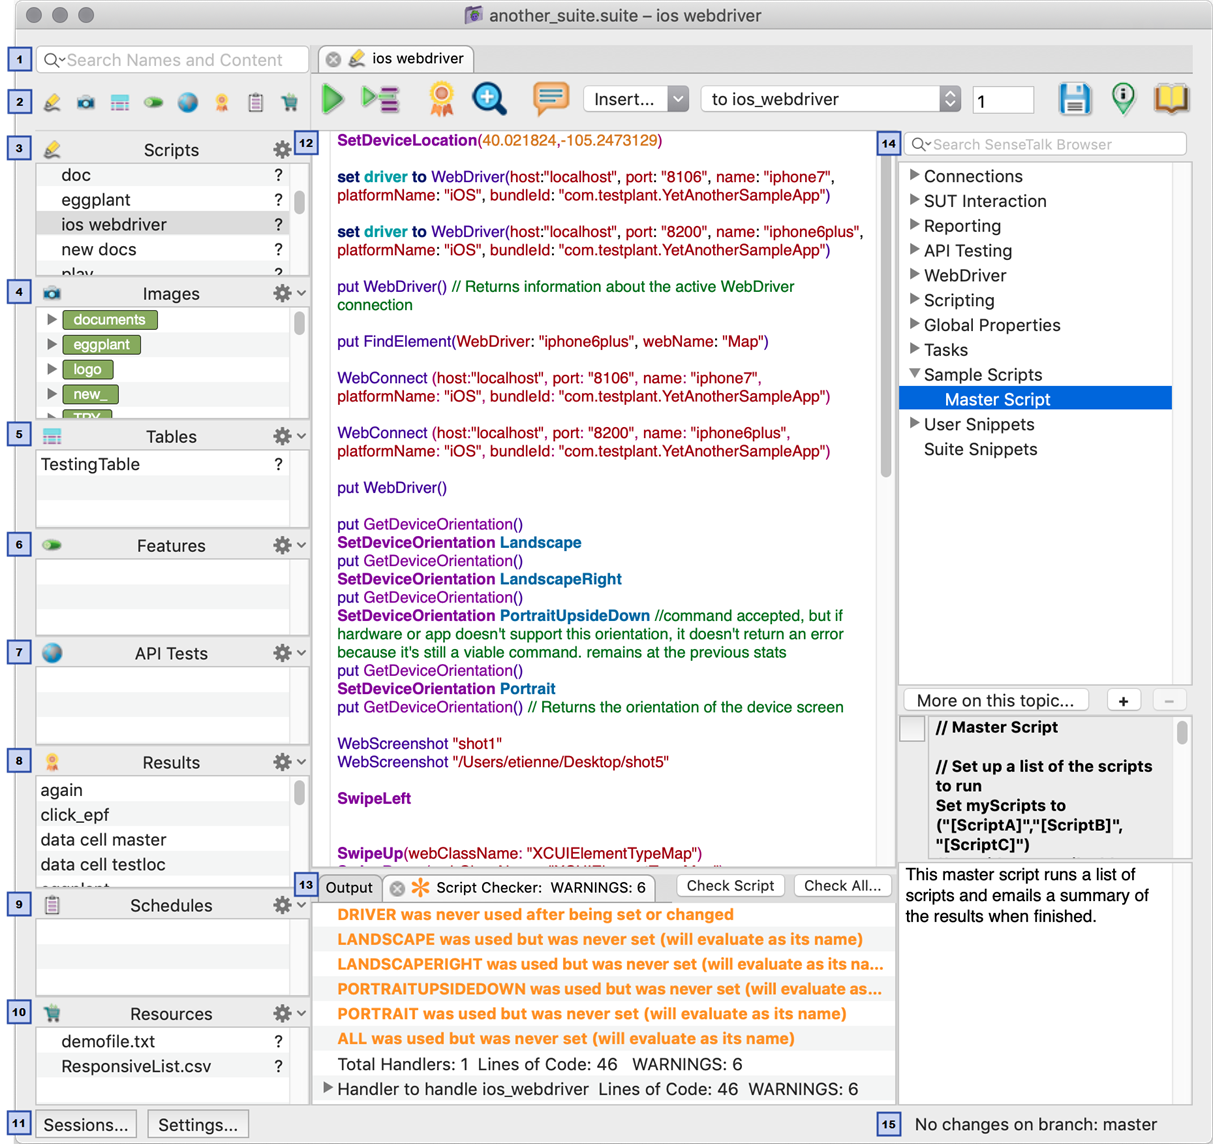
The Suite window contains several panes. When you open a suite, you see the objects contained in the suite listed in these panes. When you select a specific object, the context of the Suite window changes depending on the object you select. For example, if you select a script, the Script Editor opens in the center pane.
A brief description of each pane follows:
-
Search field: To search for a particular object in your suite, type part of an object name or text here. For more information about using the search filter, see Using the Search Filter below.
-
Assets Toggle Bar: Use these icons to turn off or on the panes in the left sidebar. This toggle affects visibility of the pane only; any objects associated with a pane are not affected by turning the pane off or on. You might use this feature to turn off those sections of the sidebar that you aren't currently using so that other sections have more space.
-
Scripts: This pane lists all the scripts in the suite, and can include scripts in attached helper suites. If you select a script, the Script Editor opens your script in the center pane so that you can edit your test scripts. For more information about writing and editing scripts in Eggplant Functional, see the Script Editor.
-
Images: This pane lists all of the images in the suite, and can include images in attached helper suites. If you select an image, the Image Viewer opens in the center pane so that you can work with the image. For more information, see the Images Pane.
-
Tables: This pane lists any tables defined in the suite. When you select a table, the table opens in the center pane. For information about using this pane, see the Tables Pane and Keyword-Driven Testing.
-
Features: This pane lists any Gherkin tests (known as
feature filesorfeatures) in the suite. For more information on Gherkin tests, see Using Gherkin in Eggplant Functional for Behavior-Driven Development. -
API Tests: This pane lists any API tests defined in the suite. For more information on API testing, see API Testing in Eggplant Functional.
-
Results: This pane lists the tests in the suite. If you select a test, the main suite window displays statistics for each time the test was run. For more information, see the Results Pane.
noteYou can see more detailed results using Eggplant Manager.
-
Schedules: This pane lists any test schedules defined in the suite. If you select a schedule, the schedule displays in the main suite window. For more information, see the Schedules Pane.
-
Resources: This pane lists any other files that were added to the suite. For example, you might see .csv files for table-driven tests in this pane. If you select a file, Eggplant Functional can open it with an application that has been associated with its file type. For example, if you have data in a text file with a .txt extension, Eggplant Functional can open it with Notepad.exe on Windows. For more information, see the Resources Pane.
-
Sessions and Settings buttons: These open the Sessions and Settings tabs, respectively. You can generate scripts from Autoscan, Character Collection, Rapid Image Capture, and Turbo sessions from the Sessions tab. Add helper suites, utility scripts, suite variables, and more in the Settings tab.
-
Center pane: This pane is context-sensitive. If you select a script, the Script Editor opens here. If you select an image, the Image Viewer opens here.
-
Output/Script Checker pane: In Output context, this pane shows the results of your script—the same results you can see in the Run window. In Script Checker context, this pane shows the results of static script analysis.
-
SenseTalk Browser: The SenseTalk Browser pane is part of the Script Editor. Thus, you only see it when you are using the Script Editor. The SenseTalk Browser is a quick-reference tool for the SenseTalk programming language. You can use it to drag and drop code directly into your scripts. For information, see the SenseTalk Browser.
-
Source Control Status: If your suite is under source control, the status of any changes displays here. If your suite is not under source control, nothing displays here.
Using the Search Filter
The Suite window includes a suite-wide search filter in the left sidebar that you can use to find images, scripts, or even specific code within scripts. To search for a particular object or keyword in your suite, begin typing in the search field. The search works as you type, so you might find your results before you finish entering your search term.
The search function searches all the content in the left sidebar simultaneously, filtering to show only those items that contain your search string. Your search keywords are matched against elements in any of the panes, which means you could see results that include scripts, images, results, and other elements. To exclude results from a specific pane, you can turn off that pane by clicking its icon on the Assets Toggle Bar.
The default search looks both at item names (titles) as well as the actual contents. For example, if you search for an image by its name, the filtered results in the suite would show the image in the Images pane and it would show any scripts in the Scripts pane that reference that image.
You can limit searches to the titles of element or to contents. Click the magnifying glass beside the search field, then choose Search All (default), Search Names, or Search Contents from the drop-down list. If you have searches that you frequently repeat, you can save your search as an item in the Search History by pressing Return after you type the term. Your search is saved on the drop-down list under the magnifying glass.
Using the Search Controls
When you begin typing in the search field, the search controls appear below the search field:

Use the search control area to scroll through found instances of your search keywords as well as to replace the found search term in scripts or Gherkin feature files. Note that if you have selected the Search Names filter option, these controls are not available.
Use the right or left arrow keys to step through found instances of the search term within contents in your suite. When you click the arrow button, the search term is highlighted in the script or feature file in the center pane. If the search term is found in any other type of content, such as Tables or Results, the appropriate tab opens, but no content is highlighted.
You can continue clicking through each additional found instance, and the Suite window opens tabs (in preview mode, if the tab is not already open) where the search term is found. Keep in mind that the arrow buttons will not step through instances of the search term that are found in the names of scripts, images, and so forth.
To replace a found term with something else, type the replacement text in the empty field beneath the search field, then click Replace to replace the current found instance, or click All to replace all found instances. Keep in mind the following traits of the replace function:
- The replace function works only in script and feature file contents.
- The replace function is case-sensitive; that is, text is replaced exactly as you type it in the replace field. (Note that search is
notcase-sensitive, so search results include the search term without respect to case.) - Replace cannot be used in names/titles of suite elements.
- If you have helper suites and have chosen to have them show in the current suite's Scripts pane or Images pane, the replace function replaces instances found in those helper suites as well. (If you have helper suites but the contents of those suites are not displayed in the sidebar panes, then they are not found in searches or available for the replace function.)
Using the replace All function replaces the found term in all scripts and feature files in the suite, including scripts and feature files that are not open. If you have attached helper suite content displayed in the Scripts pane, matches in those suites are replaced as well. When you use the All function, a confirmation warns you that you can't undo the action. All changes from the replace All function are saved automatically.