Using Compare Screen in Eggplant Functional for UI Testing
The compare screen feature in Eggplant Functional (EPF) detects changes to the layout or appearance of a screen or window in your application. This feature can alert you to changes that might affect the usability of the application or its compliance with your company's visual guidelines.
Compare screen can also alert you about new or missing elements, which can indicate a need to add, change, or remove some of your functional tests. Compare screen does not test the functionality of your application or interact with it in any way.
Compare Screen Basics
Eggplant Functional’s UI verification feature is based on the SenseTalk CompareScreen command, which compares the current SUT screen against a baseline image. Typically, you would use this command at a point in your script just after an action has caused a transition to a new screen or window of your application under test—in other words, as soon as you display a new screen that you want to verify for layout variation.
If the comparison shows that there are differences between the original image and the current state of the screen, you can decide whether those changes are significant and should be followed up on, or if they are expected or acceptable changes that should be ignored in future comparisons. The comparison looks for:
- New elements: anything that is on the current screen but not on the baseline image
- Missing elements: anything that was on the baseline image but is not on the current screen
- Moved elements: anything that is in a different location on the current screen from its original location in the baseline image
- Changed elements: anything that shows significant difference in color or other properties between the baseline and current state
- Screen changes: any non-specific change that wasn't identified as one of the other types
The comparison takes advantage of OCR, so it reports differences in each of these categories for text changes as well as change to images.
Using the CompareScreen Command
The CompareScreen command can be used in your SenseTalk scripts wherever you want to do a UI comparison. The command takes an image name as a required parameter, which is the baseline image for the comparison.
CompareScreen can also be called as a function. For information about using CompareScreen as a function, see CompareScreen Command or Function.
By default, CompareScreen captures the entire SUT screen. However, for desktop applications, you typically want to compare only the contents of a single window instead of the entire screen. Therefore, you can pass an optional rectangle parameter so that you capture only a part of the screen, such as a specific application window. You use the rectangle (or rect) parameter name and can define the rectangle either with coordinates or with images specifying two opposite corners:
CompareScreen name: "tutorialSut_menu", rectangle: (22,575,415,640)
CompareScreen "calcHist", rect:("Calculator_A","Calculator_B")
See The Set Rectangle and Generate Code Dialog Box for information about defining rectangles in SenseTalk.
As a best practice, we recommend that you specify a rectangle to focus your comparison on the application window or area of the screen of interest. You can perform full-screen comparisons when that is appropriate. However, you will see the best performance by constraining the comparison to only what matters to your testing.
When CompareScreen is executed, the script locates the baseline image in the special [Baseline_Screens] folder within the Images folder of the suite (or in an active helper suite). If no image by that name is found, an initial baseline image is captured and stored automatically, then the script proceeds without any further action.
The [Baseline_Screens] folder is created automatically the first time you run CompareScreen in a suite. You do not need to create this folder yourself.
If an existing baseline image is present, that image is compared to the current SUT screen (or to the specified rectangle of the SUT screen). The comparison is performed using the search criteria (e.g., search type, tolerance) of the baseline image. Note that you can open the baseline image from the Images pane of the suite and adjust these properties if desired, which will affect future comparisons.
The behavior following the comparison is controlled by the Compare Screen Action mode, described below. Typically, when differences are detected, you can allow the Compare Screen panel to open so that you can review the changes and determine whether to take further action.
For more information about CompareScreen in SenseTalk, including code examples, see CompareScreen Command or Function.
Compare Screen Action Mode
You can control the behavior of the Compare Screen panel by setting the Compare Screen Action mode. By default, the Compare Screen panel opens during a script run when differences are detected, but you can change that behavior so that you can review differences after the script run instead. Other modes might be useful for running your scripts unattended as well.
You can change the Compare Screen Action mode on the Run menu in Eggplant Functional (Run > Compare Screen) or by using the CompareScreenAction global property. The Compare Screen Action mode can be set to:
- Show Panel: If a screen difference is detected, the Compare Screen panel opens.
- Log Warning: If a screen difference is detected, a warning message is entered in the log.
- Log Error: If a screen difference is detected, an error message is entered in the log.
- Show Panel Always: The Compare Screen panel opens with every
CompareScreencommand, regardless of whether any screen difference is detected.
You can also change this setting by using the pop-up menu on the Run window. However, you need to customize the toolbar to add that option. Right-click the Run window toolbar, then select Customize Toolbar. Drag and drop the Compare Screen option to where you want it to appear on the toolbar, then click Done.
When you call CompareScreen as a function, the setting of the Compare Screen Action mode is ignored. The Compare Screen panel is never displayed. Information about differences is returned by the function as a list of property lists. If no significant differences are found, the function returns an empty list.
Reviewing Differences in the Compare Screen Panel
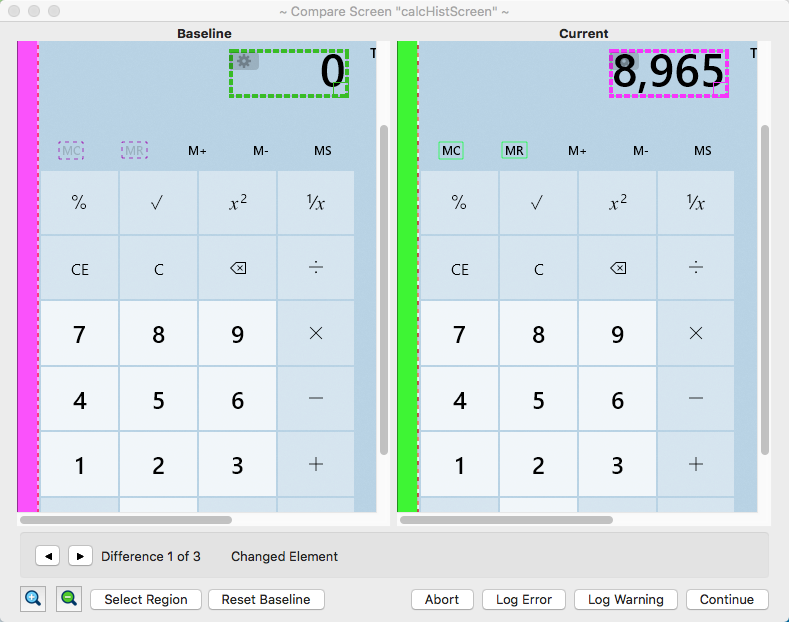
When a CompareScreen command detects a difference between the baseline image and the current SUT screen, the Compare Screen panel opens if the Compare Screen Action is set to Show Panel (or Show Panel Always). The panel shows the baseline image and the corresponding region of the current SUT screen side-by-side for comparison.
A detailed analysis of the differences between the two images is performed to identify regions or elements that have changed, then boxes are drawn around areas of the screen where differences are detected. You can use the arrow buttons at the bottom left to scroll through each detected difference and determine whether the change is significant to your testing.

The Compare Screen panel
Reviewing Differences
When the Compare Screen panel opens, the first detected difference is selected on both the baseline image (left) and current SUT screen (right). The message beside the scroll arrows beneath the images tells you what type of difference was detected for the selected region.
Rectangles are drawn around regions as follows:
-
A solid line indicates a region where an element was detected on the screen.
-
A dashed line indicates a region where an element was detected on the other screen.
-
When a rectangle is selected, that rectangle is shown using a heavier dashed rectangle in a color different from the other highlighted rectangles.
-
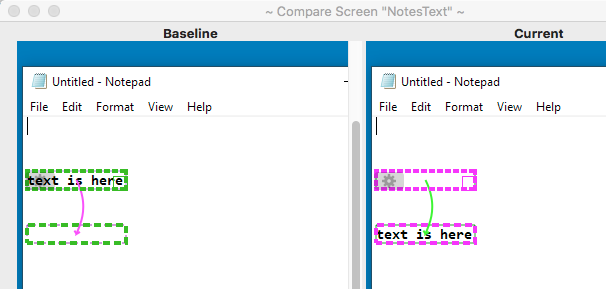
When an element on the baseline screen was moved to a different location on the current screen, rectangles are drawn around both the original and destination locations. When that difference is selected, an arrow is drawn from the source to the destination locations to highlight the move.

Moved text displayed in the Compare Screen panel in Eggplant Functional
The color of the selected rectangle is a contrast color to the background color for the image, and the other rectangles match the background color. You can change these colors by clicking anywhere outside a rectangle. The colors are intended to provide options for contrast to the screens you’re testing.
If the baseline image and the current screen are very different, the comparison feature draws rectangles around the entire screen or a large portion of it, on both the baseline and current screen, and reports a change type of Screen Changed. This status can be a result of large color shifts, a screen size change, or similar large layout variation. You can still review individual changes, but you might need to capture a new baseline image after you determine the cause of the change.
Use the arrow buttons to cycle through the detected differences and review each one to determine the appropriate action. Each time you click the forward or back arrow, the selected rectangles in the images above change to the new region, and the message updates to show the change type.
You can change the magnification of the image by using the Zoom In and Zoom Out buttons at the bottom left of the panel. When the screen images are zoomed in to high levels of magnification, the individual pixels that are different are also highlighted.
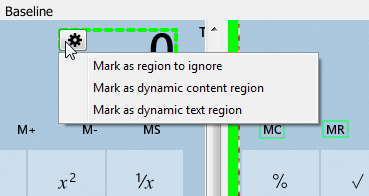
When you need to take action on a region, click the gear icon at the top-left corner of its rectangle. Your options for each region are:

The gear icon provides choices for how to treat differences
- Mark as region to ignore: Use this option to mask out this region on the baseline image so that it is not used in future comparisons. This option is useful for regions that are not important to your testing. For instance, if your baseline image includes a clock, you might want to ignore that region because the time will be different every time you run your test.
- Mark as dynamic content region: Use this option to mark a region as required while the specific content that appears in the region can change. When you use this option, the comparison verifies that something appears in the region, and shows a difference if nothing is there or if the region has moved. Use this option when you know that something must appear in a location, but the specific content can vary—for instance, a banner ad on a website.
- Mark as dynamic text region: Use this option to mark a region as required while the specific content that appears in the region can change, and must be text. A dynamic text region relies on OCR to verify that text is present. Otherwise, these regions operate similarly to dynamic content regions. Use this option when you have a region where text must appear but the specific text can vary.
You can remove any previously defined region by selecting it, then choosing Remove this region from the gear menu.
Adding Your Own Regions
In addition to the differences detected by the comparison, you might want to add your own regions to ignore or treat as dynamic. To create your own region:
-
Click the Select Region button on the left below the images. A new rectangle appears in the center of both screens.
-
Drag the rectangle from its center to the location where you want to add a region. Note that the rectangle on both the baseline and current screen move simultaneously.
-
Resize the rectangle as appropriate by dragging from the lower-right corner until you have masked the appropriate region of the image.
-
Click the gear icon on the rectangle's upper-left corner, then select the type of region you want to define. Your choices are the same as for the automatically detected regions:
- Mark as region to ignore
- Mark as dynamic content region
- Mark as dynamic text region
Creating a New Baseline Image
If your UI has changed significantly, you might decide that you need to create a new baseline image for future comparisons. You can create a new baseline from the Compare Screen panel by clicking the Reset Baseline button on the left below the images. You will see a confirmation dialog box warning that you are replacing your baseline image with the current SUT screen.
When you create a new baseline image with this method, any ignored or dynamic regions stay in place. Therefore, if those regions no longer apply to your new layout, you need to edit or remove them from the new baseline image.
Creating a new baseline image with this method creates an image of the same size as the original. If your UI has changed size, or the size of the region you're interested in testing has changed, you will need to use a CompareScreen command with a new image name to capture a new baseline image of the appropriate region.
Continuing the Script Run
After you review the comparison, you can continue with the script run, whether you took action or not. Use the buttons at the bottom right of the Compare Screen panel to determine how to proceed:
- Abort: This option aborts the script run without proceeding. An error is entered in the log before the script ends, allowing detected differences to be reviewed afterward on the Results pane.
- Log Error: Use this option to log an error, which will cause the script to fail. Any differences detected are available to review after the script run on the Results pane.
- Log Warning: This option logs a warning about the differences, and lets the script run proceed. Any differences detected are available to review after the script run on the Results pane.
- Continue: Use this option to proceed with the script run without creating an error or warning. Note that if you use this option, detected differences are not available for review afterward.
Important: Any changes you make on the Compare Screen panel persist, including adding or removing regions or creating a new baseline image, regardless of how you choose to proceed with the script run.
Reviewing Differences After a Script Run
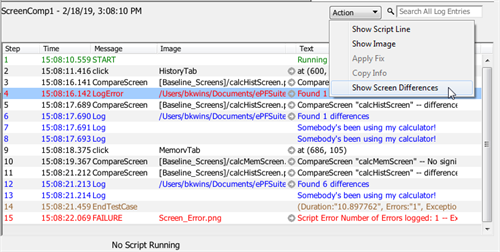
You can open the Compare Screen panel after a script run by going to the Results pane and selecting the results for the specific script. Note that this option is available only if you logged an error or warning for the comparison.
Select the results for the script run that have an error or warning logged. On the Action menu above the detailed log, select Show Screen Differences.

Opening the Compare Screen panel from script results
The first CompareScreen log entry is located and the Compare Screen panel opens showing the differences between the baseline image and the appearance of the screen at that point in the script run (based on an image captured during the script run). Note that it does not look at the current SUT screen, and therefore does not require an active connection to the SUT.
To see the differences for a particular CompareScreen entry rather than the first, select that CompareScreen log entry before selecting Show Screen Differences. Additionally, you can click the left and right arrow buttons at the bottom of the panel to step forward or backward through each of the CompareScreen log entries for that script run.
When you review differences after a script run, you can perform the same actions that are available during script runs. You can:
- mark regions to ignore
- mark regions as dynamic content or dynamic text
- add new regions
- remove previously defined regions
- reset the baseline image
When you are done examining the screen differences, click Done to dismiss the panel.
Running CompareScreen from the Command Line
When you run a script from the command line that includes the CompareScreen command, the Compare Screen panel cannot be displayed. In this case, if the CompareScreenAction global property is set to ShowPanel or ShowPanelAlways, CompareScreen behaves as though it were set to LogWarning: If significant differences are found, the command logs a warning.
If you use CompareScreen through Eggdrive, the best way to get useful results is to call CompareScreen as a function and return the list of differences. That is, use an Execute message to execute a command such as
return CompareScreen("baselineName")
See CompareScreen Command and Function for addtional information.