Eggplant Functionalビューアウィンドウ
Eggplant Functionalビューアウィンドウは、Eggplant Functionalインターフェースを通じてテスト対象のシステム(SUT)に接続すると開きます。このウィンドウには、そのオリジナルのディスプレイで見るようなリモートSUTの画像が表示されます。
ビューアウィンドウには、ライブモードとキャプチャモードの2つのモードがあります。ライブモードでは、ユーザーとしてSUTと対話でき、キャプチャモードでは、Eggplant Functionalスクリプトで使用する画像をキャプチャできます。ライブモードとキャプチャモードを切り替えるには、ビューアウィンドウツールバーのEnter Capture ModeまたはEnter Live Modeアイコンをクリックします。
WindowsではControl、MacではCommandを押すことでLive ModeとCapture Modeを切り替えることもできます。Eggplant Functionalの設定(Eggplant > Preferences > Viewer)のViewerタブで、この操作を実行するための異なるキーを選択することができます。
ライブモード
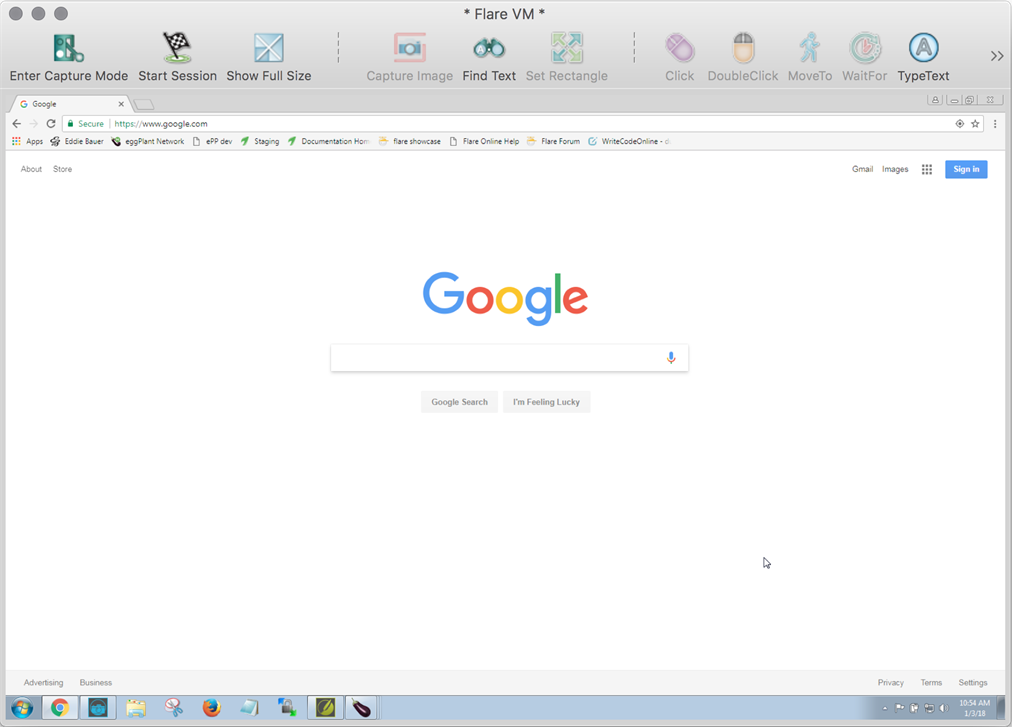 ライブモードのビューアウィンドウ
Live Modeでは、ローカルのマウスとキーボードを使って、ユーザーとしてSUTと対話できます。この対話は、SUTのキーボードとマウスを直接使用しているかのように動作します。Live Modeでは、SUT上で動作するアプリケーションとローカルコンピューターとの間でテキストをコピー&ペーストすることもできます。
この機能を使用して、リモートSUTをナビゲートし、アプリケーションを起動し、画像をキャプチャし、興味のあるテストを実行するための環境を準備することができます。
ビューアウィンドウがローカルシステムのアクティブウィンドウでない場合、クリックやキーストロークはローカルコンピューターに適用され、SUTには適用されません。
キャプチャモード
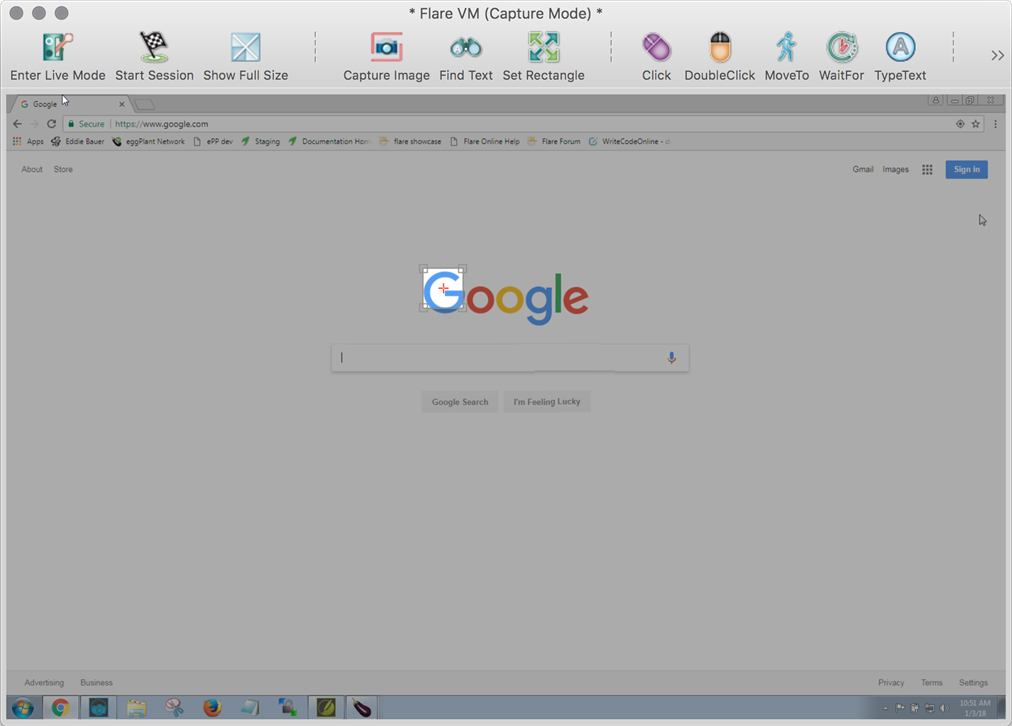 キャプチャモードのビューアウィンドウ
Capture Modeでは、SUTから画像をキャプチャし、実行したいアクションを表すコマンドと関数を組み合わせて、結果のSenseTalkコードを現在のスクリプトに挿入できます。キャプチャモードでは、ビューアウィンドウが暗くなり、下記で説明するキャプチャエリアを除いて表示されません。
画像キャプチャ
SUTから画像をキャプチャするには、画像をクリックします。Eggplant Functionalのエッジ検出機能が自動的に画像を囲むキャプチャエリアのサイズを調整します。ほとんどの場合、自動的にサイズ調整された画像はSenseTalkのスクリプティングや画像検索に適しています。ただし、キャプチャエリアのサイズと配置は手動で調整することも可能です。詳細は下記のキャプチャエリアを参照してください。
自動エッジ検出に基づいて画像をキャプチャする場合、ホットスポットはクリックした位置に配置されますが、これは必ずしも画像の中心ではありません。必要に応じてホットスポットを移動できます。ホットスポットについての完全な情報は、ホットスポットをご覧ください。
スクリプトにコードを挿入せずに画像をスイートに追加したい場合は、ビューアウィンドウツールバーのCapture Imageをクリックするか、キャプチャエリアで右クリックし、Add Imageを選択します。
現在のスクリプトに関連するコード行を追加して、スイートに画像をキャプチャするには、ツールバーの適切なボタン(Click、DoubleClickなど)をクリックするか、キャプチャエリアで右クリックして、ドロップダウンメニューから適切なアクションを選択します。Viewerウィンドウでは、キャプチャした画像に含めることができる多くのコードオプションを提供しています。この機能は、Eggplant Functionalのアシステッドスクリプティングメソッドによるスクリプト生成の基礎となっています。
画像をキャプチャする方法を選択したら、Image Captureパネルが開きます。このパネルは基本的にSaveダイアログボックスですが、スクリプトで画像を使用する際に希望するオプションを更新する追加の機会を提供します。詳細情報については、Image Capture Panelをご覧ください。
画像キャプチャに関する詳細情報は、Image Capture Best Practicesをご覧ください。
The Capture Area
 キャプチャエリア
キャプチャモードでは、キャプチャエリアは保存する画像に含まれる領域を示します。それはViewerウィンドウの他の部分が暗くなったときに通常の明るさで表示される矩形です。デフォルトでは、Eggplant Functionalはエッジ検出を使用して、クリックした画像のキャプチャエリアを自動的にサイズ調整します。キャプチャモードでViewerウィンドウのどこでもクリックすると、キャプチャエリアがその位置に移動し、クリックした画像として検出したものを中心に自動的にサイズ調整します。
画面に画像がない場所をクリックするか、またはEggplant Functionalが画像のエッジを検出できない場合でも、キャプチャエリアはその位置に移動し、サイズはデフォルトの64 X 64ピクセルに設定されます。エッジ検出を使用せずにキャプチャエリアを画像に移動させるには、Shift+クリックを使用できます。キャプチャエリアは、新しい位置に移動しますが、サイズは変わらず、自由にエッジを調整できます。
キャプチャエリアを移動するには、クリックして新しい位置にドラッグすることができます。また、矢印キーを押して、キャプチャエリアを1ピクセルずつ動かすこともできます。Shift+矢印を使用して、キャプチャエリアを10ピクセル単位で移動します。
キャプチャエリアをリサイズするには、エッジをドラッグします。また、Alt+矢印(MacではOption+矢印)キーを使用して、サイズを1ピクセルずつ調整することもできます。Shiftキーを追加して、10ピクセル単位でリサイズします。
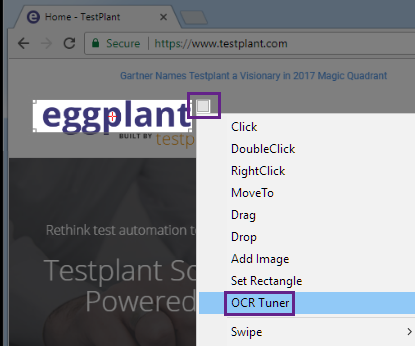
キャプチャエリアには、右上にドロップダウン矢印が含まれていま�す。このボタンをクリックすると、コンテキストメニューが開き、キャプチャした画像に含めてアクティブなSenseTalkスクリプトに挿入するコマンドを選択できます。これは、キャプチャエリア内で右クリックしたときに表示されるメニューと同じです。SenseTalkコードを追加せずに画像をキャプチャしたい場合は、Add Imageを選択してください。
キャプチャエリアは、暗い背景で見やすくするために灰色の枠線で描かれています。この枠線はViewerウィンドウの設定でオフにできます。
OCR Tuner
OCRチューナーを使用して、光学的文字認識(OCR)の検索プロパティを調整します。キャプチャエリアの右上隅にあるドロップダウン矢印からOCR Tunerを開きます。
これらのプロパティは、OCR アップデートパネルやテキスト設定からも調整することができます。詳細については、OCRチューナーの使用をご覧ください。
ホットスポット
 ホットスポットがハイライト表示されたキャプチャエリア
ホットスポットは、キャプチャエリア内に見える赤いクロスヘアです。ホットスポットは、スクリプトが画像に対してクリックや他のコマンドアクションを実行する際のクリックポイントです。キャプチャエリアが主に赤い画像の上に配置されると、赤いクロスヘアは自動的に黒に変わります。
キャプチャエリア内のホットスポットを移動するには、Ctrl+クリックまたはCtrl+ドラッグ(MacではCmd+クリックまたはCmd+ドラッグ)します。また、Ctrl+矢印(MacではCmd+矢印)でホットスポットを1ピクセル単位で移動させることもできます。Shiftキーを追加すると、ホットスポットを10ピクセル単位で移動させることができます。
ホットスポットはキャプチャエリアの外に位置させることができます。これは、テキストフィールド内など、簡単に認識できる画像を含まない場所でクリックや他のアクションを必要とする場合に便利です。アクションを起こす場所に対して相�対的に同じ位置に見つかる画像をキャプチャし、その後、ホットスポットをアクションを起こしたい場所に移動させることができます。
フルスクリーンコントロール
フルスクリーンコントロールを使用すると、SUTをデスクトップ全体として表示することができます。小さなコントロールパネルは、通常のビューアウィンドウの機能へのアクセスを提供します。コントロールパネルを開くには、メインメニューからControl > Control Panelを選択します。
コントロールパネルに表示されるボタンをカスタマイズするには、パネル内で右クリックし、コンテキストメニューからビューアウィンドウの項目を選択します。
フルスクリーンビューに入るには、Enter Full Screenボタンをクリックするか、キーボードショートカットのCtrl+Alt+Enter(MacではOption+Cmd+Return)を使用します。自分のデスクトップに戻るには、Exit Full Screenボタンをクリックするか、フルスクリーンビューに入るために使用した同じキーボードショートカットを入力します。
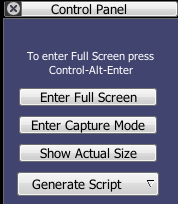 フルスクリーンコントロールパネル
ズームイン
キャプチャモード中にSUTをズームインすることが可能です。ビューアウィンドウは、SUTをフルスケールで表示するように設定する必要があります。WindowsまたはLinuxでズームインするには、Controlキーを押しながらプラス(+)キーを押します。ズームアウトするには、Controlキーを押しながらマイナス(-)キーを押します。Macでは、Controlの代わりにCommandキーを使用します。
ビューアウィンドウツールバー
![]() ビューアウィンドウツールバー
ビューアウィンドウツールバー
ビューアウィンドウツールバーのボタンのほとんどは、Controlメニューのメニューアイテムとしても表現されています。
ツールバーボタン��については以下に説明します。ツールバーはカスタマイズできるため、あなた自身のツールバー上で全て同じボタンを見ることができないかもしれません。ツールバーボタンの追加と削除については、以下のカスタマイズを参照してください。
ツールバーにボタンを追加したり、ビューアウィンドウのサイズを縮小したりすると、ツールバーの右側にオーバーフローチェブロン(ダブルアロー)が表示されることがあります。チェブロンをクリックすると、追加のオプションを含むメニューが開きます。
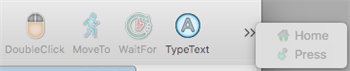 ビューアウィンドウツールバーに表示されるダブルチェブロンは、ウィンドウに収まらない追加アイテムを示します
デフォルトのツールバーボ
以下のリストは、ビューアウィンドウツールバーに表示されるデフォルトのボタンセットを説明しています。ツールバーのボタンを変更し、並べ替える方法については、カスタマイズセクションを参照してください。
 キャプチャモードに入る /
  ライブモードに入る
このボタンは、Viewerウィンドウをライブモードとキャプチャモードの間で切り替えます。Enter Capture Modeをクリックすると、Viewerウィンドウがキャプチャモードに切り替わり、ボタンがEnter Live Modeに変わります。Enter Live Modeをクリックすると、Viewerウィンドウがライブモードに切り替わり、ボタンがEnter Capture Modeに変わります。
WindowsではControlを、MacではCommandを押すことで、ライブモードとキャプチャモードを素早く切り替えることも可能です。この操作を行うための異なるキーを、Viewerウィンドウの設定で選択�することができます。
 セッション開始 /
  セッション終了
このボタンは、Rapid Image Capture、Turbo Capture、Autoscan、Character Collectionのキャプチャセッションの開始と終了を行います。セッションが進行中かどうかに応じて、Start SessionとEnd Sessionの間で切り替わります。
 フィットスケール /
  フルサイズ表示
このボタンは、ViewerウィンドウをSUTのフル表示サイズで表示するか、Viewerウィンドウのサイズに合わせてSUT全体をスケール表示するかを切り替えます。サイジングオプションの切り替えは、Viewerウィンドウの機能や、画像キャプチャ、画像マッチングには影響しません。
 画像のキャプチャ
Capture Imageボタンは、キャプチャエリアで現在選択されている領域の画像をキャプチャし、画像キャプチャパネルを開きます。このパネルは以下で詳細に説明されています。
 テキスト検索
Find Textボタンは、Find Textパネルを開き、以前にキャプチャした画像を使わずにテキストを検索することができます。テキスト検索パネルは以下で詳細に説明されています。Find Textボタンは、キャプチャモードとライブモードの両方で利用可能です。
コマンドボタンをShiftクリックすると、Find Textパネルも開きます。
 矩形設定
矩形設定
このボタンは、Set Rectangle and Generate Codeダイアログボックスを開き、SUT上で簡単に検索矩形を設定し、関連する操作を行うことができます。このダイアログボックスは以下で詳細に説明されています。
 クリック、
クリック、  ダブルクリック、
  移動
移動
これらのコマンドボタンは一度に3つのアクションを実行します:
- 現在のスイートのImagesフォルダに、Capture Areaで選択されたSUTの画像を保存します。
- アクティブなスクリプトに対応するSenseTalkコマンド(Click、DoubleClick、またはMoveTo)を挿入します。
- SUT上で対応するアクションを実行します。
 WaitFor
WaitForコマンドは、スクリプトがViewerウィンドウに画像が表示されるのを一時停止して待つようにします。
WaitForボタンをクリックすると、画像キャプチャパネルが開きます。Maximum Waitテキストフィールドに、スクリプトがViewerウィンドウに画像が表示されるのを待つ最長時間(秒)を入力します。
スクリプトを実行すると、WaitFor画像が表示されるとすぐに次のコマンドが実行されます。画像が最大待機時間内に表示されない場合、テストは失敗します。
 TypeText
TypeTextコマンドは、Viewerウィンドウで入力されるキーストロークとしてテキストを送信し、SUT上での入力をシミュレートします。
TypeTextボタンは、テキストパラメータを入力できるパネルを開きます。このパネルでTypeTextコマンドを作成すると、Insertボタンをクリックするとスクリプト内のテキストパラメータが自動的に引用符で囲まれます。
引用符で囲まれたテキストパラメータは、SUT上で文字通りのテキストとして入力されます。引用符で囲まれていないテキストパラメータは変数として扱われます。
Viewerウィンドウがキャプチャモードにある場合、スクリプトに挿入するテキストを入力することでTypeTextコマンドを開始できます。詳細は、SUTでの入力を参照してください。
 Home
Home
Homeボタンは、モバイルデバイスのホームボタンを押します
 Press
Press
Pressボタンは、モバイルデバイスでタップとホールドを実行します。
ツールバーのカスタマイズ
Viewerウィンドウのツールバーをカスタマイズするには、Window > Customize Toolbarに移動します。ボタンをViewerウィンドウのツールバーに表示できるように選択できるパネルが開きます。ツールバー自体を右クリックしてもCustomizeパネルを開くことができます。
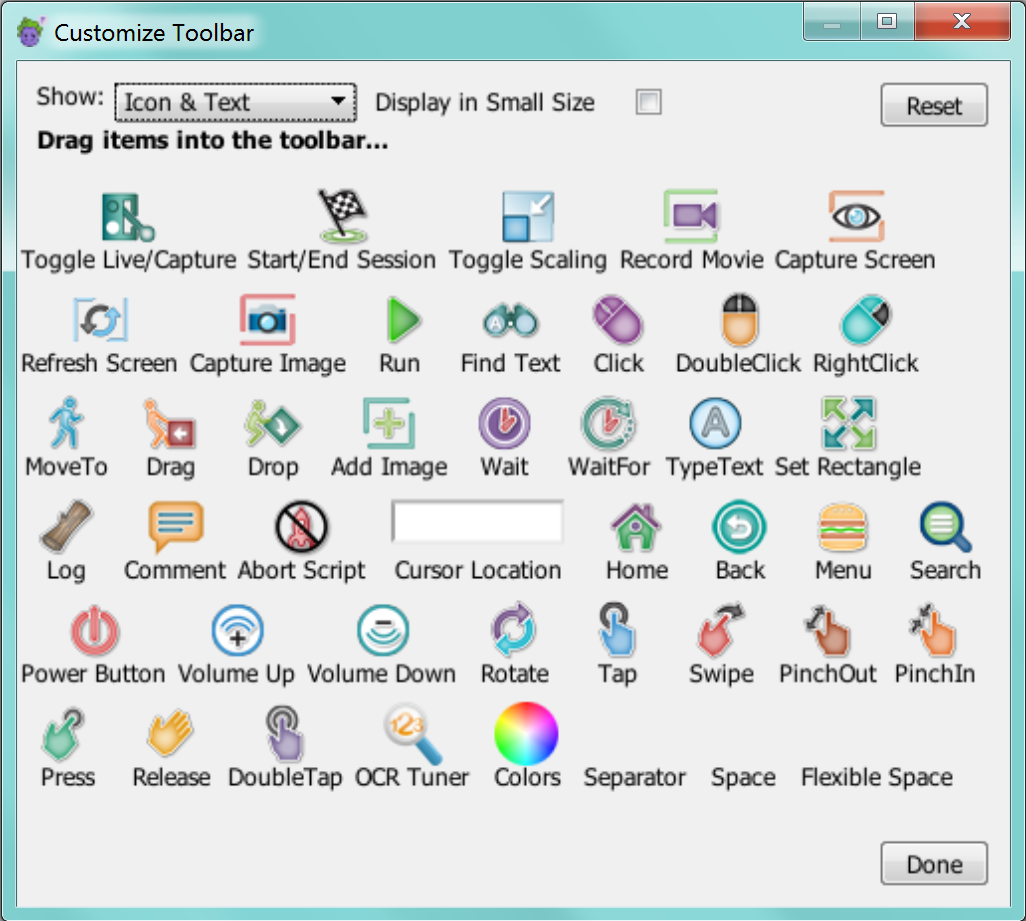
ツールバーにボタンを追加するには、Customize Toolbarパネルからツールバーにボタンをドラッグします。ツールバーからボタンを削除するには、ツールバーからそれをドラッグします。Customize Toolbarパネルが開いている間は、ツールバー内のボタンの配置も変更できます。
デフォルトのボタン
デフォルトのボタンセットに戻すには、Customizeパネルを開きます。Macでは、デフォルトボタンセットをツールバーにドラッグします。Windowsでは、Resetをクリックします。
垂直ツールバー
ツールバーは垂直にも表示できます。これを行うには、Window > Show Vertical Toolbarに移動します。水平ツールバーに切り替えるには、Window > Show Toolbarに移動します。
#capture-image-panel
画像キャプチャパネルは、一部の追加のスクリプトと画像コントロールを備えたSaveダイアログボックスと似ています。
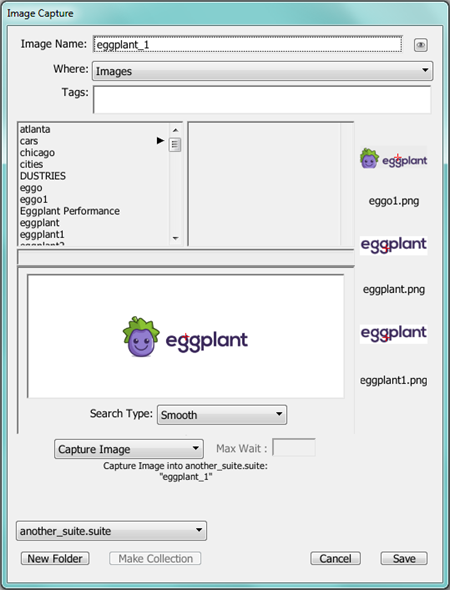
Image Name: **Image Name:**フィールドは、image0001から始まる、現在のスイートに固有の動的に生成された名前がデフォルトになっています。この名前は一時的なスクリプトや実験には十分かもしれませんが、本格的にスクリプト作成を始めると、説明的な名前の方が追いやすくなります。
画像名には英数字、スペース、ほとんどの句読点を含めることができます。
OCR Button: 眼球ボタンをクリックすると、OCRが画像に検出した任意の文字に基づいて新しい画像の名前を提案します。
Where: このドロップダウンリストは、画像を保存できるフォルダを表示します。デフォルトの選択�肢は、現在のスイートの画像フォルダです。
Tags: 新しい画像に既存の画像タグを適用します。このフィールドで新しいタグを作成することもできます。
Use Existing: Eggplant Functionalが新しい画像と、開いているスイート内にすでにある画像との間に類似性を検出した場合、新しいものを保存する代わりに既存の画像を使用するよう提案します。
Image Well: キャプチャパネルの中央部分で、キャプチャした画像を表示します。 画像のホットスポットは赤い十字線で示されます。ホットスポットを移動するには、画像内でCtrl+クリック(MacではCmd+クリック)するか、十字線をCtrl+ドラッグ(MacではCmd+ドラッグ)します。
キャプチャした画像が画像ウェルに収まらない場合、フィットするように縮小されます。実際の画像は影響を受けませんが、キャプチャパネルでは歪んで表示される場合があります。
Search Type: Search Typeドロップダウンリストは、画像キャプチャ時にデフォルト以外の検索タイプを選択できるようにします。
Search Typeドロップダウンリストのデフォルト選択肢は、保存する画像によります。Eggplant Functionalは、各画像に最も適した検索タイプを選択しようとします。Tolerant to Backgroundが最も一般的なデフォルト検索タイプです
Precise Image Tolerance、Standard Image Tolerance、およびAdaptive Image Toleranceのデフォルト値を、Run PreferencesのScreenタブで調整することができます。
Command/Function: 画像と一緒にスクリプトにコマンドまたは関数を挿入するには、Command/Functionドロップダウンリストでコマンドまたは関数を選択します。コマンドまたは関数なしで画像をスクリプトに挿入するには、Capture Imageを選択します。スクリプト内の選択さ��れたコマンドまたは関数に画像を挿入するには、Add Imageを選択します。
Max Wait: このフィールドでは、WaitまたはWaitForコマンドに関連付けられた最大待ち時間(秒単位)を指定します。
Suite Location: このドロップダウンリストから、新しい画像を保存するスイートを選択します。このメニューに表示するには、スイートが開かれている必要があります。
New Folder: 現在選択されているフォルダ内にサブフォルダを作成するには、New Folderボタンをクリックします。
Make Collection: 既存の画像に基づいて画像コレクションを作成するには、画像を選択してMake Collectionボタンをクリックします。画像コレクションは画像と同じ名前を取り、画像は自動的に画像コレクションに移動されます。この機能の詳細については、Creating an Image Collectionを参照してください。
Cancel: 画像キャプチャをキャンセルし、キャプチャパネルを閉じるには、Cancelボタンをクリックします。
Save: 画像キャプチャを完了し、キャプチャパネルを閉じるには、Saveボタンをクリックします。
Use Imageパネル(MacとLinuxのみ)
Use Imageパネルは、標準のOpenダイアログに似ていますが、下部にスクリプトコントロールが追加されています。Use Imageボタンは、Viewerウィンドウツールバーをカスタマイズする際に追加することができます。
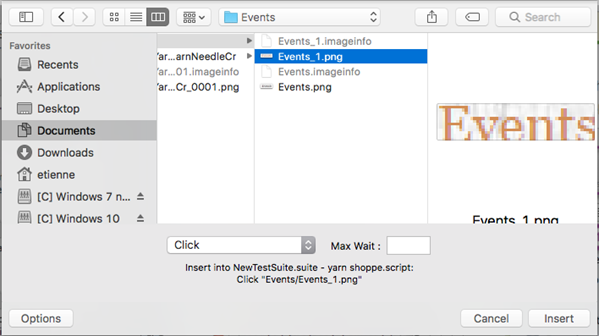
File Browser: この機能を使用して、現在のスイートのImagesディレクトリとサブフォルダ間を移動します。
Command/Function: このドロップダウンリストから、画像とともにスクリプトに入力するコマンドまたは関数を選択します。スクリプトの選択されたコマンドまたは関数に画像を組み込むには、Add Imageを選択します。
Max Wait: このフィールドでは、WaitまたはWaitForコマンドに関連付けられた最大待ち時間(秒単位)を指定します。
Options: Command/FunctionリストとMax Waitフィールドを表示または非表示にします。
Cancel: 画像の選択をキャンセルし、Use Imageパネルを閉じます。
Insert: 生成されたコマンドまたは関数をスクリプトに挿入し、コマンドを実行(可能な場合)、Use Imageパネルを閉じます。
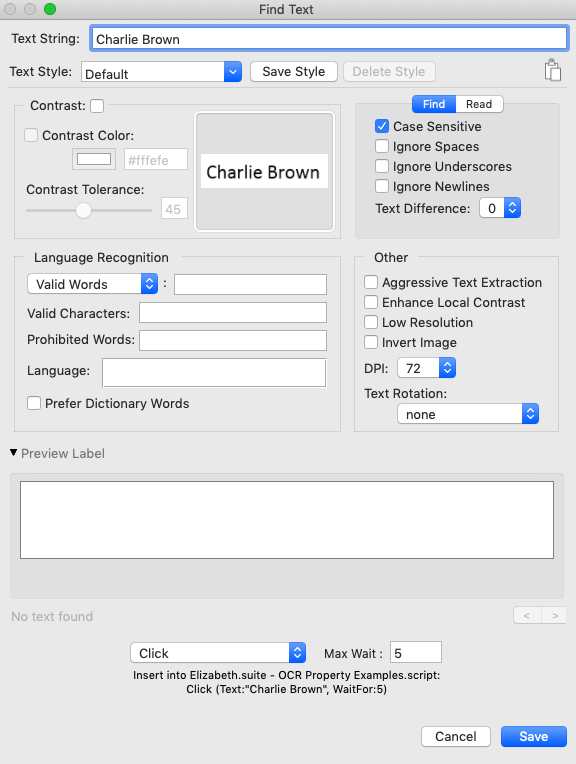
Find Textパネル
Find Textパネルは、キャプチャした画像の代わりにEggplant Functionalの光学文字認識(OCR)機能を使用してテキストを検索することができます。
OCR: (推奨) デフォルトのプラットフォームはGeneric OCRで、Eggplant FunctionalのOCR機能を使用します。OCRは、SUTの画面上のピクセルパ��ターンを見て、画面上に存在する文字を識別します。それはその結果を辞書と照らし合わせます。デフォルトの辞書は英語ですが、OCRはさまざまな辞書にアクセスできるため、多くの言語を読むことができます。サポートされている言語のリストについては、OCR Language Supportを参照してください。
Find Textパネルを開くには、ViewerウィンドウでFind Textボタンをクリックするか、Control > Find Textを選択します。
以下の選択肢を使用して、Eggplant Functionalが検索するテキスト文字列とスタイルを定義します。
テキスト文字列
Text Stringフィールドには、画像に表示される実際のテキストが含まれます。以下で説明するパラメータを変更する前に、ここにテキストを入力する必要があります。Text Stringフィールドにテキストを入力し始めると、Eggplant Functionalはその文字列のコマンドを作成し、背景でテキストを検索します。Eggplant Functionalがテキスト文字列を見つけると、それはSUT上のテキスト文字列を黄色の矩形でマークします。
テキストスタイル
��テキストスタイルは、Eggplant FunctionalのText Preferences、OCR Tuner、またはOCR Update panelで定義されたテキストプロパティの保存されたセットです。各テキストスタイルは通常、テスト対象のアプリケーションで繰り返し遭遇する特定のフォントやGUI要素、例えばメニューアイテムやタイトルバーに合わせて調整されます。テキストスタイルはOCR検索とReadText()の両方に適用できます。読み取りと検索の違いについての詳細は、How to Use OCRを参照してください。
パネルはDefaultスタイルが選択されている状態で開きます。この部分以下のセクションでOCR Propertiesを変更すると、現在のスタイルが変更されます。この新しいスタイルを保存するには、Text Styleドロップダウンメニューで"Default"を選択し、名前を変更するか、上書きしたいスタイルを選択します(Defaultスタイルは変更可能)。Save Styleをクリックします。
現在選択されているスタイルを削除するには、Delete Styleをクリックします。このオプションは、Defaultスタイルが選択されているときに無効になります。
このセクションの右側には、コピーアイコンがあります。これは、以下のセクションで設定した現在のテキストプロパティをコピーして、スクリプトで使用するために使うことができます。詳細はSave or Copy Property Settingsをご覧ください。
コントラストセクシ��ョン
Contrastセクションでは、Contrastプロパティと関連プロパティを設定し、操作することができます。Contrast設定は、テスト対象システム(SUT)の画像をOCRが取得してから、それを白黒に変換し、認識のためにOCRエンジンに送ります。このインタラクティブなセクションは、右側にリアルタイムに更新されるエリアがあり、Viewer windowで描画される現在の検索矩形と、現在のContrast設定でOCRエンジンに送られる形を示しています。
-
Contrast: SUTのディスプレイがOCR分析の前に高コントラストの二色画像に変換されるかどうか。
contrastがオンの場合、ContrastColorプロパティで設定することができる色("contrast color"と呼ばれる)がSUTディスプレイの主要な色と見なされ、他のすべての色は二次色として扱われます。テキストはどちらの色でも見つけることができます。Contrastプロパティは、テキストの検索(見つける)と読み取りの両方に使用できます。- Contrast Color:
Contrastがオンの場合、contrast colorはSUTディスプレイの主要な色と見なされ、他のすべての色は二次色として扱われます。背景色の見つけ方については、Determining the Background Colorを参照してください。 - Contrast Tolerance:
Contrastがオンの場合、contrastToleranceは、ピクセルがコントラスト色と見なされるために許される最大のチャネル別の色差を設定します。
- Contrast Color:
Findタブ
パネルの右上隅には2つのタブがあります:FindとReadです。これは、OCRが特定の文字列を見つけるために使用されるか、またはSUTの画面から未知のテキストを読み取るために使用されるからです。一部のプロパティはテキストの読み取り時にのみ使用できたり、テキストの検索時にのみ使用できたりします。Findタブは、特定の文字列を検索するときに設定できる次のプロパティを表示します。読み取りと検索の違いについては、How to Use OCRをご覧ください。
Ignore Spaces: ignoreSpacesプロパティにより、OCRテキスト検索ではテキスト文字列内のスペースが無視されます。例えば、文字列"My Computer"は"MyComputer"や"M y C o m p u t e r"にマッチします。ignoreSpacesプロパティはデフォルトでオンになっています。これは、OCRが意図せずにスペースを読み取ることがあるため、特に、離散的な単語でない文字列や、通常とは異なる文字間隔のテキストでは、この設定がオンになっています。
Ignore Underscores: ignoreUnderscoresプロパティにより、OCRテキスト検索ではアンダースコアをスペースとして扱います。例えば、文字列"My_Computer"は"My_Computer"または"My Computer"と一致します。ignoreUnderscoresプロパティはデフォルトでオンになっています。これは、OCRがアンダースコアを認識しないことがあるためです。
Ignore Newlines: 有効化された場合、ignoreNewlinesはOCRテキスト検索により行末が無視され、検索は複数の行にまたがる文字列とも一致します。このプロパティはテキスト検索にのみ使用可能で、ReadTextでは使用できません。
Readタブ
パネルの右上隅には2つのタブがあります:FindとReadです。これは、OCRが特定の文字列を見つけるために使用されるか、またはSUTの画面から未知のテキストを読み取るために使用されるからです。一部のプロパティはテキストの読み取り時にのみ使用できたり、テキストの検索時にのみ使用できたりします。Readタブは、テスト対象のシステム(SUT)の画面からテキストを読み取るときに設定できる次のプロパティを表示します。読み取りと検索の違いについては、How to Use OCRをご覧ください。
Trim Whitespace: TrimWhitespaceがオンのとき、返されるテキストの始まりと終わりのすべての空白文字が削除されます。TrimWhitespaceがオフのとき、ReadText関数は空白文字で始まるか終わるテキストを返すことができます。このプロパティは、テキストの読み取りにのみ使用可能で、事前に定義された文字列の検索には使用できません。
Multi-Line: このプロパティは、矩形内のテキスト�を読み取るのではなく、点の近くのテキストを読み取るときにのみ適用されます。MultiLineがオンのとき、ReadText関数はあなたの点に関連するテキストの行と、その点の上下のテキストの行を返します(これらの行が同じテキストブロックに属しているように見える場合)。MultiLineがオフのとき、ReadText関数は点に関連するテキストの行のみを返します。
言語認識
言語設定を使用してOCR検索を修正することができる多くの変更があります。OCRはデフォルトでは言語辞書を使用していませんが、辞書を指定したり修正したり、またはカスタムOCR辞書を作成することもできます。このセクションのOCRプロパティすべてが言語と関連しており、それは事前に定義されたOCR言語の1つを使用して言語プロパティを設定するか、有効なと見なるべき単語や文字を指定するか(その他すべてのマッチを排除)、マッチが発生する可能性のある特定の単語を禁止するか、またはパターンを使用するかを指示します。
有効な単語ドロップダウンメニュー:
このドロップダウンメニューには、設定できる5つの異なるプロパティがリストされています。これらは相互排他的であり、一度に設定できるのは1つだけで、このメニューの右側のテキストフィールドにそのプロパティに提供する値が入ります。
- Valid Words: OCRがマッチと見なすことができる単語を制限することで、OCRエンジンを成功したマッチに向けたり、あなたのテキスト文字列を正しく認識させることができます。アスタリスク(*)をワイルドカードとして使用して、OCRエンジンがあなたのオリジナルのテキスト文字列にある単語のみを検索するようにすることができます。このプロパティは、OCRテキストエンジンが見つけることができる単語を制限します。詳しくはCustomize the OCR Engine Dictionaryを参照してください。
validWordsプロパティはLanguageプロパティをオーバーライドします。このオーバーライドは、validWordsプロパティの一部でない単語は返されないことを意味します。 - Preferred Words: このプロパティを現在の言語の内蔵辞書を補完する単語のリストに設定します。
PreferredWordsはテキストの読み取りまたは検索のどちらにも使用できます。このプロパティはOCR辞書を修正します。詳しくはCustomize the OCR Dictionaryを参照してください。 - Valid Pattern: このプロパティは正規表現を受け取り、指定したパターンに一致する文字や単語のみを返します。SenseTalkで使用できる正規表現文字については、SenseTalkでのパターンの使用を参照してください。パターンを優先したいが必須ではない場合は、PreferredPatternを参照してください。
- Preferred Pattern: このプロパティが有効になっていて、正規表現の文字列が与えられると、OCRは提供されたパターンに一致するテキストを優先します。SenseTalkで使用できる正規表現文字については、SenseTalkでのパターンの使用を参照してください。OCRにパターンマッチを必須としたい場合は、ValidPatternを使用してください。
- Extra Words: このプロパティを現在の言語の組み込み辞書を補完する単語のリストに設定します。これらの単語は他の辞書の単語と同じように優先されます。
Valid Characters: validCharactersプロパティは、OCRテキストエンジンが見つけることができる文字を制限します。ValidCharactersは、探している文字列の文字に限定することができ、文字列を"*"に設定することでこれを行うことができます。これは、認識されていない文字からテキストマッチを"強制"しようとしている場合に役立ちます。OCRが定義したエリアに文字が存在し、それがvalidCharacters文字列に提供された文字と一致しない場合、"^"を返します。
Prohibited Words: 探しているものではないとOCRが認識できる単語を提供して、正しい方向に��導くのに役立ちます。ProhibitedWordsはテキストの読み取りと検索の両方に使用できます。このプロパティはOCRの辞書を変更します。詳細はOCR辞書のカスタマイズを参照してください。
Language: 探しているテキストの自然言語。(対応している言語のリストは、OCR言語サポートを参照してください。)OCRはこれをガイドとして使用し、使用している辞書に指定された単語を優先します。複数の言語を指定することもできます。Eggplant Functionalはデフォルトで多数の言語を備えており、追加の言語は購入可能です。言語が指定されていない場合でもOCRはテキストを読み取りますが、見つけたものを比較する辞書は持っていません。また、カスタムOCR辞書を作成することもできます。
Prefer Dictionary Words: OCRは常にLanguageプロパティによって提供される辞書の任意の単語を優先しますが、PreferDictionaryWordsはこれを一歩進めて、可能であればOCRが辞書の単語を返すことを要求します。可能なバリアントが見つからない場合にのみ、最善の解釈を用いて非辞書の単語を返します。このプロパティはOCRの辞書を変更します。詳細はOCR辞書のカスタマイズを参照してください。テキストの読み取りと検索の両方に利用可能です。
その他のセクション
これらのOCRプロパティはあまり使用されませんが、適切なシナリオでは役立つことがあります。
Aggressive Text Extraction: 画像から可能な限り多くのテキストを抽出したい場合は、このプロパティを有効にします。
Enhance Local Contrast: OCRにテキスト画像のローカルコントラストを自動的に高めてOCRエンジンに送信するようにしたい場合は、このプロパティを有効にします。このプロパティは、読み取られるテキストの一部または全部が比較的にコントラストが低い場合(たとえば、暗い背景に青いテキストなど)に、認識を助ける可能性があります。コントラストがオンのとき、このプロパティは効果がないため、Contrastがオフのときにのみ有用です。
Low Resolution: OCRエンジンがEggplant Functionalから受け取る画像を低解像度として処理するモード(画像は実際には低解像度に変換されません)。これにより、OCRが小さな文字を認識するのを助けることができます。
Invert Image: OCRがテキスト画像(写真ネガのように)の色を反転させ、それをOCRエンジンに送信して処理するようにするため、このプロパティを有効にします。
DPI: DPIプロパティは、SUTディスプレイのDPI(ドット・パー・インチ)を参照します。SUT上でテキストを見つけるのに問題がある場合は、SUTのDPI設定を確認し、DPIプロパティをそれに応じて調整します。
Text Rotation: このプロパティが設定されると、OCRは、予め定義された値の1つで指定された回転角度で単語を識別します。Clockwiseは右に90度回転します。Counter-clockwiseは左に90度回転します。Upside-downは180度回転します。Noneはテキストを回転させません。テキストの読み取りと検索の両方に使用できます。
テキスト認識エリア
このエリアは、パネルの上のエリアで提供された設定を使用して、ビューアウィンドウの現在のキャプチャエリアで読み取られているテキストを表示します。これはリアルタイム更新です。
コマンドまたは関数の選択
パネルの左下部には、上のエリアでの選択から生成されたテキストプロパティリストとスクリプトにコマンドまたは関数を挿入できるようにするドロップダウンメニューがあります。このメニューは通常Clickにデフォルト設定されていますが、パネルを開く方法によっては変更されることがあります。
コマンド/関数ドロップダウンメニューの右には、Max Waitフィールドがあります。これにより、WaitまたはWaitForプロパティに関連する最大待機時間(秒)を指定できます。
これら2つの要素の下では、パネルは挿入するコードのプレビューを表示し、そのコードがどのスクリプトとスイートに挿入されるかを示します。
保存またはキャンセル
Cancel: テキストプロパティリストをキャンセルしてFind Textパネルを閉じるには、**Cancel:**ボタンをクリックします。
Save: **Save:**ボタンをクリックすると、選択したコマンドまたは関数と共にテキストプロパティリストがスクリプトに挿入され、該当する場合はコマンドが実行され、その後Find Textパネルが閉じます。
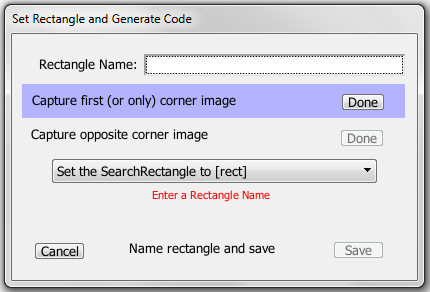
Set RectangleとGenerate Codeダイアログボックス
このダイアログボックスは、画像のキャプチャとコード生成を支援し、検索矩形や類似のオブジェクトを作成します。以下の手順に従って、適切なコードをスクリプトに挿入します。
手順:Set Rectangleダイアログボックスの使用
-
ViewerウィンドウがCapture Modeにあるとき、Capture Areaを使用して定義したい矩形のエリアを強調表示します。
-
ツールバーのSet Rectangleボタンをクリックして、Set RectangleとGenerate Codeダイアログボックスを開きます。または、メインメニューからControl > Script Command > Set Rectangleを選択してダイアログボックスを起動することもできます。
ノートこのボタンは、デフォルトのツールバーセットの一部です。ただし、ツールバーをカスタマイズしている場合、ツールバーに表示されない可能性があります。
-
- Set Rectangle ダイアログボックスで、Rectangle Name フィールドに名前を入力します。ここで使用する名前は、ステップ4で矩形を定義するためにキャプチャした画像に割り当てられます。
-
- 最初または唯一のコーナーイメージをキャプチャします。ビューワーウィンドウでは、定義したい矩形が黄色のボックスで囲まれており、キャプチャエリアはその矩形の左上隅に移動されています。通常どおり、キャプチャエリアを移動させたり、サイズを変更したりすることができます。ただし、ホットスポットはあなたの矩形の左上隅に残ります。実際、ホットスポットを移動すると、矩形が移動したり、サイズが変更されたりします。適切な画像の上にキャプチャエリアがある場合、Set Rectangle ダイアログボックスの最初の画像の Done をクリックします。
-
- (オプション)対角線上の角の画像をキャプチャします。2つ目の画像は、矩形を定義するために、そのホットスポットを右下隅に持ちます。対角の角を表す新しい画像を作成することができます。それをしない場合、この機能は最初の画像を複製しますが、2つ目の画像のホットスポットを左下隅に配置して、正しい矩形を定義します。
-
ドロップダウンリストから、スクリプトに挿入したいコードに適切なオプションを選択してください。オプションは次のとおりです:
-
Set the SearchRectangle to [rect]: 検索領域を制限する検索矩形を作成するコードを挿入します。
-
ReadText [rect]: 設定した矩形内のテキスト(OCR)を読み取るコードを挿入します。
-
CaptureScreen [rect]: 設定した矩形に基づいた画像をキャプチャするコードを挿入します。
-
[rect]: 選択した矩形を定義するコードを挿入しますが、コマンドや関数の追加コードは含まれません。
-
[rect as coordinates]: 選択した矩形を画像ではなく座標として定義するコードを挿入しますが、コマンドや関数も含まれません。スクリーンサイズや向きの変更�が座標の絶対位置を変えるため、この方法は通常は推奨されません。そして、期待していた矩形を得られない可能性があります。
ノートこのオプションでは、画像が必要ないため、画像をキャプチャすることはできません。
-
Set the SearchRectangle to empty: 現在設定されている検索矩形をクリアするコードを挿入します。
ノートこのオプションでは、画像が必要ないため、画像をキャプチャすることはできません。
ドロップダウンリストから選択をすると、挿入されるコードのプレビューがリストの下に表示されます。
-
-
Save をクリックします。選択したコードタイプに必要な要素が提供されていない場合、Save ボタンは有効になりません。Save をクリックすると、作成した画像または画像がキャプチャされ、スイートに追加され、コードがアクティブスクリプトに追加されます。Cancel をクリックすると、画像はキャプチャされず、コードも追加されません。