The Models tab is where you manage models that are ultimately edited in the Modeler UI. It's also the main repository for all your models. You can create a new model, search for a specific model, or view from the list of existing models. The existing models provide useful information such as, whether it has a suite associated and the group it belongs to. You can also change the suite association for a model by selecting a different suite, if required.
New Feature: All the features described on this page except Associating Suites are available within the Designer menu from Eggplant DAI 5.1 onwards.
Creating a New Model
Use the Model tab to view existing models and create new models. You can use the Preview button to quickly get a glimpse of your model within Designer.
New Feature: The option to view your models in Designer is available in Eggplant DAI 5.2 and later.
To create a model, follow these steps:
- Click Designer on the left side of the Eggplant DAI screen. The Models tab opens.
- Click the New/Import button on the top right. The Create Model pane opens.
- Enter the Model Name, then assign it to a group by selecting your preferred group from the Model Access drop-down list. Groups determine which users are allowed to access which models. The newly created model appears as a tile in the Models tab. You can create as many new models as you need.
- Click Edit to start building your model in the Modeler UI. You can also import an existing model that's already been built and exported. To switch back to the Models tab in Designer view, click the Dashboard button on the toolbar and click the Designer > Models tab.


Note: The model name must be unique and should not contain spaces. The only permitted special characters are underscore (_), tilde (~), and hyphen (-).
You can also click View to preview the model without editing and then click the Edit button in the top-right corner to return to the Modeler UI for editing your model.
Associating Suites
In order to run a model from the Eggplant DAI Runner screen, you must first associate a suite to it. Additionally, always upload any scripts you’ve changed in an Execution Environment before you run the test to avoid your changes from being overwritten.
To associate a suite to a model:
- In the Models tab, locate the model tile to which you want to associate a suite.
- From the Suite Required section, click Link a suite to run this model. The Edit Model pane opens. Alternatively, you can also open the Edit Model pane from the Actions menu and click Suite Association to select your preferred suite.
- From the Suite Association drop-down list, select the suite you want to associate with this model and click Save.

The newly associated suite appears in the model tile of Models tab. You can also perform this step for modifying an existing suite association.
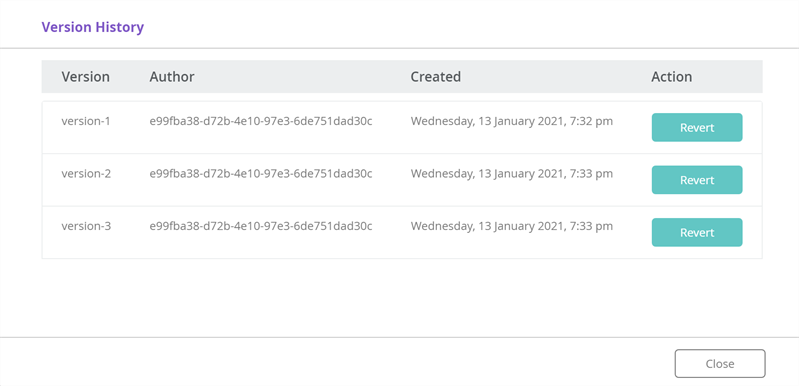
Viewing Model Version History
You can view the version history of a model in the Models tab as long as it exists for the selected model. You save a new version of the model in the Modeler UI via the File > Save Model option or when you perform Ctrl+S after the initial save. Typically, a tag name is added in the Create a version tag window to represent model versions. When a model is automatically saved, any changes you've made is saved to the active version.
Reverting To a Particular Version History:
- In the Models tab, select the model whose version history you want to view.
- From the Actions menu, click Version History. The Version History panel appears displaying the version history for that model.
- To revert to a previous version of the model, select the version you want to open and click Revert. Versions are preserved when you switch between them; reverting to another version doesn't overwrite the version that you switched from.
Note: As versions are preserved when you switch between them, reverting to another version doesn't overwrite the version that you switched from.
Deleting Models
You can delete a model from the Models tab by selecting it and then clicking Delete from the Actions menu. After a model is deleted, it'll also remove the suite association if it was associated with any suites.
Editing Groups
You can change the group of existing models in the Models tab whenever you need to. To edit the group of a model, click Edit Group from the Actions menu of the model that you want to change the group of. The Edit Model pane opens allowing you to change the group of the model. Make the required changes and click Save. The newly associated group is displayed on the model tile.
Importing Models
You can import models instead of building them from scratch. You import a model (json file) that was exported from an existing model in Eggplant DAI.
To import a model:
- From the Models tab, click the New / Import button. The Create Model pane opens.
- Enter the Model Name and assign a group by selecting it from the Model Access drop-down list.
- Click Choose file to locate the model json file on your local machine and upload it. The new model name appears on the button.
- Click Save. The newly imported model appears as a tile in the Models tab.
Exporting Models
You can export your model in json file format and import them as you need in Eggplant DAI. This is particularly useful when sharing models with other team members, for debugging, and taking backups.
To export models:
- In the Models tab, locate the model that you want to export.
- From the Actions menu, click Export. A file with the same name as the current model is downloaded in json format in the Downloads folder of your browser.
![]() Eggplantsoftware.com | Documentation Home | User Forums | Support | Copyright © 2022 Eggplant
Eggplantsoftware.com | Documentation Home | User Forums | Support | Copyright © 2022 Eggplant