Indirect Android Connections
The information on this page is for Android Gateway 5.6 and older. If you use Android Gateway 6.0 or later, see Getting Started with Android Gateway.
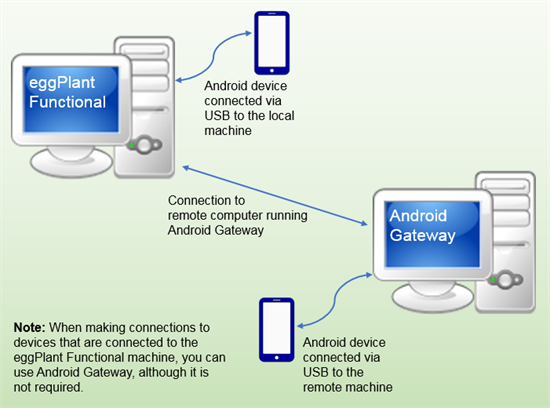
Android Gateway is a tool for use with Eggplant Functional to assist in making connections to Android devices for test automation. You can connect to Android devices from a local machine where the device is connected via USB, or remotely to a different computer that has a connected Android device.
You create tests against Android devices in the same manner that you would with any other SUT: by managing your connections using the Viewer window and Connection List in Eggplant Functional. Below is a high-level overview of possible environment architectures for using Android Gateway:

System Requirements for Android Gateway
Runs on: Windows 10, Windows 7. macOS 10.15, macOS 10.14, macOS 10.13, macOS 10.12.
Connects to: 4.1.1 and later.
Note: WebDriver functionality requires Android 5.0 (API level 21) and later on the device being tested.
When running Android Gateway on Windows, you might need to install a USB driver to allow Android Gateway to detect some devices. See OEM USB Drivers on the Google Developers website for more information.
Step by Step: Install Android Gateway
To install Android Gateway, follow the steps below:
- Download the Android Gateway application for the appropriate platform from the Mobile Gateways Downloads page on the Eggplant website.
- To install Android Gateway, double-click the install package.
- On Mac, drag the Android Gateway application into the Applications folder.
- On Windows, follow the on-screen instructions in the Setup wizard to finish installation.
- Launch Android Gateway.
From this point, you should be ready to make connections to your Android devices. You can learn about that process in Using Android Gateway.
The Android Gateway UI

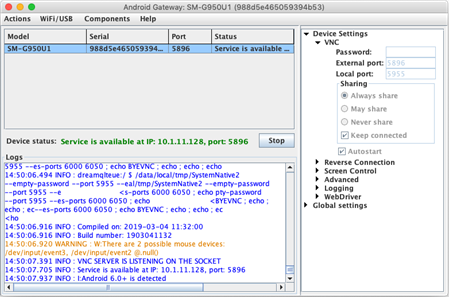
The Android Gateway UI consists of five sections, each with different functions:
- Device table: Shows a list of any detected Android devices. The table displays the model, serial number, connection port, and connection status of each device.
- Device status: Shows the connection status for the device currently selected in the table.
- Start: Starts the connection service for the selected device. See Using Android Gateway for detailed information about connecting to devices.
- Logs: Displays the event log. The event log messages are color-coded. Messages displayed in red indicate errors. If you are having trouble making connections, these error messages will usually help you troubleshoot the problem. Orange messages indicate warnings, which might or might not be an actual problem. Informational messages are displayed in blue or green text.
- Device Settings: Set configuration and connection preferences here. You can also enable special connections in this section. See Android Gateway Settings.
The Top Toolbar
There are other configuration settings and actions available in the top toolbar.
Actions
The Actions menu lets you perform the follow tasks:
- Reboot Device: Reboots the attached Android device.
- Clear Logs: Clears the Logs area on the UT screen. Note that the saved log file is not changed or deleted.
- Save Shared Settings: Saves any settings that are shared between devices.
- Save Device Settings: Saves settings for the selected device.
- Reset Settings: Returns all settings to their defaults for the selected device. Settings for other devices remain unchanged.
WiFi/USB
The WiFi/USB menu has the following options:
- Switch to Wi-Fi mode: Switches the device into wireless debugging mode.
- Connect via Wi-Fi: Allows you to enter the IP address of an Android device, and then connect to it over Wi-Fi.
- Switch to USB mode: Switches the device into USB debugging mode.
- Connection List: Shows a list of connected devices. You can add or remove devices here.
Components
The Components menu has the following options:
-
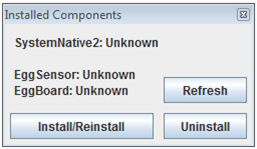
Installed Components: Choosing this option opens a window where you can install or uninstall the VNC server components on the selected Android device and verify version information for the currently installed VNC server. If you've attached a device but haven't started the service, the SystemNative2 and EggSensor versions show as
Unknown. Click Refresh to have Android Gateway query the device and update the displayed information. The Installed Components window in Android Gateway
If the required components aren't installed, Android Gateway installs them automatically when you start the connection service. However, you can use the Install/Reinstall button to install the VNC server components manually. Click Uninstall to remove the VNC server from the device.
Help
The Help menu has the following options:
- Online Help: Opens the online documentation for Android Gateway in your browser.
- Custom Parameters: Opens the documentation that lists the parameters you can enter in the text box at Device Settings > Advanced > Custom Parameters.
- Credits: Displays Android Gateway version information and copyright, along with development credits.