Eggplant Manager lets you create schedules to run tests at specific times or that run with specific frequency, which makes it easy to customize test runs to fit the needs of your team.
Eggplant Manager also lets you run tests on demand. For information about this process, see Running Tests.
The Schedules View
Eggplant Manager lets you view schedule information either as a table or a calendar. Use either view to set schedules or edit existing schedules To see the table view, select Schedules > Table from the main Eggplant Manager menu. To see the calendar view, select Schedules > Calendar.
Table View
The table view for Eggplant Manager schedules shows you all existing schedules, whether they are active or inactive, completed or still to be run.
Use the New Schedule button to create a new schedule. Eggplant Manager lets you edit or delete an existing schedule by selecting it in the list and clicking the Edit Schedule or Remove Schedule buttons.
Calendar View
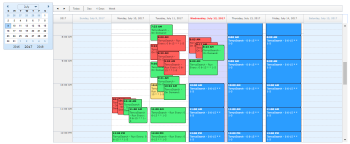
The Calendar view provides an easy way to see your past and future schedules. Completed test runs show in red or green to indicate fail/pass respectively. Future runs show as blue.
To add a new schedule, click in an empty part of the calendar. To edit or remove an existing schedule, right-click the schedule and select Edit schedule or Remove schedule.
Step by Step: Creating a Schedule
- There are three ways to create a new schedule, depending on which part of the Eggplant Manager interface you're in:
- From the Schedules table view, click New Schedule.
- From the Schedules calendar view, click an empty part of the calendar.
- From a specific test's page, click New Schedule in the Schedules section.
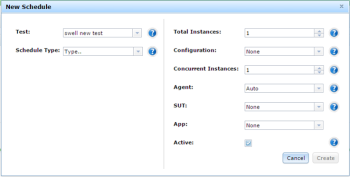
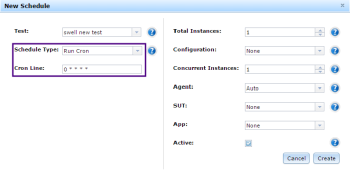
Each method opens the New Schedule dialog box:
- Select the test you want to add to the schedule from the Test drop-down list.
Note: If you launched the New Schedule dialog box from a test page, you don't have an option to select a test because the test is determined by the page you are on.
- Choose a Schedule Type. There are three types of schedules:
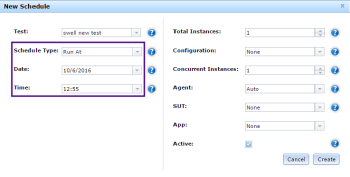
- Run At: Run At schedules let you choose a specific date and time for the test to execute. When you make this selection, the Date and Time fields become active:
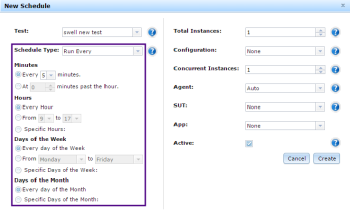
- Run Every: Run Every schedules let you schedule the test to run periodically. This type of schedule is highly customizable. When you make this selection, the Minutes, Hours, Days of the Week, and Days of the Month sections become active.
- Run Cron: The Run Cron option lets you create schedules by using Cron-style definitions. The Eggplant Manager application runs most standard Cron tests. It throws an exception if the line is invalid or not supported by Eggplant Manager. Choosing this option activates the Cron Line where you enter your Cron definition.
- Select the number of Total Instances you want to run for this schedule. An instance is one complete iteration of the test as defined on the test page. The default value is 1, so the schedule runs each script in the test once. Change the Total Instances value if you want the schedule to repeat the test multiple times.
- Select a Configuration from the drop-down list if you want to use a defined configuration. Note: Choosing a configuration makes the Total Instances field inactive because the number of instances is controlled by the configuration definition. For information about configurations, see Working with Test Configurations in Eggplant Manager.
- Select the number of Concurrent Instances you want the schedule to run. If you selected multiple Total Instances (or a configuration that includes multiple instances), you can have Eggplant Manager run them concurrently (i.e., at the same time) by selecting an appropriate number of Concurrent Instances.
The default value is 1, meaning that multiple Total Instances run consecutively rather than concurrently. Note: Running concurrent instances requires an Eggplant Functional license for each instance as well as an Eggplant Manager license for each instance.
Example 1: If a test has 5 Total Instances and 2 Concurrent Instances, two of the instances run, concurrent with one another. And then two more run, concurrently. The remaining fifth instance runs by itself.
Example 2: If a test has 10 Total Instances and 10 Concurrent Instances, all ten instances run at the same time. Remember, however, that this configuration requires ten licenses for Eggplant Functional and ten licenses for Eggplant Manager.
- Select an agent to run the test. All the agents defined on the Agents page (Admin > Agents) appear in the drop-down list. The default value is Auto, which lets Eggplant Manager choose one or more agents based on their current availability and concurrency settings. If you choose a specific agent, only that agent can run the test. For information about agents, see Working with Agents.Note: When running tests, the agent you select here takes precedence over the agent you set when you created this test. See Creating Tests in Eggplant Manager for more information.
- Select a SUT to run the schedule against, if desired. All the SUTs you have defined on the SUTs page (Admin > SUTs) are available in the drop-down list. The default is None. For information about SUTs, including SUT priority, see Creating and Working with Systems Under Test (SUTs).
- Select an App to run in the schedule, if desired. All the apps you have defined on the App Management page (Admin > App Management) are available in the drop-down list. The default is None.
Note: When an app is selected, Eggplant Manager attempts to install that app at runtime. If the app can't be installed, the script still runs, and a message displays in Results indicating that the app wasn't installed.
- Eggplant Manager has the Active checkbox selected by default, allowing the schedule to run. If you clear the checkbox, the schedule is inactive and the test won't run at the scheduled time(s). You could, for example, use this option to temporarily disable recurring schedules.
- Click Create to confirm creation of your new schedule.
Eggplant Manager adds new schedules to the list on the table view for schedules, as well as to the calendar on the calendar view. Also look for a list of schedules in the Schedules section on each individual test page. This list is filtered to schedules for only the specific test.
