Eggplant Manager houses tests containing scripts or other executables that you want to run against your test environment. The executables run in a sequence you set. You can specify a system under test (SUT) for the test or set different SUTs for different scripts. After you determine what a test consists of, you can create schedules for when the test should run.
Creating tests is a two-step process. First, you create the test and set global test properties. Second, you add scripts or executables to the test in the Scripts section of the test page. Eggplant Manager lets you assign properties to each script as well. For information about adding scripts and executables, see Adding Executables to Eggplant Manager Tests.
Step by Step: Creating a Test
Follow these steps to create a test in Eggplant Manager.
- Go to Tests > New Test on the main Eggplant Manager menu to open the New Test dialog box.
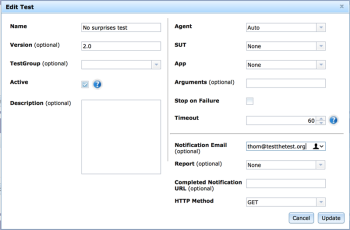
- Fill in the New Test dialog box with the relevant information. Naming the test is required, but the rest of the form is optional.
- Name: Enter a name for the test here. This field is required.
- Version: Specify a version number for the test.
- TestGroup: Specify or create a test group. Test groups can be used to organize testing and results.
- Active: This setting determines if a test can be run by a schedule; it is selected by default. Clear this checkbox to make a test inactive. When a test is inactive, it won't run based on any schedules you have defined for it; however, you can still run the test on demand. For information about schedules and running tests on demand, see Running Eggplant Manager Tests.
- Description: Enter a description for this test.
- Agent: Choose an agent to run the test. All the agents defined on the Agents page (Admin > Agents) appear in the drop-down list. The default value is Auto, which lets Eggplant Manager choose one or more agents based on their current availability and concurrency settings. If you choose a specific agent, only that agent can run the test. For information about agents, see Working with Agents.Note: When running tests, the agent you configure when Creating a Schedule or Running Tests on Demand takes precedence over the agent you set here.
- SUT: You can specify a SUT here for the test to run on. However, you can also specify SUTs on individual scripts and on schedules; for information about which SUT setting takes precedence, see SUT Priority for Eggplant Manager Tests. Any script in this test runs against the SUT specified here unless it has a SUT specified at a higher order of precedence.
- App: Specify an app to test, if desired. All the apps you have defined on the App Management page (Admin > App Management) are available in the drop-down list. The default is None.
- Arguments: Add any Eggplant Functional command-line argument options that you want passed to your test. You can use any command-line argument that Eggplant Functional accepts; you can find the list of options on the Eggplant Command Line Options page and the Runscript Command Line Options page.
- Stop on Failure: Selecting this checkbox causes the test to stop if any of its scripts fail.
- Timeout: Select a maximum execution time for the test, in minutes. If the test is still running after this amount of time has passed, the test will be aborted by the system. Note that the abort process can take a few minutes.
- Notification Email: Add an email address for Eggplant Manager to send notifications to regarding completions of runs for this test.Note: Email notifications from Eggplant Manager require administrative setup. See Mail (SMTP) Server Configuration for more information.
- Report: If there is a specific report affected by this test, you can optionally add that report name here. The Eggplant Manager application attaches a copy of this report to the notification email address. See Creating Custom Reports in Eggplant Manager for more information about creating custom reports.
- Completed Notification URL: Add a URL that triggers a test or activity in a different environment after this test completes. For example, you might have a Jenkins task you want to start following the completion of the test run in Eggplant Manager.
- HTTP Method: Select either GET or POST from the drop-down list for how the Completed Notification URL gets called.
- Click Create. The test opens on its specific page. You can now begin adding scripts to your test as described in Adding Executables to Eggplant Manager Tests. On the All Tests page (Tests > All Tests), the new test is added to the list:
To edit a test after creating it, use the Tests > <Test Name> menu, then click the Edit button.
Cloning an Existing Test
You can clone an existing test to quickly create a new test with the same settings. Click the Clone Test button on the top portion of any test page:
Cloning a test copies all of that test's scripts and test settings, such as an assigned SUT and timeout value. The original test's results and schedules are not copied.
You can edit the new test as you would any other test—no link persists between the original test and the clone, so you can customize any information in the new test without affecting the original.

