The Eggplant Functional Viewer Window
The Eggplant Functional (EPF) Viewer window opens when you make a connection to a system under test (SUT) through the Eggplant Functional interface. The window shows an image of the remote SUT as you would see it on its own display.
The Viewer window has two modes, Live Mode and Capture Mode. You can interact with the SUT as a user while in Live Mode, and you can capture images to use in Eggplant Functional scripts while in Capture Mode. To toggle between Live Mode and Capture Mode, click the Enter Capture Mode or Enter Live Mode icon in the Viewer window toolbar.
You can also toggle between Live Mode and Capture Mode by pressing Control on Windows or Command on Mac. You can select a different key to perform this action on the Viewer tab of Eggplant Functional Preferences (Eggplant > Preferences > Viewer).
Live Mode
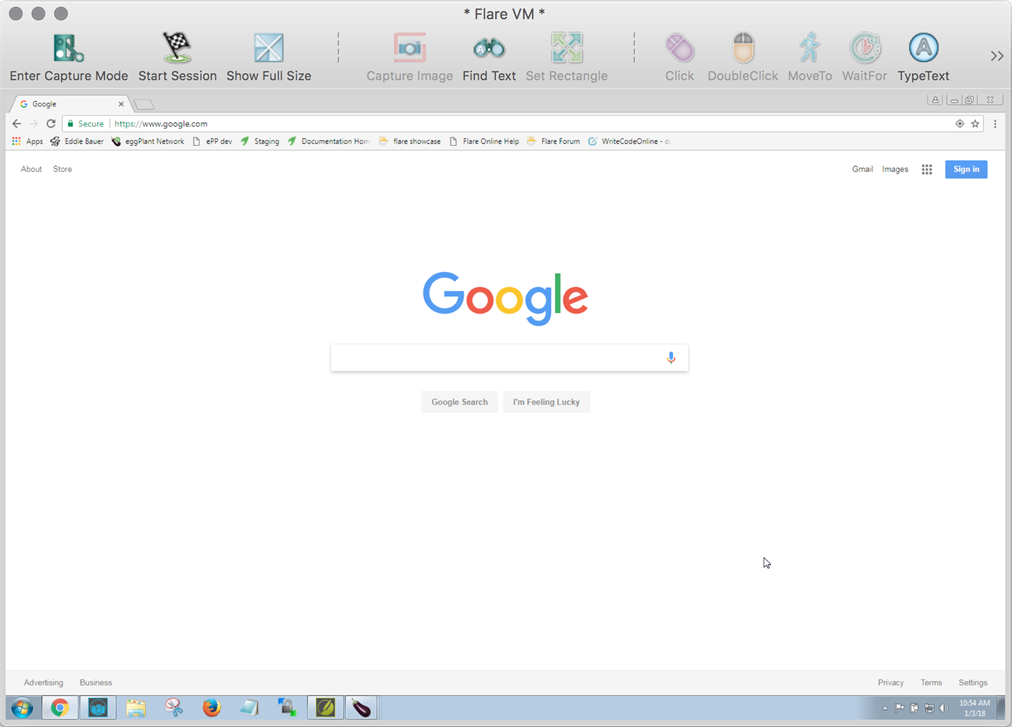
The Viewer window in Live Mode
In Live Mode, you can use your local mouse and keyboard to interact with the SUT as a user. This interaction works as if you were using the SUT's own keyboard and mouse directly. In Live Mode, you can also copy and paste text between applications running on the SUT and your local computer.
You can use this functionality to navigate in the remote SUT, launch applications, and otherwise prepare the environment to capture images and perform the tests you're interested in.
If the Viewer window is not your local system's active window, your clicks and keystrokes are applied to your local computer, not the SUT.
Capture Mode
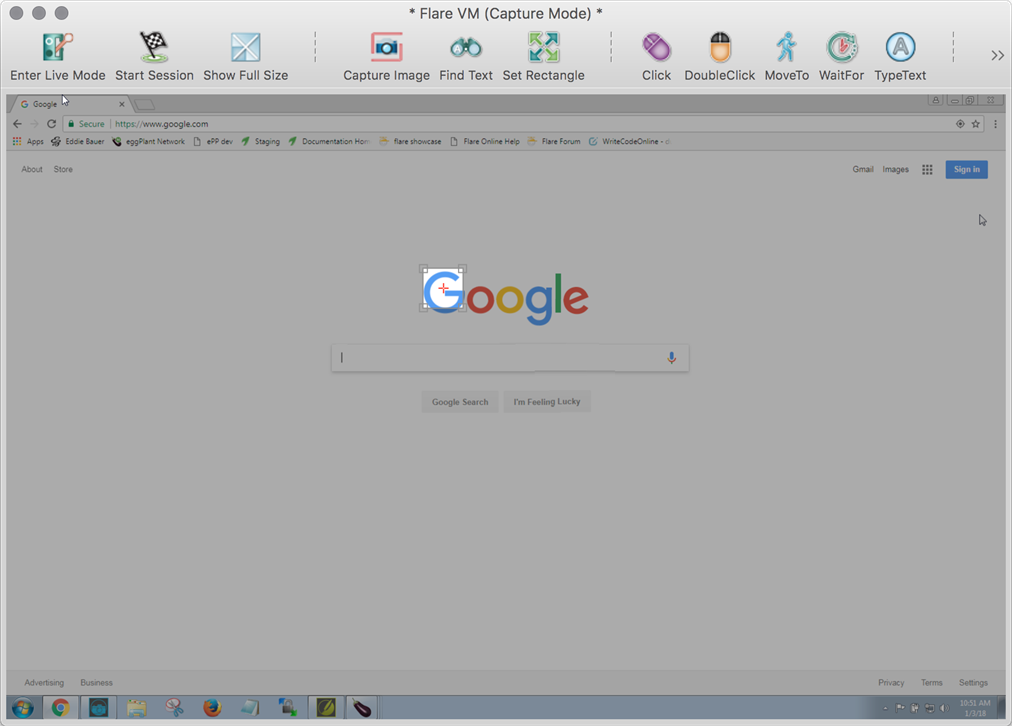
The Viewer window in Capture Mode
In Capture Mode, you can capture images from your SUT, combined with commands and functions that represent the actions you want to perform, then insert the resulting SenseTalk code into your current script. The Viewer window is dimmed in Capture Mode, except for the Capture Area, described below.
Capturing Images
To capture an image from the SUT, click the image. The Eggplant Functional edge detection functionality automatically sizes the Capture Area around the image for you. In most cases, the auto-sized image should work fine for SenseTalk scripting and image searches. However, you can adjust the size and placement of the Capture Area manually as well; see The Capture Area below for details.
When you capture an image based on automatic edge detection, the hot spot is placed where you clicked, which is not necessarily in the center of the image. You can move the hot spot as required. See The Hot Spot for complete information about the hot spot.
If you want to add the image to the suite without inserting code into a script, click Capture Image on the Viewer window toolbar, or right-click in the Capture Area and select Add Image.
To capture the image to the suite along with adding an associated line of code to your current script, click the appropriate button on the toolbar (e.g., Click, DoubleClick), or right-click in the Capture Area and select the appropriate action from the drop-down menu. The Viewer window provides many code options you can include with your captured images. This functionality is the basis for the assisted scripting method of script generation in Eggplant Functional.
When you have selected the method to capture the image, the Image Capture panel opens. This panel is basically a Save dialog box, but it provides additional opportunities for updating the options you want to use with the image in your scripts. See The Image Capture Panel for complete information.
For more information about image capture, see Image Capture Best Practices.
The Capture Area

The Capture Area in Eggplant Functional
In Capture Mode, the Capture Area shows the area that is included when you save an image. It is the rectangle shown at normal brightness when the rest of the Viewer window is dimmed. By default, Eggplant Functional uses edge detection to automatically size the Capture Area for images you click. When you click anywhere in the Viewer window while in Capture Mode, the Capture Area moves to that location and automatically sizes around what it detects as the image you clicked.
If you click an area of the screen where there is no image, or Eggplant Functional can't detect the edges of an image, the Capture Area still moves to that location and the size is set to the default, 64 X 64 pixels. You can use Shift+click to move the Capture Area to an image without using edge detection; the Capture Area moves to the new location without changing size so that you can manually adjust the edges as you wish.
To move the Capture Area, you can click and drag it to a new location. You can also nudge the Capture Area one pixel at a time by pressing the arrow keys. Use Shift+arrow to move the Capture Area in ten-pixel increments.
To resize the Capture Area, drag the edges. You can also nudge the size one pixel at a time with Alt+arrow (Option+arrow on Mac) keys. Add the Shift key to resize in ten-pixel increments.
The Capture Area includes a drop-down arrow at the upper-right. Clicking the button opens the context menu, which lets you select a command to include with the captured image to insert into your active SenseTalk script. Note that this is the same menu you see if you right-click within the Capture Area. Choose Add Image if you want to capture an image without adding SenseTalk code.
The Capture Area is drawn with a gray border to make it easier to see on dark backgrounds. You can turn this border off in Viewer window preferences.
The OCR Tuner
Adjust optical character recognition (OCR) search properties with the OCR Tuner. Open the OCR Tuner from the drop-down arrow located in the upper right corner of the Capture Area.
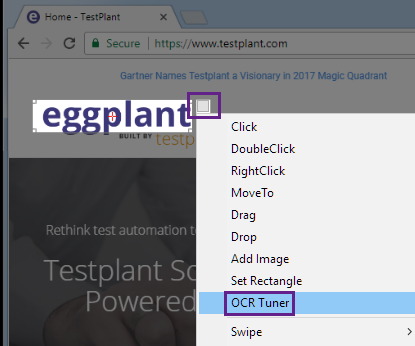
Launching the OCR Tuner in Eggplant Functional
You can also adjust these properties from the OCR Update Panel and from Text Preferences. See Using the OCR Tuner for more information.
The Hot Spot

The Capture Area with the hot spot highlighted
The hot spot is the red crosshairs that you see inside the Capture Area. The hot spot is the point that is clicked when a script executes a Click or other command action on an image. The red crosshairs automatically turn black when the Capture Area is positioned over a predominantly red image.
To move the hot spot in a Capture Area, Ctrl+click or Ctrl+drag the crosshairs (Cmd+click or Cmd+drag on Mac). You can also nudge the hot spot in one-pixel increments with Ctrl+arrow (Cmd+arrow on Mac). Adding the Shift key moves the hot spot in ten-pixel increments.
You can position the hot spot outside of the Capture Area. This can be useful when you need a click or other action to happen at a location that doesn't include an easily recognizable image, such as within a text field. You can capture an image that will be found in the same location relative to the spot where you want the action to take place, then move the hot spot the location where you want the action to occur.
Full-Screen Control
With full-screen control, you can view the SUT as your entire desktop. A small control panel provides access to the regular Viewer window features. To open the control panel, choose Control > Control Panel from the main menu.
To customize the buttons displayed on the control panel, right-click in the panel, and choose Viewer window items from the context menu.
To enter full screen view, click the Enter Full Screen button, or use the keyboard shortcut Ctrl+Alt+Enter (Option+Cmd+Return on Mac). To return to your own desktop, click the Exit Full Screen button, or type the same keyboard shortcut you used to enter full screen view.
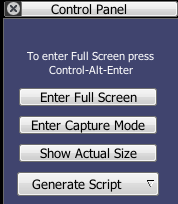
The Full-Screen Control Panel
Zooming
It is possible to zoom in on the SUT while in capture mode. The Viewer window must be set to show the SUT at full scale. To zoom in on Windows or Linux, hold Control and press the plus (+) key. To zoom out, hold Control and press the minus (-) key. On Mac, use the Command key instead of Control.
The Viewer Window Toolbar

The Viewer window toolbar
Most of the buttons in the Viewer window toolbar are also represented as menu items in the Control menu.
The toolbar buttons are described below. Because the toolbar can be customized, you might not see all the same buttons on your own toolbar. For information about adding and removing toolbar buttons, see Customize below.
Note that if you add buttons to the toolbar, or if you shrink the size of the Viewer window, you might see the overflow chevron (double arrow) at the right side of the toolbar. Click the chevron to open a menu with the additional options.
A double chevron in the Viewer window toolbar indicates additional items that won't fit on the window
The Default Toolbar Buttons
The following list describes the default set of buttons that appear on the Viewer window toolbar. See the Customize section to learn how to change and rearrange the buttons in the toolbar.
 Enter Capture Mode /
  Enter Live Mode
This button toggles the Viewer window between Live Mode and Capture Mode. When you click Enter Capture Mode, it switches the Viewer windows to Capture Mode and the button changes to Enter Live Mode. When you click Enter Live Mode, it switches the Viewer windows to Live Mode and the button changes to Enter Capture Mode.
You can also toggle between Live Mode and Capture Mode quickly by pressing Control on Windows or Command on Mac. You can select a different key to perform this action in the Viewer Window Preferences.
![]() Start Session /
Start Session / ![]() End Session
End Session
This button starts and ends Rapid Image Capture, Turbo Capture, Autoscan, and Character Collection capture sessions. It toggles between Start Session and End Session according to whether a session is in progress.
 Scale to Fit /
  Show Full Size
This button toggles between showing the Viewer window at the SUT's full display size and showing the entire SUT scaled to fit the size of the Viewer window. Switching between the sizing options has no effect on the functionality of the Viewer window, image captures, or image matching.
 Capture Image
The Capture Image button captures an image of the area currently selected by the Capture Area and opens the Image Capture panel, which is described in detail below.
 Find Text
The Find Text button opens the Find Text panel, where you can search for text without using a previously captured image. The Find Text panel is described in detail below. The Find Text button is available in both Capture Mode and Live Mode.
Shift-clicking a command button also opens the Find Text panel.
 Set Rectangle
This button opens the Set Rectangle and Generate Code dialog box, which helps you easily set search rectangles and perform related actions on the SUT. This dialog box is described in detail below.
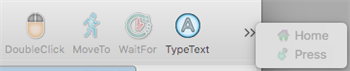
 Click,
  DoubleClick,
  MoveTo
These command buttons perform three actions at once:
- Save an image of the SUT as selected by the Capture Area into the Images folder of the current suite.
- Insert the respective SenseTalk command (Click, DoubleClick, or MoveTo) into the active script.
- Perform the respective action on the SUT.
 WaitFor
The WaitFor command causes a script to pause and wait for an image to appear in the Viewer window.
When you click the WaitFor button, an image capture panel opens. In the Maximum Wait text field, enter the longest period of time (in seconds) that you want the script to wait for the image to appear in the Viewer window.
When you run the script, the script executes the next command as soon as the WaitFor image appears. If the image does not appear in the maximum wait time, the test fails.
 TypeText
The TypeText command sends text as keystrokes typed in the Viewer window, allowing you to simulate typing on the SUT.
The TypeText button opens a panel in which you can enter your text parameters. When you create a TypeText command with this panel, clicking the Insert button automatically encloses your text parameters in quotation marks in your script.
Text parameters enclosed in quotation marks are typed as literal text on the SUT. Text parameters that are not enclosed in quotation marks are treated as variables.
When the Viewer window is in capture mode, you can start a TypeText command by typing the text you want to insert into your script. For more information, see Typing on the SUT.
 Home
Home
The Home button presses the home button on mobile devices.
 Press
Press
The Press button executes a tap and hold on mobile devices.
Customize the Toolbar
To customize the Viewer window toolbar, go to Window > Customize Toolbar. A panel opens in which you can select the buttons that are available in the Viewer window toolbar. You can also right-click in the toolbar itself to open the Customize panel.

The Customize Toolbar panel
To add a button to the toolbar, drag the button from the Customize Toolbar panel to the toolbar. To remove a button from the toolbar, drag it off of the toolbar. While the Customize Toolbar panel is open, you can also rearrange the buttons within the toolbar.
Default Buttons
To return to the default set of buttons, open the Customize panel. On Mac, drag the default button set to the toolbar. On Windows, click Reset.
Vertical Toolbar
The toolbar can also be displayed vertically. To do this, go to Window > Show Vertical Toolbar. To switch to a horizontal toolbar, go to Window > Show Toolbar.
The Image Capture Panel
The Image Capture panel in Eggplant Functional is similar to a Save dialog box, with some additional script and image controls.
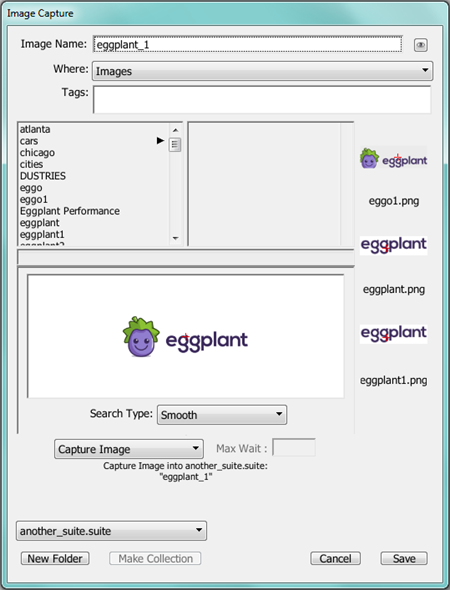
Image Capture panel in Eggplant Functional
Image Name: The Image Name field defaults to a dynamically generated name that is unique to the current suite, beginning with image0001. This name might be sufficient for temporary scripts and experimentation, but more descriptive names are easier to follow as you start scripting in earnest.
Image names can contain alphanumeric characters, spaces, and most punctuation marks.
OCR Button: When you click the eyeball button, OCR suggests a name for the new image based on any characters it detects in the image.
Where: This drop-down list displays the folders in which you can save an image. The default choice is the Images folder of the current suite.
Tags: Apply existing Image Tags to the new image. You can also create new tags in this field.
Use Existing: If Eggplant Functional detects similarities between a new image and an image already in the suite that's open, it suggests that you use the existing image rather than save a new one.
Image Well: The central portion of the Capture panel that displays the captured image. The hot spot in the image is indicated by red crosshairs. To move the hot spot, Ctrl+click in the image (Cmd+click on Mac) or Ctrl+drag the crosshairs (Cmd+drag on Mac).
If the captured image is too large for the image well, it is scaled down to fit. The actual image is not affected, but it might appear distorted in the Capture panel.
Search Type: The Search Type drop-down list lets you choose a search type other than the default at the time of image capture.
The default choice in the Search Type drop-down list depends on the image you are saving. Eggplant Functional attempts to choose the most appropriate search type for each image. Tolerant to Background is the most common default search type.
You can adjust the default value of the Precise Image Tolerance, Standard Image Tolerance, and Adaptive Image Tolerance in the Screen tab of Run Preferences.
Command/Function: To insert a command or function into the script with your image, choose the command or function in the Command/Function drop-down list. To insert the image into the script with no command or function, choose Capture Image. To insert the image into a selected command or function in the script, choose Add Image.
Max Wait: Specify the maximum wait time associated with the Wait or WaitFor commands (in seconds) in this field.
Suite Location: Choose the suite you want to save the new image into from this drop-down list. Note that a suite must be open to display in this menu.
New Folder: To create a subfolder within the currently selected folder, click the New Folder button.
Make Collection: To make an Image Collection based upon an existing image, select the image and click the Make Collection button. The Image Collection takes on the same name as the image, and the image is automatically moved into the Image Collection. To learn more about this feature, see Creating an Image Collection.
Cancel: To cancel the image capture and close the Capture panel, click the Cancel button.
Save: To complete the image capture and close the Capture panel, click the Save button.
The Use Image Panel (Mac and Linux only)
The Use Image panel in Eggplant Functional is similar to a standard Open dialog, with added script controls at the bottom. The Use Image button can be added when you customize the Viewer window toolbar.

Use Image panel in Eggplant Functional
File Browser: Use this to navigate between the current suite’s Images directory and subfolders.
Command/Function: Choose a command or function to enter into the script with your image from this drop-down list. To incorporate the image into the selected command or function in the script, choose Add Image.
Max Wait: Specify the maximum wait time associated with the Wait or WaitFor commands (in seconds) in this field.
Options: Shows or hides the Command/Function list and Max Wait field.
Cancel: Cancels the image selection and closes the Use Image panel.
Insert: Inserts the generated command or function into the script, executes the command (if possible), and closes the Use Image panel.
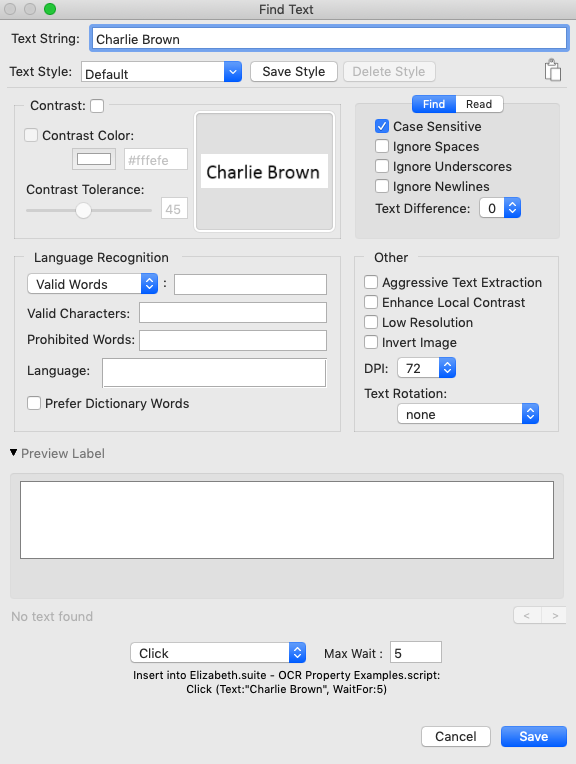
The Find Text Panel
The Find Text panel allows you to search for text using Eggplant Functional's Optical Character Recognition (OCR) feature instead of captured images.
OCR: (Recommended) The default platform is Generic OCR, which uses the OCR functionality in Eggplant Functional. OCR uses interpretive algorithms to look at pixel patterns on the screen of the SUT and identify characters present on the screen. It checks its findings against a dictionary. Although the default dictionary is English, OCR has access to a variety of dictionaries, so it can read in many languages. For a list of supported languages, see OCR Language Support.
To open the Find Text panel, click the Find Text button in the Viewer window, or choose Control > Find Text.
Find Text panel in Eggplant Functional
Use the following selections to define the text string and style for which you want Eggplant Functional to search.
Text String
The Text String field contains the actual text that appears in your image. You must enter text here before you can modify the parameters discussed below. As you start typing text in the Text String field, Eggplant Functional creates a command for the string and searches for the text in the background. If Eggplant Functional finds the text string, it marks the text string on the SUT with a yellow rectangle.
Text Style
A text style is a saved set of text properties as defined in the Eggplant Functional Text Preferences, OCR Tuner, or OCR Update panel. Each text style is typically tailored to a particular font or type of GUI element, such as a menu item or title bar that will be encountered repeatedly in an application under test. Text styles can be applied to both OCR searches and ReadText(). For more on the difference between reading and searching, see How to Use OCR.
The panel opens with the Default style selected. Once you modify the OCR Properties in the sections below this one, you have altered the current style. To save this new style, select the word "Default" in the Text Style drop-down menu and change the name, or select the style you want to override (the Default style can be modified). Click Save Style.
To delete the current selected style, click Delete Style. This option is disabled when the Default style is selected.
To the right of this section is the copy icon. This can be used to copy the current text properties as you have them set in the following sections for use in your script. For more on this see Save or Copy Property Settings.
Contrast Section
The Contrast section allows you to set and work with the Contrast property and related properties. The Contrast setting converts the image OCR takes of the system under test (SUT) to black and white before sending it to the OCR engine for recognition. This interactive section has a live-update area to the right that shows the current search rectangle as it is drawn in your Viewer window, and how it will be sent to the OCR engine with the current Contrast settings.
-
Contrast: Whether or not the SUT display is converted to a high contrast two-color image before it is sent to OCR for analysis. If
contrastis on, a color referred to as the "contrast color" (which can be set using theContrastColorproperty is considered the primary color of the SUT display, and all other colors are treated as the secondary color. Text can be found in either color. TheContrastproperty is available for use with both searching for (finding) text and reading text.- Contrast Color: If
Contrastis on, the contrast color is considered the primary color of the SUT display, and all other colors are treated as the secondary color. For instructions on finding the background color, see Determining the Background Color. - Contrast Tolerance: When
Contrastis on,contrastTolerancesets the maximum per-channel color difference that is allowed for a pixel to be seen as the contrast color.
- Contrast Color: If
The Find Tab
The upper-right quadrant of the panel has two tabs: Find and Read. This is because OCR can be used to either find a given string of text, or read unknown text off of the SUT screen. Some properties are only available for use when reading text, or for searching text, but not both. The Find tab displays the following properties that can be set when searching for a given string of text. For more on the differences between reading and finding text, see How to Use OCR.
Ignore Spaces: The ignoreSpaces property causes OCR text searches to disregard spaces in your text string. For example, the string "My Computer" would match "MyComputer" or "M y C o m p u t e r". The ignoreSpaces property is on by default. This is because the OCR sometimes reads spaces that are not intended, especially in strings that are not discrete words, and in text with unusual letter-spacing.
Ignore Underscores: The ignoreUnderscores property causes OCR text searches to treat underscores as spaces during searches. For example, the string "My_Computer" would match "My_Computer" or "My Computer". The ignoreUnderscores property is on by default, because the OCR sometimes fails to recognize underscores.
Ignore Newlines: When enabled, ignoreNewlines causes OCR text searches to ignore line breaks, so a search will match a string even if it's broken over several lines. This property is only available for text searches (not available with ReadText).
The Read Tab
The upper-right quadrant of the panel has two tabs: Find, and Read. This is because OCR can be used to either find a given string of text, or read unknown text off of the SUT screen. Some properties are only available for use when reading text, or for searching text, but not both. The Read tab displays the following properties that can be set when reading text off the screen of the system under test (SUT). For more on the differences between reading and finding text, see How to Use OCR.
Trim Whitespace: When TrimWhitespace is on, all whitespace characters are removed from the beginning and end of returned text. When TrimWhitespace is off, the ReadText function can return text that starts or ends with whitespace characters. Only for use with reading text, not searching for pre-defined strings.
Multi-Line: This property only applies when reading text near a point, as opposed to reading text within a rectangle. When MultiLine is on, the ReadText function returns the line of text associated with your point, and any lines of text above and below that point if they appear to belong to the same block of text. When MultiLine is off, the ReadText function only returns the line of text associated with the point.
Language Recognition
There are many modifications you can make to an OCR search by working with language settings. OCR does not use a language dictionary by default, but a dictionary can be specified or modified, and you can also create a Custom OCR Dictionary. All of the OCR Properties in this section work with language, whether that is setting the Language property using one of the predefined OCR Languages, telling it what words and characters it should consider valid (eliminating all other matches), prohibiting certain words that may come up in matches, or working with patterns.
The Valid Words drop-down menu
The Valid Words drop-down menu lists five different properties you can set, which are mutually exclusive. Only one can be set at a time, and the value you provide to that property goes in the text field to the right of this menu.
- Valid Words: Limiting the words that OCR can consider a match allows you to steer the OCR engine toward a successful match, or force the engine to recognize your text string correctly. You can use the asterisk (*) as a wildcard so that the OCR engine looks only for the words in your original text string. This property limits the words that may be found by the OCR text engine; for more see Customize the OCR Engine Dictionary. The
validWordsproperty overrides theLanguageproperty. This override means that words that are not part of thevalidWordsproperty are not returned. - Preferred Words: Set this property to a list of words to supplement the built-in dictionary for the current language.
PreferredWordscan be used for either reading or searching for text. This property modifies the OCR dictionary. For more information, see Customize the OCR Dictionary. - Valid Pattern: This property takes a regular expression value and returns only characters or words that match the pattern specified. For information on regular expression characters that can be used with SenseTalk, see Using Patterns in SenseTalk. If you want OCR to prefer a pattern but not require it, see PreferredPattern.
- Preferred Pattern: When this property is enabled and given a regular expression string, OCR gives preference to text that matches the provided pattern. For information on regular expression characters that can be used with SenseTalk, see Using Patterns in SenseTalk. If you want the OCR to require a pattern match, use ValidPattern.
- Extra Words: Set this property to a list of words to supplement the built-in dictionary for the current language. These words will be given preference the same way as other dictionary words.
Valid Characters: The validCharacters property limits the characters that may be found by the OCR text engine. ValidCharacters can be limited to the characters in the string you are searching for by setting the string to "*". This can be useful if you are trying to "force" a text match from characters that are not being recognized. If OCR determines that characters are present in the defined area but they do not match characters provided in the validCharacters string, it will return "^".
Prohibited Words: Provide words OCR can recognize that are not what you are looking for to help steer it in the right direction. ProhibitedWords can be used for both reading and searching for text. This property modifies the OCR dictionary. For more information see Customize the OCR Dictionary.
Language: The natural language of the text you are searching for. (For a list of supported languages, see OCR Language Support.) OCR uses this as a guide, giving preference to words specified in the dictionary it is using. More than one language can be specified. Eggplant Functional comes with numerous languages by default, and additional languages are available for purchase. If no language is specified OCR will still read text; it just won't have a dictionary to compare its findings to. You can also create a Custom OCR Dictionary.
Prefer Dictionary Words: While OCR always prefers words in any dictionary it is provided by the Language property, PreferDictionaryWords takes this a step further and requires OCR to return a dictionary word if possible. It will only return a non-dictionary word—using its best interpretation of each character—if no possible variants are found. This property modifies the OCR dictionary. For more information see Customize the OCR Dictionary. Available for both reading and searching for text.
Other Section
These OCR properties are not often used, but can be helpful in the right scenarios.
Aggressive Text Extraction: Enable this property if you want OCR to extract as much text from the image as possible.
Enhance Local Contrast: Enable this property if you want OCR to automatically increase the local contrast of the text image being sent to the OCR engine. This property may aid recognition when some or all of the text being read has relatively low contrast, such as blue text on a dark background. When Contrast is turned on, this property has no effect, so it is only useful when Contrast is turned off.
Low Resolution: A mode of processing used by the OCR engine to treat the image it receives from Eggplant Functional as low resolution (the image is not actually converted to a lower resolution). This might help OCR recognize smaller characters.
Invert Image: Enable this property for OCR to invert the colors of the text image (like a photo negative) before sending it to the OCR engine for processing.
DPI: The DPI property refers to the DPI (dots per inch) of the SUT display. If you are having problems finding text on the SUT, check the SUT's DPI setting, and adjust the DPI property accordingly.
Text Rotation: When this property is set, OCR identifies words at the degree of rotation specified by one of the predefined values: Clockwise rotates 90 degrees to the right; Counter-clockwise rotates 90 degrees to the left; Upside-down rotates 180 degrees; None does not rotate the text. Can be used for both reading and searching for text.
Text Recognized Area
This area displays the text being read in the current Capture area on the Viewer window using the settings you have provided in the above areas of the panel. This is a live update.
Choose a Command or Function
Towards the bottom left of the panel, there is a drop-down menu that allows you to insert a command or function into the script with the text property list generated from your selections in the areas above. This menu usually defaults to Click, though this can change depending on how you open the panel.
To the right of the command/function drop-down menu is the Max Wait field. This allows you to specify the maximum wait time (in seconds) associated with the Wait or WaitFor properties.
Below these two elements, the panel displays a preview of the code you will be inserting, along with which script and suite the code will be inserted into.
Save or Cancel
Cancel: To cancel the text property list and close the Find Text Panel, click the Cancel button.
Save: The Save button inserts the text property list into your script with the chosen command or function, executes the command, if applicable, and then closes the Find Text panel.
The Set Rectangle and Generate Code Dialog Box
This dialog box helps you capture images and generate code to create search rectangles and similar objects. Follow the steps below to insert the appropriate code into your script.

Use the Set Rectangle dialog box to insert code for a SearchRectangle and similar objects
Step by Step: Using the Set Rectangle Dialog Box
-
With the Viewer window in Capture Mode, use the Capture Area to highlight the area of the rectangle you want to define.
-
Click the Set Rectangle button on the toolbar to open the Set Rectangle and Generate Code dialog box. You can also launch the dialog box from the main menu by navigating to Control > Script Command > Set Rectangle.
ノートThis button is part of the default toolbar set. However, if you have customized your toolbar, it might not show on your toolbar.
-
In the Set Rectangle dialog box, enter a name in the Rectangle Name field. The name you use here will be assigned to images that you capture to define the rectangle in Step 4.
-
Capture first or only corner image. Note that in the Viewer window, the rectangle you want to define is outlined with a yellow box, and the Capture Area has been moved to the upper left corner of that rectangle. You can move the Capture Area and resize it, just as you typically can. However, the hot spot remains on the upper left corner of your rectangle. In fact, if you move the hot spot, you move or resize the rectangle. When you have the Capture Area over an appropriate image, click Done for the first image on the Set Rectangle dialog box.
-
(Optional) Capture opposite corner image. The second image will have its hot spot on the lower right corner to define the rectangle. You can create a new image to represent the opposite corner. If you don't, then this feature duplicates the first image, but places the hot spot of the second image in the lower left corner so that you define the correct rectangle.
-
On the drop-down list, select the appropriate option for the code you want to insert in your script. The options are:
-
Set the SearchRectangle to [rect]: Inserts code to create a search rectangle, which limits the area of subsequent searches.
-
ReadText [rect]: Inserts code to read text (OCR) within the set rectangle.
-
CaptureScreen [rect]: Inserts code to capture an image based on the set rectangle.
-
[rect]: Inserts code to define the selected rectangle without additional code for a command or function to accompany it.
-
[rect as coordinates]: Inserts code to define the selected rectangle as coordinates instead of with images, and also doesn't include a command or function. Note that this method is not typically recommended as changes to screen size or orientation will change the absolute positioning of the coordinates, and you might not end up with the defined rectangle you were expecting.
ノートThis option does not allow you to capture images because none are required.
-
Set the SearchRectangle to empty: Inserts code to clear any currently set search rectangle.
ノートThis option does not allow you to capture images because none are required.
When you make your selection from the drop-down list, a preview of the code that will be inserted is shown beneath the list.
-
-
Click Save. If any required elements for the type of code you've chosen have not been provided, the Save button is not enabled. When you click Save, the image or images that you created are captured and added to the suite and the code is added to active script. If you click Cancel, no images are captured and no code is added.