The Image Update panel helps you manage, modify, and work with previously existing images. It also assists in capturing new images, creating collections, and replacing previously existing images.
See the Image Diagnostics section on The Image Viewer page for information about image search settings and selecting diagnostic searches.
Enabling the Image Update Panel
The Image Update panel lets you work with image diagnostics and fix image searches from the alert panel that pops up when an image is not found during a script run. Depending on the selected settings, this panel also appears when multiple instances of an image are found that were not anticipated by the script. You can enable the Image Update panel functionality on the main menu by adjusting the options shown in the Run > Image Update menu.
Your choices when using the Image Update menu are as follows:
- Throw Exception (Update Off): The Image Update panel is not used.
- Show Panel (Manual Update): This option opens the Image Update panel when an OCR or text search fails during runtime so that you can interactively work with settings to find an appropriate match.
- Auto Update: This setting engages the Image Update panel internally by trying additional search parameters to create a match and continue the script without user interaction.
Auto Update(自動アップデート)オプションはスクリプトを人の付き添いなしで実行する場合に良い選択です。 Frequently, it can find a match and continues the script run when otherwise the search would throw an exception and fail. However, if your parameters are too broad, you could end up matching the wrong image, with unintended results.
When you use the Auto Update option, changes made during the script run are applied in memory only. You must apply updates to the image from the Results panel to retain changes.
Because of the behaviors listed above that are caused by using the Auto Update option, it is good to track how often your scripts are engaging this option. To see how often this is happening, do the following:
- Click the script in question in the Results pane in the Suite window. This action displays a Results pane that shows records of the tests you have run in the current suite.
- Click a row in the top of the Results pane.
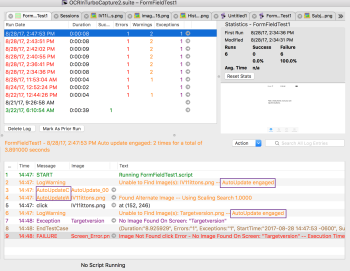
- Review the results in the bottom of the Results pane, looking for the AutoUpdate string in the text and message columns. By searching for these AutoUpdate string occurrences, you can see how many times auto update has been engaged and how long it took to resolve each case. For example, in the following screenshot, the AutoUpdate are highlighted:
The Show Panel (Manual Update) option lets you use the Image Update panel interactively, which gives the most complete control over text matches. This method is best for attended test runs.
Using the Image Update Panel
The Image Update panel comprises three tabs, described in more detail below: The Start tab, the Diagnostics tab, and the Properties tab. Each tab allows you to make adjustments that make your Eggplant Functional scripts more successful.
All of the tabs in the Image Update panel include the Manual Update drop-down menu. The Manual Update drop-down menu includes the selections for the Image Update options explained in Enabling the Image Update Panel. As you make changes to the Image Update options, you must click Try Again to continue the script with the new preference.
Start(開始)タブ
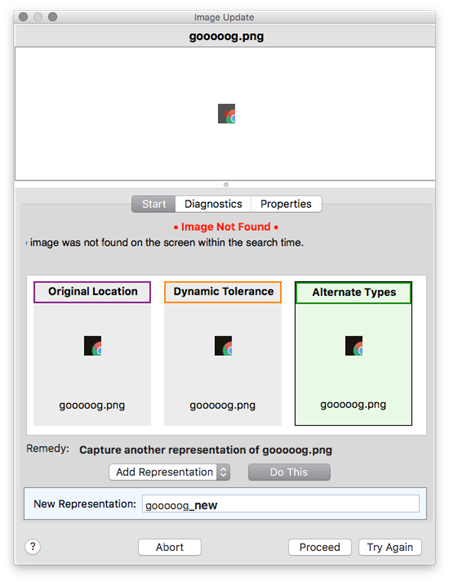
The Start tab in the Image Update panel
The Image Update panel opens with the Start tab displayed. The Suggested Remedies section of the panel offers options to fix or replace the image that can't be found based on the following diagnostic searches performed by Eggplant Functional:
-
Standard Search(標準検索):元の仕様を使用して画像をもう一度検索します。 この検索の結果は、最初の画像検出の失敗より後に画像が現れたことを意味します。 Most likely this result means that the timing of the script at the step needs to be adjusted to allow more time for the image to appear.
-
Dynamic Tolerance(ダイナミック許容値):一致が見つかるまで特定の増分(デフォルト=5)でRGBカラー許容値を増やしながら、画像を検索します。 本診断の結果は、画像のRGB値がシフトしたという意味です。
-
Alternate Types: Searches for the image while using the different SearchType filters, which are Smooth, Pulsing, and Smooth and Pulsing. If the image is text-based, a result indicating Smooth suggests that the system under test (SUT) is using anti-aliasing in its text. A result for Pulsing or Smooth and Pulsing suggests that the background portion of the image either has a pulsing effect or perhaps another effect such as a variable gradient.
-
Scaling Search(スケーリング検索):元の画像とは異なるスケールで画像を検索します。
-
Discrepancy Search: Performs the search while allowing a certain percentage or number of the pixels in the image to differ. 画像とビューアウィンドウ内の一致で認められる差異のピクセルの割合(パーセント記号あり)またはピクセル数(パーセント記号なし)です。
Note: Discrepancy can be slow to use and can result in false positive matches. Preferable approaches include setting the Search Type to Smooth in the Image Update panel, cropping the image using the Image Editor, or creating an Image Collection that includes several acceptable versions of a basic image. You can also capture a new image if the current image can only be found using a discrepancy search. -
OCR Search(OCR検索):テキストに関する元のキャプチャ画像をスキャンしてから、そのテキストの検索を実行します。 For example, if the original image is of a button that says Search on it, this search will use OCR to look for the word Search on the screen.
-
Prior Location(以前のロケーション):コードの現在のラインの実行が成功であった現在のスクリプトの結果を参照します。 本テストの成功した実行で画像が見つかった場所を、画面上でロケーションをハイライトします。 The results that this search uses can be specified manually using the Mark As Prior Run button in the results portion of the suite for any script.
Note: This search is not used when the Image Update panel is set using the Run > Image Update > Auto Update option. -
Original Location: References the coordinate pair of the location at which the image was first captured.
- Crop Edges: Searches by progressively cropping in on the image, looking for smaller and smaller images. 画像内部が画面上の他のものと一致しない限り、端部は重要ではありません。
Selecting a Suggested Remedy shows a highlight rectangle on the SUT screen in the color for that diagnostic. The Remedy drop-down list changes depending on the option you choose. Available remedies are:
- Apply Fix: This option performs the selected fix to the current image.
- Replace Image: This option automatically recaptures the image without changing any of its properties. The search is then run again.
- Add Representation: This option adds a new representation of the image to the current suite. The new representation is added to the same collection as the original image, and Eggplant Functional suggests a name for the image in the New Representation field.
- Capture to Helper: This option captures a new version of the desired image and saves it in a helper suite. If you select this option, a drop-down menu appears, listing available suites to which the image can be captured
Select a Remedy action from the drop-down list, then click Do This. For the options listed above, Eggplant Functional will fix the image and try the search again.
Enter a name in the New Representation field. この画像の新規表現をコレクションに追加する場合は、本フィールド内の名前を使用します。 本フィールドで使用されている命名規則を変更すると、その規則が今後の画像アップデートのため記憶されます。
The Diagnostics Tab
The Diagnostics tab lists the results of diagnostic searches so that you can see what settings can be adjusted or what search types can be used in order to find the image on the screen. The options listed correlate to the options in the Start tab, described above.
Fix(修正)、Recapture(再キャプチャ)、またはAdd Rep(表現を追加)(Add Representationの省略形)の各ボタンを使用するには、肯定的な結果を返した適切な診断検索を選択します。 For instance, in the example below, the Scaling Search can be used to Fix the image:
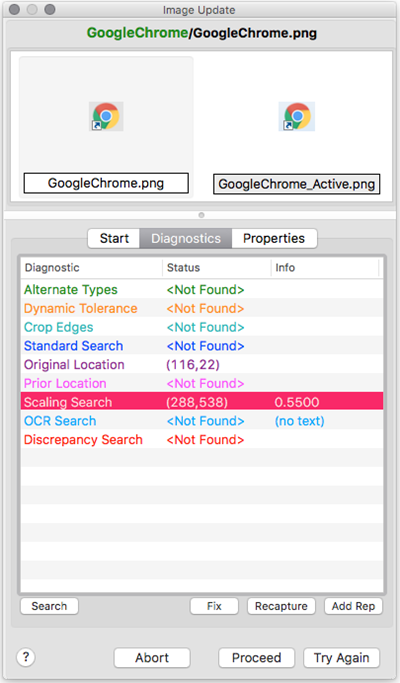
The Diagnostics tab, with Scaling Search selected
In the following example, selecting Original Location enables the Recapture and Add Rep options:
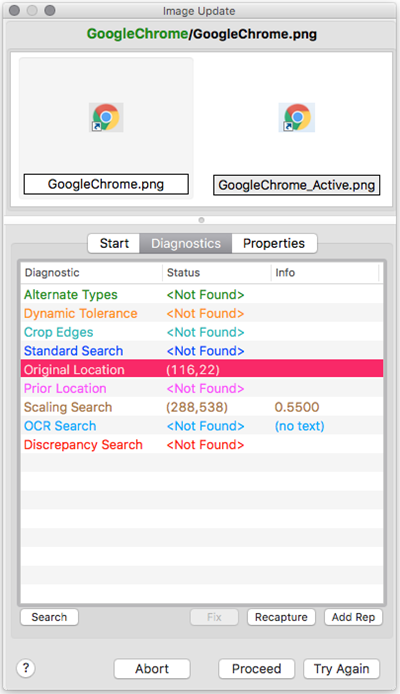
The Diagnostics tab in the Image Update panel
Recapture(再キャプチャ)は、選択した検索タイプが画像を検出するロケーションを利用して、画像をもう一度キャプチャします。 Add Rep(表現を追加)は、画像の表現を画像コレクションに追加します。または、まだ存在しない場合は、コレクションを作成します。
Properties(プロパティ)タブ
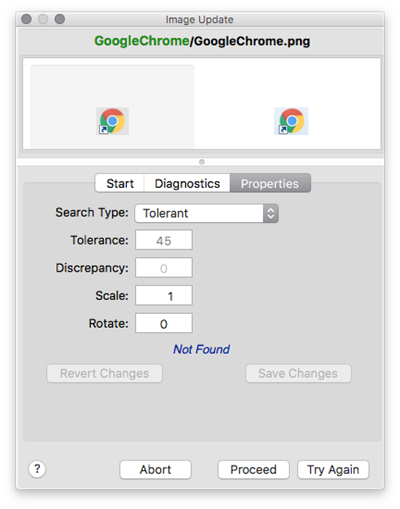
The Properties tab, visible in the Image Update panel
The Properties tab gives you the ability to manually adjust different image settings without permanently altering the state of the captured image in your suite. You can change the Search Type, Tolerance, Discrepancy, Scale, and Rotate values in this panel, then press Enter to conduct a search of the current active connection to see what settings work best. 元の設定は右側に赤で表示されます。 画像を恒久的に修正するには、Save Changes(変更を保存)をクリックします。 元の設定に戻すには、Revert Changes(変更を戻す)をクリックします。
ビューアウィンドウ内の画像に作業する
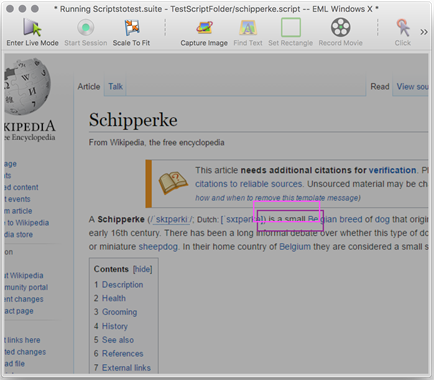
The Viewer window during an Image Update panel Diagnostic Search
When an image is not found, or multiple instances of an image are found, the Image Update panel appears and conducts a variety of diagnostic searches. The results are highlighted in the remote screen window. 診断検索のいずれかにより画像が見つかったSUT画面上の各ロケーションに、対応するカラーのボックスが表示されます。
Hovering over one of these colored squares turns the square white.

A Highlighted image match in the Viewer window
If clicked, the capture area snaps to that box, and you can use that selection to add a representation for an image collection, or fix the current image that you are working with in the Image Update panel.

A selected image match in the Viewer window
Clicking the arrow to the right of the capture area in this instance brings up the following drop-down menu:
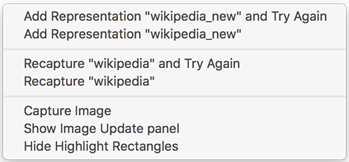
The capture area drop-down menu in the Viewer window
オプションは以下の通りです。
- Add Representation and Try Again: Captures an image using the selected image-capture bounds and adds it to the current collection or creates a collection using the current image and the newly captured image. その後、新規/アップデートした画像コレクションを利用して検索を再試行します。
- Add Representation: Captures an image using the selected image-capture bounds and adds it to the current collection or creates a collection using the current image and the newly captured image.
- Recapture and Try Again: Captures an image using the selected image-capture bounds and replaces the current image with this new image. その後、新しくキャプチャした画像を利用して検索を再試行します。
- Recapture: Captures an image using the selected image-capture bounds and replaces the current image with this new image.
- Capture Image(画像をキャプチャ):選択した画像キャプチャ境界を使用して画像をキャプチャし、画像キャプチャパネルを表示させ、保存前に画像に名前を付け希望に応じてその他の設定を調整します。
- Show Update Image Panel(アップデート画像パネルを表示 ):現在表示されていない場合、アップデート画像パネルが表示されます。
- Hide Highlight Rectangles: This hides the highlighted rectangles displayed after a search.
