画像ビューア
画像プレビュー
When you click an image once in the Images pane, it opens in preview mode, with a light gray screen over the Image Viewer area. This mode lets you browse and view images but not edit them. Double-clicking an image or clicking in the preview display fully opens the image.
Image Viewer Components
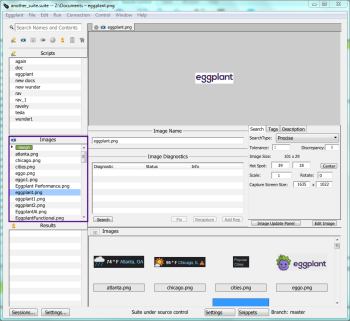
The Image Viewer consists of several distinct areas where you can browse between and manipulate images in your suite.
画像ウェル
When you select an image in the Images pane, it loads in the top of the Image Viewer. The image's hot spot is marked by red crosshairs. You can change the location of the hot spot by Ctrl-clicking (Cmd-clicking in Mac) and dragging it to a new location. You can also nudge the hot spot one pixel at a time with Ctrl+arrow key (Cmd+arrow on Mac). 上記にShiftキーを加えると、10ピクセル刻みでホットスポットを移動できます。
By default, images display on a pale gray background. Click the background to change this color. The choices range from white to black with several shades of gray in between, so you can use the one that looks best with your images—or even change it as you view each image.
Click Edit Image to load the image in the Image Editor.
画像名フィールド
Displays the name of the image file. You can use this field to change the name of the image if needed.
Search / Tags / Description Tabs
This section of the Suite window contains supplemental information about the selected image and lets you change certain properties.
Search Tab
- SearchType: Describes the level of precision Eggplant Functional requires to consider a part of the Viewer window a match for your target image. The drop-down list lets you to select from the following settings related to the image search:
- Precise: The Precise search type requires a very high degree of precision to consider an image matched in the Viewer window. この設定はあまり色の差異がない、またはコントラストが低い画像で有用です。
- Tolerant: The Tolerant search type accepts matches that have slightly different pixel colors caused by background and transparency changes. 厳密検索より許容値が広いので、レンダリングの些細なばらつきによりスクリプトが失敗する事例が減少します。
Smooth: The Smooth search type allows for dynamic font smoothing (text anti-aliasing) in images that contain text. If Eggplant Functional sometimes fails to locate an image that contains text, try changing the search type to Smooth.
Note: The Smooth search type was formerly called Text.
- Pulsing: The Pulsing search type allows for pixel colors that can change.
- Smooth and Pulsing: The Smooth and Pulsing search type allows for both changing pixel colors and text anti-aliasing.
-
Tolerance(許容値):画像の検索に使用するカラーばらつきの許容値を変更できます。
-
Discrepancy(相違):画像への一致を検出するときに無視可能な、ピクセルのパーセント値または数値を調整できます。 画像とビューアウィンドウ内の一致で認められる差異のピクセルの割合(パーセント記号あり)またはピクセル数(パーセント記号なし)です。
Note: Discrepancy can be slow to use and can result in false positive matches. Preferable approaches include setting the Search Type to Smooth in the Image Update panel, cropping the image using the Image Editor, or creating an Image Collection that includes several acceptable versions of a basic image. You can also capture a new image if the current image can only be found using a discrepancy search.
-
Image Size(画像サイズ):元の画像の寸法をピクセル単位で表示します。
-
Hot Spot: Move the image hot spot by entering new coordinates. Click Center to return the hot spot to the center of the image.
-
Scale: Scale the original image.
-
Rotate: Rotate the original image.
-
Capture Screen Size(キャプチャ画面サイズ):元の画像がキャプチャされたSUTの画面サイズが表示され、その値を変更できます。
- Image Update Panel: Opens the Image Update panel.
- Edit Image: Opens the Image Editor interface.
Tags Tab
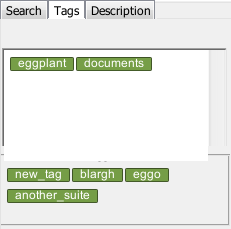
Suggested image tags appear below the Tags field. Click a suggested tag to add it to the image. You can create new tags in the Tags field, as well. Type in the tag name you want to use, then hit the Enter key or comma key to commit the tag. To remove a tag from an image, delete it from the Tags field.

Description Tab
Add an optional description of the image in this field.
画像診断
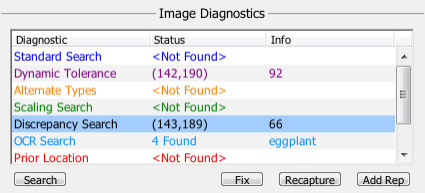
Image Diagnostics(画像診断)セクションでは、SUTビューアウィンドウで見つからなかった画像の検索基準を調整できます。 Using Image Diagnostics requires an active connection. 画像診断を使用するには、画像ペイン内で画像を選択し、その後Search(検索)ボタンをクリックします。 検索が完了すると、各種診断の結果がこのエリアに表示されます。

行われる検索は:
- Standard Search(標準検索):調整を行わず標準的なやり方で画像を検索します。
- Dynamic Tolerance(ダイナミック許容値):画像の許容値設定を調整して検索します。 画像の標準的な許容値設定から開始して、ビューアウィンドウ内で画像が見つかるまで徐々に許容値を上げていきます。
- Alternate Types(代替タイプ):一致が見つかるまで、徐々に寛大な検索タイプを適用して検索します。
- Scaling Search(スケーリング検索):0.5~2.0の範囲の異なるスケールで、一致が見つかるまで画像を探します。
- Discrepancy Search(相違検索):一致が見つかるまで、徐々に画像の相違設定を上げて検索します。
- OCR Search(OCR検索):画像内のテキストを検索して、画面上でそのテキストのインスタンスを検出します。
- Prior Location: Searches the location where your image was last found in a successfully completed test. 注:最も最近に完了した実行以外のテスト実行を選択するには、スクリプトの結果ペインのMark As Prior Run(以前の実行とマーク)ボタンを使用してください。
- Original Location(元のロケーション):元のキャプチャの時点での選択画像のロケーションを検索します。
- Crop Edges: Searches by progressively cropping in on the image, looking for smaller and smaller images. 画像内部が画面上の他のものと一致しない限り、端部は重要ではありません。
Status(ステータス)カラムには、各診断で見つかったステータスが表示されます。 特定の診断検索がビューアウィンドウ内で画像を検出すると、その画像の画面座標がStatus(ステータス)カラムに表示されます。
Info(情報)カラムには、成功した各診断が一致検出のために、検索基準をどの程度変更したかに関するの情報が表示されます。
画像診断を活用する
The buttons below the diagnostic results become active when you select a diagnostic from the list. Options are available only for those diagnostic searches that produced successful results, and not all options are available for all diagnostics.
- Fix: Replaces your image's original search criteria with the search criteria that produced the diagnostic image match.
- Recapture: Recaptures your image at the location where the diagnostic image is found.
- Add Rep: Turns your original image into an Image Collection and saves the diagnostic image as part of it. For more information, see Creating an Image Collection.
画像ブラウザ
This browser previews the images and folders in your suite. To open an image from here, click it. To open a folder, double-click it. Click Up to return to the main Images folder in your suite
