The Script Editor
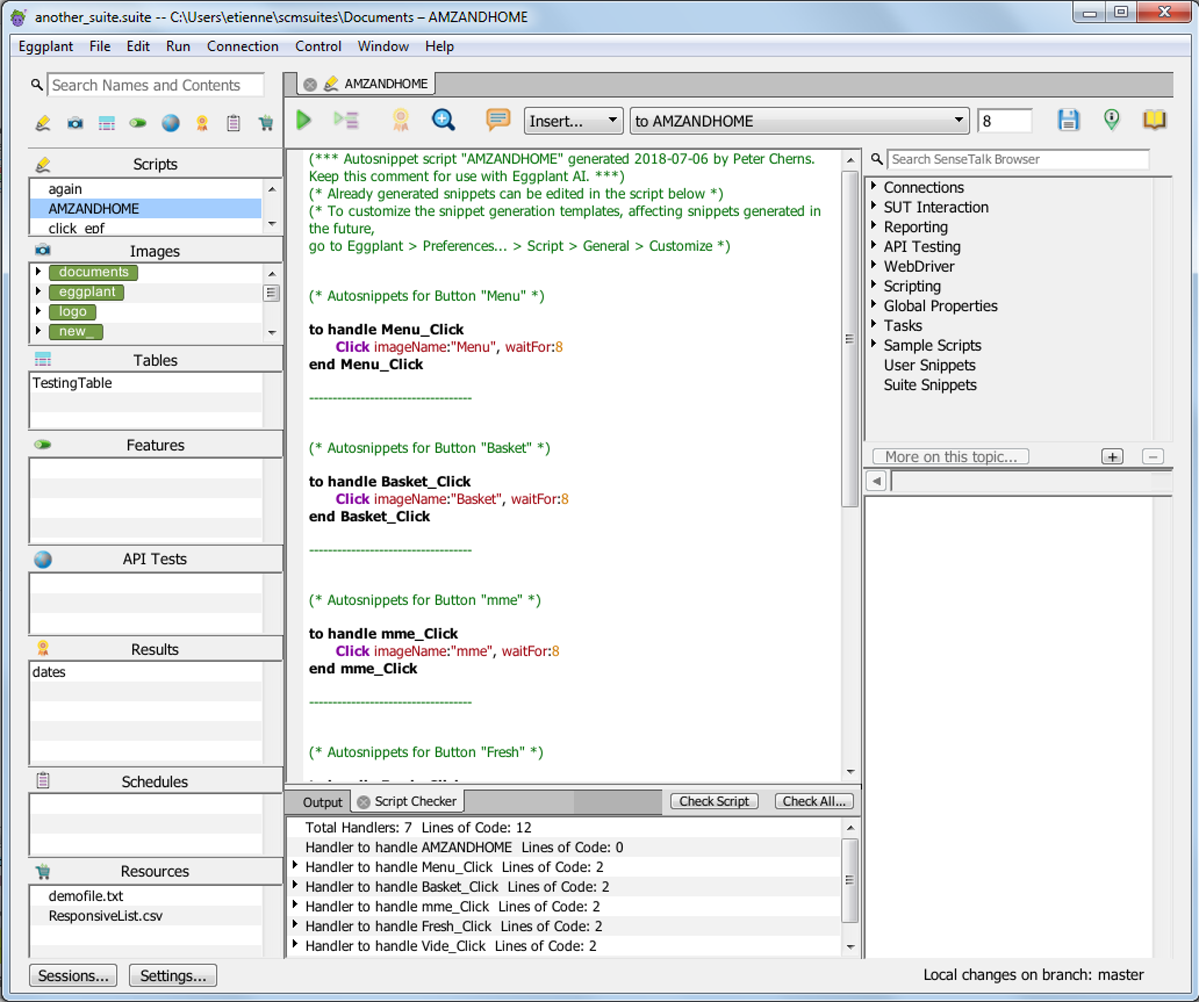
Use the Eggplant Functional Suite window to manage all of the scripts in the active suite. You also use it to create new scripts and run scripts.
Video: Organization in Eggplant Functional
The following video describes organizational features in Eggplant Functional, including those related specifically to scripts and their component parts.

Scripts Pane
The Suite window's Scripts pane on the left sidebar shows all of the scripts in the suite, and can include scripts in attached helper suites. When you select a script in the Scripts pane, the main pane of the Suite window opens a Script Editor tab with your selected script displayed in preview mode (in a temporary tab). If you click away from it, its tab goes away. When a script is in preview mode, the Script Editor appears gray. To make the tab persist, click it or click into the script.
When you add helper suites on the Settings tab, their scripts are shown by default in the Scripts pane. Helper suites and their scripts display in italic type in the scripts list. To turn off display of helper suites scripts, right-click within the Scripts pane, then select Show Helper Suites Scripts. On Mac, you can also click the gear icon at the top of the pane, then select the menu item from the drop-down list. If you open a script from a helper suite, it opens in a new Suite window. If you view a script from a helper suite in preview more, however, it opens in the current suite.

Actions List
Right-click within the Scripts pane (or on a specific script in the list) for a list of actions you can perform. On Mac, you can also click the gear icon at the top of the pane to view the actions list. Your options include:
- New Script: Creates a new, untitled script in the scripts list, and a new Script Editor tab opens. You can also select New Script from the File menu.
- Run: Executes the selected script; you can also click the
Runbutton on the Script Editor toolbar. - Debug: Runs the selected script in debug mode.
- Open: Opens a script from preview mode into a permanent Script Editor tab for editing. You can also double-click the script name to open it, or you can click in the Script Editor when the script is displayed in preview mode.
- Reveal In Explorer/Finder: Opens a Windows Explorer or Mac Finder window and shows the location of the current script.
- Rename: Allows you to change the name of the current script.
- Delete: Deletes the selected script. You can select and delete multiple scripts at one time. All Script Editor tabs associated with deleted scripts close.
- New Folder: Creates a new folder, which you can use for organizing scripts. When you create a new folder, the name will be highlighted so that you can rename it to fit your needs. If you have a folder selected when you select the New Folder option,the new folder is created inside the original folder. See the note below about referencing scripts in folders.
- Show Folders First: Select this option if you want folders to appear first in the list before items that are not inside folders.
- Show Table Actions: Turns on the color indicator in the Scripts list so that any scripts that are enabled as table actions are shown in blue.
- Show Helper Suites Items: This option is selected by default when you attach helper suites on the Settings tab. Helper suites scripts are shown inside a folder for the helper suite, and both the folder and the script names display in italics in the list.
- Sort by: This section lets you sort the scripts list by
Name,Modified Date,Last Run Date, orStatus. - Source Control: These options let you work with content if your suite is under source control management (SCM). For information about using Commit and Discard Changes, see Working with Suites Under SCM.
Referencing Scripts in Folders
When you want to call a script from within another script, typically all you need to do is include the name of the script you're calling. For example, a line of code such as
helper1
would call a script named helper1 that was in the same suite as the calling script.
If you use folders to organize your scripts, you need to use the full path, including the folder name, to reference those scripts when you call them from other scripts, and you need to use the Run command with the path enclosed in quotes. For example, if a script is in the same suite but in a folder, the SenseTalk line might look like this:
Run "Folder1/Helper1"
If the script you're calling is in a helper suite, the full path includes the file system path, which might look like this:
Run "Y:/Documents/ePFSuites/gherkin.suite/Scripts/CalcTesting2"
An easy method to get the correct code for calling a script is to drag the script name from the Scripts pane in the left sidebar into your script. The script editor automatically inserts the appropriate code, whether the script is in a folder or not.
For additional information about calling scripts in your code, see Calling Scripts from Other Scripts.
Searching Your Existing Scripts
To search for a particular script in your suite, type part of a script name or script text in the search field above the Scripts list. (Note: This search function searches all the panes in the left sidebar simultaneously.) To set a search filter, click the magnifying glass beside the Search field and choose Search All, Search Names, or Search Contents from the drop-down list.
The search works as you type, so you might find your results before you finish entering your search term. However, if you have searches that you frequently repeat, you can save your search as an item in the Search History by pressing Return after you type the term. Your search is saved on the drop-down list under the magnifying glass.
For complete information about using the search and replace function in the Suite window, see Using the Search Filter.
Script Editor Toolbar
Along the top of the Script Editor, you see a toolbar with buttons to run scripts as well as other controls to help with creating scripts.

Descriptions of the functions available on the toolbar follow. The numbers on the toolbar above correspond to the following descriptions:
1. Run Script
Use this button to execute your scripts. While the script is running, the Run Script button changes to Abort Script.
While a script is running (and is not paused), you cannot perform any manual actions in the Viewer window or open and close VNC connections.
To run a script in debug mode, Alt-click (Option-click on Mac) the Run Script button. Debug mode loads the script for execution and immediately pauses it so that you can step through line by line to closely follow its execution.)
Dynamic Breakpoints
Dynamic breakpoints are markers that cause a script to pause for debugging at designated points.
To set a dynamic breakpoint in the Script Editor, click in the narrow column to the left of the script. A black triangle appears next to the line, denoting the breakpoint.
To change or remove a breakpoint, drag the triangle to another line in the script or out of the script entirely.
2. Run Selection
This button executes only the selected part of the script. The selection does not have to include an entire line of code, but it must be syntactically complete and executable. For example, if you select the beginning of an if block, you must select all the way through the end if statement.
To run the selection in debug mode, Alt-click (Option-click on Mac) the Run Selection button. Debug mode loads the selection for execution and immediately pauses it so that you can step through line-by-line to closely follow its execution.
When you run a selection, results are not generated in the Results pane of the Suite window.
3. Show Results
Click this button to go to the Results pane for this script.
4. Show Resource
Use this button to see the source of an image or script referenced in your script. When you select an image name and click the Show Resource button, the image opens in a new Image Viewer tab. When you select a script name and click the Show Resource button, the script opens in a new Script Editor tab.
You can also show a resource by Alt-clicking (Option-clicking on Mac) a script or image name.
5. Comment
Use this button to insert a comment into a script. The button inserts an empty comment into your script at the current cursor location. Comment text is not compiled as part of the script, and will look like the code shown below:
(*Comment*)
You can also comment out a portion of existing code by using the Comment button while a portion of text in a script is selected.
Because comments are not compiled with the rest of the script, you can use the Comment button to temporarily disable parts of a script.
When you select comment text, this button changes to Uncomment. You can uncomment a previously commented portion of your script by selecting it and clicking the button. The selected text is then treated as a regular part of the script.
6. Insert
This drop-down list contains common commands and functions that you can insert into your script. When you choose an image-based item from this menu, an Open File dialog box lets you select previously captured images as parameters to the chosen command or function. Choosing Add Image lets you insert the image into the script with no new command or function.
The Find Text menu item opens the Find Text panel so that you can create an image based on text attributes.
On Mac, Shift-clicking the Insert drop-down list lets you use any of the commands there with an OCR Find Text search.
7. Handler
This drop-down list contains all of the handlers defined in the current script, including the script itself. You can choose a handler from the list to jump to its definition in the script.
8. Line Jump
In this field, you can enter a line number and press Return to jump to that line in the script.
If you have a handler selected in the Handler drop-down list, line numbers entered in the Line Jump field apply only to that handler.
9. Save
The Save button saves the current script. When a script has unsaved changes, a yellow dot appears in the close button in the top left corner of the Script Editor tab; the dot disappears when the script is saved.
10. Info
This button toggles a portion of the toolbar known as the Info pane. The Info pane contains supplemental information about the current script, and the Table Action pane, enables you to define any of your scripts as possible actions for tables. For more information, see Info pane below.
11. SenseTalk Browser
This button is a toggle that shows or hides the SenseTalk Browser. It is displayed by default when the Script Editor opens. For more information about it, see The SenseTalk Browser.
By default, Eggplant Functional automatically saves scripts when you run them. You can change this behavior in Script Editor preferences.
For more detailed information about creating scripts and running tests, see Creating Tests with Eggplant Functional.
Info Pane
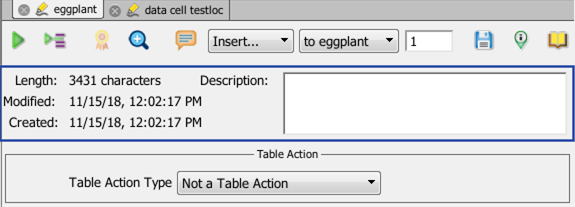
The Info toggle button on the right side of the toolbar opens the Info pane, which contains supplemental information about the current script, and the Table Action pane.

The information in the Info pane includes:
- Length: The number of characters in your script.
- Modified: The date the script was last modified.
- Created: The date the script was originally created.
- Description: A text field where you can add information about the purpose of the script or other pertinent notes.
Table Action Pane
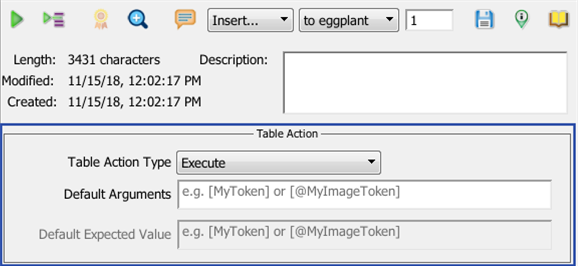
The Info pane is also where you find the Table Action pane. The Table Action pane enables you to define any of your scripts as possible actions for tables. Learn more about tables on the Tables Pane and Keyword-Driven Testing page.

The fields you can set in the Table Action pane are as follows:
-
Table Action Type: This drop-down list provides the following options:
-
Not a Table Action: is for scripts that cannot be used in tables. This option disables the other options in the Table Action pane. It is the default setting.
-
Execute: is for executing scripts that do not return a value to the table.
-
Verify: is for executing scripts that you want to verify a value against an expected result after execution.
Selecting either the Execute or Verify option enables the Default Arguments field. Selecting Verify also enables the Default Expected Value field.
-
Default Arguments: is an optional field that provides you with ways to enter default arguments for your script. For more information see,
Specifying Table Argumentson the Tables Pane and Keyword-Driven Testing page. -
Actual values: You can enter specific values you want as arguments in this field.
-
Tokens: You can enter tokens in this field. Tokens provide a list of the text or images in your suite. If your argument is an image, use [@
MyImageToken] in this field. If your argument is text, type [MyToken], whereMyImageTokenandMyTokenare the names you want to assign your tokens. -
Default Expected Value: You can optionally enter a value or values in this field that you expect the script results to match. When you run the script from a table, it compares the expected value to the actual result it returns to determine if the run was successful. Note that you can also use the tokens described above in this field instead of an actual value.
SenseTalk Browser
The SenseTalk Browser provides you with a quick-reference for the SenseTalk programming language while you are working in the Script Editor. Not only can you use it for a reference, but also to paste sample syntax from the SenseTalk Browser directly into your script. You can also add your own topics and SenseTalk code to the SenseTalk Browser.
The SenseTalk Browser, when it is enabled, comprises the panes on the right side of the Script Editor.
Resources Pane Information
The Resources pane appears in the lower left corner of the Suite window. Add any files you want to store with your suite in this pane. As a best practice, store any files referenced within a script in the Resources pane and not on the local file system. See resources pane for more information.
Output/Script Checker Pane
This pane, at the bottom of the Script Editor window, displays script output and the results of Script Checker analysis.

Output
The Output tab displays script results. Note that these are the same results shown in the Run window.
Script Checker
This tab shows the results of Script Checker analysis. This analysis of your scripts can help you debug your scripts before you run them.