Using the Eggplant Functional Connection List
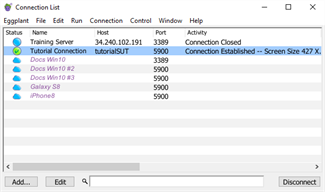
The Connection List shows you the names and other relevant information about system under test (SUT) connections defined in your Eggplant Functional (EPF) application. You can add, edit, delete, and establish connections to SUTs in this window.
Connection List Contents
The columns in the Connection List can be customized. Go to Connection > Customize Columns to select which columns to display.
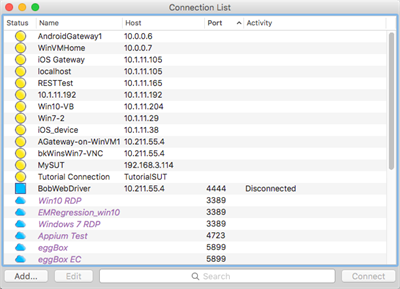
The Eggplant Functional Connection List window
Default Columns
The following columns display by default in the Connection List:
Status: Indicates the availability of the SUT, denoted by a color-coded dot. Go to Connection > Check Availability for status updates. The Connection List status colors are shown below. The Cloud category refers to Eggplant Automation Cloud SUTs.
| Cloud | Device | WebDriver | Color | Status |
|---|---|---|---|---|
| Blue | Available | |||
| Green check | Active | |||
| Green | Connected | |||
| Gray | Unavailable | |||
| Yellow | Unknown | |||
| Partial Yellow | Connecting | |||
| Partial Green | Connecting | |||
| Red | Error | |||
| Eggplant Automation Cloud connections only | Reserved |
You can have multiple connected SUTs at any given time. However, you can have only one Active SUT. The Active SUT is a SUT with an open connection that has the current focus from Eggplant Functional. It's where scripts and commands are sent. As the table shows, the Connection List represents the Active SUT with a check mark on top of the designated green icon.
If you are running a script that switches between SUTs, you can save execution time by keeping both (or all) connections open rather than disconnecting and reconnecting with each switch. The connection process itself requires measurable time, but switching between connections (that is, making a different connection the active connection) is much faster.
For information about making connections, see Opening a Connection with a SUT.
Name: Refers to the display name a SUT sends to Eggplant Functional. Before Eggplant Functional connects to a SUT, the Name column displays the same information as the Host column.
To insert the name of a SUT into a script quickly, drag it from the Connection List to the Script Editor. To insert a connection property list into the script, Alt-drag (Option-drag on Mac) the SUT to the Script Editor.
Host: Displays the SUT’s host name or IP address.
If the name in the Host field contains the word tutorial, it means the SUT is a fake SUT that you can use when you are following an Eggplant Functional tutorial. For information about Eggplant Functional tutorials, see Tutorials.
Port: Displays the number of the port on which the SUT listens for connections.
Activity: Displays a running description of your VNC connection.
Optional Columns
The following columns can be added to the Connection List window:
| Column Name | Description |
|---|---|
| Type | Displays the type of connection. |
| Color | Displays the setting you choose in the Color Depth menu. |
| SSH Host | Displays the host name or IP address of the computer that hosts an SSH tunnel for the SUT’s secure connections. |
| SSH User | Displays the account name with which the SUT user logs into an SSH host. |
| Manufacturer | Displays the manufacturer name of the connected device as specifed in Eggplant Automation Cloud. |
| Model | Displays the model of the connected device if recorded in Eggplant Automation Cloud. |
| OS | Displays the operating systems of the connected device as specified in Eggplant Automation Cloud. |
| OS Version | Displays the version of operating systems as specified in Eggplant Automation Cloud. |
| Meta-Tags | Displays the user-defined information associated with a SUT tag (custom field) in Eggplant Automation Cloud. For example, when editing a SUT, if you added a SUT tag called Location and defined the Location information, then it'll be displayed as: Location=Leatherhead under the Meta-Tags column in the Connection List window. |
Adding or Editing a SUT in the Connection List
For frequently used SUTs in Eggplant Functional, you can save the connection details in the Connection List so that you can easily make connections either from the Connection List or from within scripts.
If you are new to Eggplant Functional, you might want to visit Getting Started with Eggplant Functional for information about setting up your SUT environments, and Creating Your First SUT Connection for details on saving your first connection details in the Connection List.
After you've saved SUTs, the Connection List displays SUT details in a table:
The Connection List in Eggplant Functional with saved SUTs
To add a new connection, click the Add button at the bottom of the Connection List. To edit an existing connection, select it in the list, then click the Edit button. Both the New Connection and Edit Connection dialog boxes include the same fields for entering SUT information.
Eggplant Functional provides the option for you to create a SUT that you can use for testing when you are following an Eggplant Functional tutorial. See Creating a Tutorial SUT below for more information. For information about Eggplant Functional tutorials, see Tutorials.
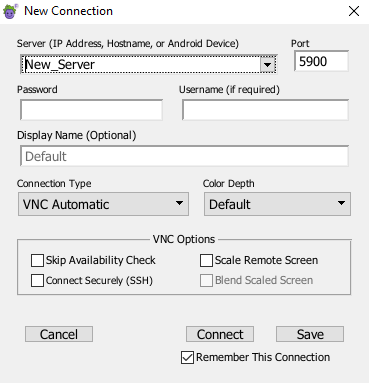
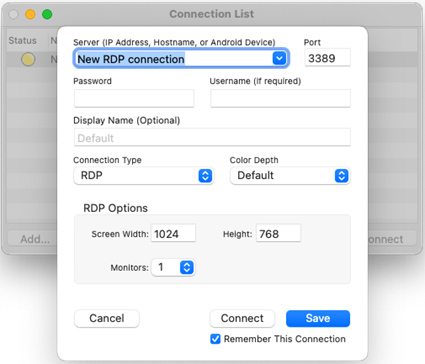
The New Connection panel in Eggplant Functional
Some of the fields in the New Connection dailog box only apply for certain connections. If a field does not apply for a specific connection type, its text box will be inactive and you will not be permitted to enter values in the field.
The fields in the New Connection dialog box are described below.
| Field Name | Description |
|---|---|
| Server (IP Address, Hostname, or Android Device) | Enter the SUT's IP address or hostname. |
| Port | The port number used to connect to the SUT. |
| Password | The password required for VNC, RDP, and Citrix connections. |
| Username | The username for VNC, RDP, and Citrix connections. |
| Display Name | Enter a name for this connection as you want it to appear in the Connection List. You can then use this name to reference the specific connection or device from your scripts when using the connect command. Note The Server information is used as the default Display Name. |
| Connection Type | The type of connection you are making. Depending on the chosen connection, you may be presented with further connection-specific options which are documented in sub-sections below. Connection types include: - VNC Automatic: Detects and assigns the appropriate VNC connection type. - VNC Standard (3.8); VNC Legacy (3.3): Different versions of the RFB protocol that the VNC server is using, for use when connecting to certain servers. - RDP: Select for connections via RDP. - WebDriver: Select for connections using Selenium WebDriver. You can use the WebDriver connection type with mobile devices. - Sauce Labs: Select for connections using Sauce Labs. You can use the Sauce Labs connection type with browsers and mobile devices. Creating a Sauce Labs connection enables both VNC and WebDriver access to a Sauce Labs device. - Citrix: Select for connections using Citrix. Citrix is ONLY available on Windows platforms. - Mobile Device: Select for connections to mobile devices and emulators which are connected to the system hosting Eggplant Functional. - Single System: (Windows only) Select to connect to the same machine where you are running Eggplant Functional, using it both to host Eggplant Functional and as a SUT. See Single Machine Testing for more information about this type of SUT connection. |
| Color Depth | The depth of color with which the Viewer window draws a SUT. To read about changing this setting, see Changing Color Depth below. |
| Connect | This button instructs Eggplant Functional to attempt to make a connection with the current settings. |
| Save | This button saves the current SUT settings. Saved SUTs appear in the main Connection List window. |
| Remember This Connection | This option is enabled by default. With this option enabled, Eggplant Functional saves this connection in the Connection List for use in the current and future Eggplant Functional sessions. If you disable this option, Eggplant Functional creates the connection as a temporary connection for the current session only; it will not be available in future sessions. Temporary connections display with their names in italics in the Connection List. |
Changing Color Depth
To increase the speed of your connection, you can decrease the color depth with which the Viewer window draws a SUT for VNC, RDP, and Webdriver connection types.
To increase or decrease color depth, choose a value in the Color Depth pop-up menu. Choose Default to draw the SUT with the same color depth you see on its native display.
If you change the color depth of a SUT, images you captured at the former color depth might not match the SUT in the current Viewer window.
VNC Specific Options
The following options only appear for VNC connections:
| Option | Description |
|---|---|
| Skip Availability Check | Select this checkbox if you don't want Eggplant Functional to poll the listed server to see if it's available. This setting isn't available for RDP connections. |
| Connect Securely (SSH) | Selecting this checkbox allows you to create a secure connection via SSH. This setting isn't available for RDP connections. To read more about creating a secure connection, see Opening Secure Connections below, as well as VNC Security. |
| Scale Remote Screen: | Select this checkbox to scale mobile VNC servers by 50 percent in each dimension. This option provides better performance when you are using mobile devices with large screens or high resolution. Note This option works only with iOS Gateway and Eggplant Functional's built-in VNC server for Android devices. |
| Blend Scaled Screen | Select this option to blend pixel colors when you are using Scale Remote Screen. This option should be used only for backward compatibility with older scripts or images. |
While the Port field is not a VNC-specific option, the default value 5900 is specific to the VNC connection types.
Step by Step: Entering VNC Connection Details
- Open the add/edit panel of the Connection List.
- Enter the display name you want to use and the IP address or hostname of the SUT you want to connect to, along with the device's port number.
- For VNC connections, the Password and Username fields refer to the VNC server on the SUT. If this information is required to connect to the VNC server, enter it here.
- Select the appropriate VNC Connection Type from the drop-down list. VNC Automatic is the default.
- Make any other changes or selections for this connection, then click Save to save the connection details to the Connection List.
Configuring Secure VNC Connections
Secure Shell (SSH) is a network protocol that uses data encryption to transfer information securely. For Eggplant Functional to make a secure VNC connection to a SUT, the SUT must be able to host an SSH tunnel or have a secure connection with another computer that can host an SSH tunnel. Also, you must have a user account on the SSH host computer.
Visit the VNC Security page for general information on VNC security in Eggplant Functional.
Step by Step: Setting up an SSH Login
-
In the Connection List, select the SUT.
-
Click Edit.
-
Select the Connect Securely (SSH) checkbox, which opens the SSH login pane.
-
Fill in the Username and Password fields. Username and Password refer to your user account on the SSH host computer. On Windows, enter your SSH key in the Password field.
-
In the SSH Host field, enter the IP address or hostname of the SSH host computer.
-
Select the Remember SSH Password checkbox to save the password of the user account on the SSH host; otherwise, you must enter the password whenever you open a connection with the SSH host.
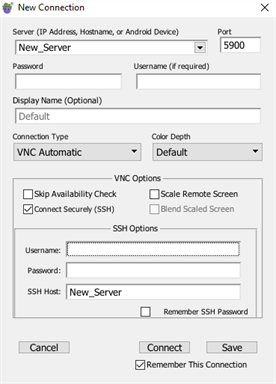
SSH Options in the New Connection panel in Eggplant Functional
Setting up SSH in the SUT's VNC Server Application
When you use SSH to connect to a SUT, the SUT's firewall must allow connections on port 22, the standard port for SSH connections.
For more information about secure VNC connections, see VNC Security, or see the SUT's VNC server documentation.
RDP Specific Options
| Option | Description |
|---|---|
| Screen Width and Height | The screen resolution you want for the SUT display. |
| Monitors | The number of monitors you want to display for the SUT. |
| Enable Smart Card | (Windows only) Enable support for Smartcard authentication. |
While the Port field is not a RDP-only option, the default value 3389 is specific to the RDP connection types.
Step by Step: Entering RDP Connection Details
-
Open the add/edit panel of the Connection List.
-
Enter the display name you want to use and the IP address or hostname of the SUT you want to connect to.
-
Select RDP from the Connection Type drop-down list. RDP connections default to port 3389, but you can change this if necessary.
-
The Password and Username fields refer to the Windows user account you are connecting to. This information is always required for RDP connections.
-
When you select RDP as the connection type, the RDP Options section appears, which lets you specify the Width and Height at which the RDP session window opens. You can also select the number of monitors you want represented in your session window.
The available options when adding a new RDP connection
-
Make any other changes or selections for this connection, then click Save to save the connection details to the Connection List.
Remember that for RDP, the SUT also has to be configured to accept the connection.
WebDriver Specific Options
Eggplant Functional provides the WebDriver connection type to connect to Selenium desktop browsers as SUTs. This connection type provides the following specific options:
| Option | Description |
|---|---|
| Browser | A drop-down list with Chrome, Firefox, Safari, MicrosoftEdge, and Internet Explorer. It also provides a None option, which allows you to specify the browser in the Capabilities section as described below. |
| Capabilities | The part of the screen where you can add capabilities for your specific WebDriver. Refer to your WebDriver documentation for information about the capabilities your WebDriver supports. |
While the Port field is not a WebDriver-only option, the default value 4444 is specific to the WebDriver connection types.
Step by Step: Entering WebDriver Connection Details
-
Open the add/edit panel of the Connection List.
-
Enter the the IP address or hostname of the SUT you want to connect to, along with the port's device number.
-
Select WebDriver from the Connection Type drop-down list.
-
The WebDriver Options section appears. You can further configure the connection here.
-
Browser: The browser you want WebDriver to connect to. Select None to test applications on a mobile device SUT.
-
Capabilities: Define arbitrary browser capabilities here, in key-value pairs (e.g., Mode=Incognito for browsers that allow it). Different browsers have different capability keys.
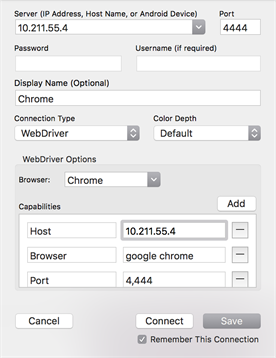
WebDriver connection options in Eggplant Functional
-
-
Click Save to save the connection details to the Connection List.
To connect to Selenium servers in SauceLabs environments, pass the SauceLabs username and accessKey as Capabilities. Using key-value pairs, enter username and accessKey as the capability keys followed by the credential values. (Alternately, Eggplant recommends that you utilize an explicit Sauce Labs connection, introduced in Eggplant Functional version 22.3, to get a WebDriver connection to Sauce Labs. Eggplant Functional is able to store Sauce Labs credentials securely, providing enhanced security over using Capabilities.)
Sauce Labs Specific Options
The options in this section only appear for Sauce Labs connections.
Many of the Sauce Labs options disscussed below have specific values which are enumerated by Sauce Labs. To understand the possible valid values, please refer to the Sauce Labs Platform Configurator Tool and take note of the option assignments produced by the tool. In general, the Platform Configurator options map to one of the option names described below and the corresponding option values shown in the Platform Configurator should be entered into the text box in the appropriate Eggplant Functional connection dialog box.
Similarly, you can find your Sauce Labs username and API key by viewing the "My Account" info under your Sauce Labs User Settings
Common Sauce Labs Options
| Options | Description |
|---|---|
| User | This is the username associated with your Sauce Labs account. |
| API Key | The API Key generated by Sauce Labs for the specified Sauce Labs account. |
| Data Center | See the Sauce Labs documentation for more information about this parameter. NOTE: Sauce Labs requires that this parameter must be entered in lower-case letters with dashes replacing spaces (also known as "kebab case"). For Example: "us-west-1" rather than "US WEST 1". |
Sauce Labs Browser-specific Options
| Options | Description |
|---|---|
| Platform Name | The name and version of the browser's host operating system. |
| Browser Name | The brand of the browser to test against. |
| Version | (Optional) The version of the Browser to test against. |
| Resolution | (Optional) The screen resolution you want configured for the browser. |
| URL | The URL for the website you want the browser to open on launch. |
Sauce Labs Device-Specific Options
| Options | Description |
|---|---|
| Platform Name | The name of the device's operating system. |
| Device Name | The model name of the device to test. Tip: Use a period and an asterisk (.*) at the end of the name to broaden the device selection (for example, "iPhone.*"). |
| App | (Optional) The native mobile app you want to test. See the Sauce Labs documentation for more information about this parameter and how to upload your app to storage. |
Sauce Labs Tunnel Proxies Options
Sauce labs tunnels can be used to connect to both Sauce Labs browsers and devices.
To use the Sauce Labs Tunnel Proxy functionality, you must first have the Sauce Connect Proxy installed and running on the same machine as Eggplant Functional. Please see Connecting Using Sauce Connect Proxy for more information.
| Options | Description |
|---|---|
| Tunnel Name | (Optional) The name of the active Sauce Connect tunnel to use when connecting to Sauce Labs. |
| Tunnel Owner | (Optional) The name of the Sauce Labs user account that was used to establish the active Sauce Connect tunnel. |
Step by Step: Entering Sauce Labs Connection Details
-
Open the add/edit panel of the Connection List.
-
Select Sauce Labs from the Connection Type drop-down list.
-
Select the Browser or Device option.
-
Enter the appropriate values for your Sauce Labs connection types:
- For Devices: Enter the connection parameters (see Common Sauce Labs Options and Sauce Labs Device-Specific Options above for definitions):
- User:
- API Key:
- Data Center:
- Platform Name:
- Device Name:
- App: (Optional)
- For Browsers: Enter the connection parameters (see Common Sauce Labs Options and Sauce Labs Browser-Specific Options above for definitions):
- User:
- API Key:
- Data Center:
- Platform Name:
- Browser Name:
- Version: (Optional)
- Resolution: (Optional)
- URL:
- For Devices: Enter the connection parameters (see Common Sauce Labs Options and Sauce Labs Device-Specific Options above for definitions):
-
If you are using the Sauce Labs Tunnel Proxies optional feature, two extra parameters are required. (see Sauce Labs Specific Options above for definitions):
- Tunnel Name:
- Tunnel Owner:
-
Click Save to save the connection details to the Connection List.
Citrix Specific Options
The following options are specific to Citrix-type connections. Citrix SUTs are only available on Windows platforms and require the Citrix Workspace App. For more information on Eggplant's Citrix integration, including the Citrix Workspace App, see Citrix Virtual Desktop in the Eggplant Gateway documentation.
Citrix Options
| Options | Descriptions |
|---|---|
| Username and Password | While these fields are not unique to Citrix connection types, the options you have for authentication with Citrix connections are unique. This is typically your Active Directory (AD) username and password synchronized to log into your Citrix environment. See Citrix Prerequisites for information about Citrix supported authentication options. |
| Storefront URL | The URL of your organization's Citrix domain. |
| Application | The application or desktop you would like to launch. You can only choose an application or desktop that is available in the Citrix Workspace App. |
| Screenshot Interval | (Optional) Default: 400. The amount of time, in milliseconds, to wait between two subsequent screenshots of the Citrix SUT. Note: Choosing a value smaller than the default may adversely impact performance. |
| Screen Resolution | (Optional) Default: 1600x900. The resolution of the Citrix SUT. Only resolutions 1280x960 and 1600x900 are supported. |
Step by Step: Citrix Connection Details
For parameter definitions please see Citrix Specific Options.
- Open the add/edit panel of the Connection List.
- Select Citrix from the Connection Type drop-down list.
- Enter the following parameters appropriate to your organization's Citrix setup: (see the table above for information about these fields.)
- Username and Password as appropriate for your system.
- Storefron URL:
- Application:
- Screenshot Interval: (Optional)
- Screen Resolution: (Optional)
- Click Save to save the connection details to the Connection List.
Mobile Device Specific Options
The options in this section only appear for Mobile Device Connections. If this is your first time connecting to a mobile device, we strongly recommend that you read Connecting to Mobile Devices and the appropriate "Working with ... Mobile Devices" topic for important concepts related to testing mobile devices (Working with Android Mobile Devices and Working with iOS Mobile Devices).
The options you need to specify for your mobile device depend on the type of device you are connecting. Currently, Eggplant Functional supports both Android and iOS devices.
Android Specific Options
| Options | Description |
|---|---|
| Device ID | The Android Device ID of the mobile device to which you want to connect. If only one device is connected to your system, you can leave this field blank and Eggplant Functional will automatically connect to that device. If you have more than one device connected, this field is required. Please see Getting Android Mobile Device IDs and Connecting to Android Emulators for details. |
Step by Step: Entering Mobile Device Connection Details for Android
- Open the add/edit panel of the Connection List.
- Select Mobile Device from the Connection Type drop-down list.
- In the Mobile Device Options pane, click on the Android radio button
- If you have multiple devices attached to your system, enter the Device ID. You can leave this field blank if you only have a single device connected.
- Click Save to save the connection details to the Connection List.
iOS Specific Options
| Options | Description |
|---|---|
| Device UDID | The iOS Device UDID of the mobile device to which you want to connect. If only one device is connected to your system, you can leave this field blank and Eggplant Functional will automatically connect to that device. If you have more than one device connected, this field is required. Please see Getting iOS Mobile Unique Device IDs for details. |
| Provisioning Profile Path | Enter the fully qualified name of the file which contains your Provisioning Profile. You may click on the "..." button to open a file navigator to help you locate your file. |
| Developer Certificate Path | Enter the fully qualified name of the file which contains your Developer Certificate. You may click on the "..." button to open a file navigator to help you locate your file. |
| Developer Certificate Password | Enter the password for your Developer Certificate. |
| Developer Disk Path | Enter the path to the top-level directory which contains all of the Developer Disks for your chosen HW platform. See Ensure You Have Your Developer Disks for details. |
Step by Step: Entering Mobile Device Connection Details for iOS
- Open the add/edit panel of the Connection List.
- Select Mobile Device from the Connection Type drop-down list.
- In the Mobile Device Options pane, click on the iOS radio button
- If you have multiple devices attached to your system, enter the Device UDID. You can leave this field blank if you only have a single device connected.
- Enter the following remaining parameters (TIP: Click the ellipses button, "...", next to any path parameter to open a helpful file system navigation window):
- Provisioning Profile Path:
- Developer Certificate Path:
- Developer Certificate Password:
- Developer Disk Path:
- Click Save to save the connection details to the Connection List.
Single System Specific Options (Windows Only)
The Eggplant Functional Single System connection type allows you to use the Windows machine where you are running Eggplant Functional as both the Eggplant Functional controller that drives the tests and the SUT. If this is your first time using a Single System connection type, we recommend you read Single System Testing for important information about this connection type.
| Option | Description |
|---|---|
| Username and Password | The credentials you use to log into the Windows machine where you are running Eggplant Functional. While these fields are not unique to Single System connection types, the fact that you use your Windows credentials to log into the same machine is. We recommend that you enable secure password management for your connections using the Windows Credential Manager as described in the Note below. This connection type also supports network domain users specified in the following format: <DOMAIN_NAME>\<user_name>. If your Eggplant Functional host machine is on a domain and you do not provide the domain user in the format shown, you will see a login screen in the SUT Viewer window and must provide credentials to proceed. |
| Screen Width and Height | The screen resolution you want for the SUT display. Default: Single System connections use the screen resolution set on the Windows operating system where you are running Eggplant Functional. You can find the resolution on your Windows system by navigating to Display > Scale and Layout > Display Resolution. |
Step by Step: Entering Single System Connection Details
Follow the steps below to create a Single System connection in the Connection List.
Support for this connection type was added in Eggplant Functional 23.3.0 for Windows only.
We recommend using the Windows Credential Manager with Single System connections. See Secure SUT Connection Credentials for more information about how to configure secure credentials in Eggplant Functional before you create your Single System connection. Be aware that enabling the Credential Manager for Single System connections will implement it for all of your saved connections.
- Click the Add... button on the Connection List to open the add/edit connection panel.
- Select Single System from the Connection Type drop-down list.
- In the Display Name (Optional) field, enter a display name if you want one.
- In the Password and Username fields, enter your Windows machine or network domain user credentials. If you are using your network domain user, please enter it in the following format:
<DOMAIN_NAME>\<user_name>. We recommend using the Windows Credential Manager with Single System connections as desribed in the Note above. - In the the Single System Options area on the panel, specify the resolution you want for your single system connection in the Screen Width and Height fields. You can leave this blank to use the screen resolution of your Windows machine.
- Click Save to save the connection. Your new Single System connection will now be available in the Connection List.
Creating a Tutorial SUT
Eggplant Functional provides the option for you to create a SUT that you can use for testing when you are following Eggplant Functional tutorials. For information about Eggplant Functional tutorials, see Tutorials.
The tutorial SUT looks like a mobile device. When you connect to a tutorial SUT, it opens in the Eggplant Functional viewer window:
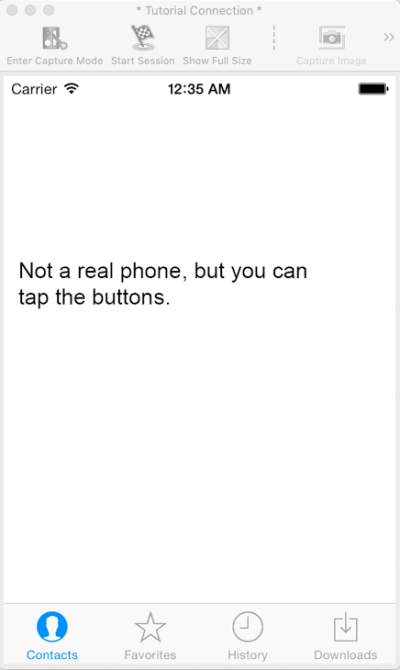
Tutorial SUT open in theEggplant Functional Viewer window
To create a tutorial SUT, create a connection for it and specify tutorialSUT as the hostname in the Server field. That is the only requirement. You can optionally specify a display name for it and create it as any connection type.
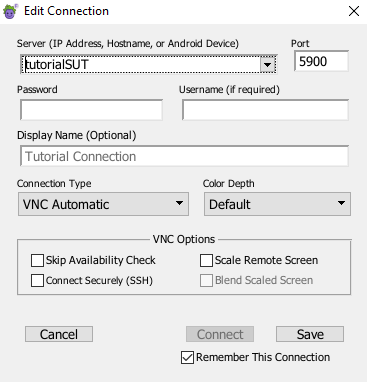
The Eggplant Functional Edit Connection window
Opening or Closing a SUT Connection
There are several ways to open a connection with a SUT:
- In the Connection List, double-click the name of the SUT.
- In the Connection List, select the SUT and click Connect.
- On the main menu, go to Connection > Available SUTs and select the desired SUT.
- You can open a VNC connection from within a script by using a
Connectcommand. If you use theConnectcommand to connect to a SUT that isn't saved in the Connection List, the connection is treated as an ad-hoc connection. The connection shows up in the Connection List while it is active (during the script run), and is removed from the list when it is no longer being used; the connection isn't saved. For more information, see The Connect Command.
RDP connections allow only one user connection at a time. If you attempt an RDP connection to a Windows system that already has a connected user, you're given the choice to ask the other user to log off or to cancel your logon attempt. If another user attempts to access a SUT while you are logged on via RDP, you'll receive a Windows system message in the SUT asking if you want to log off to allow the other user access; if you don't respond within 30 seconds, Windows logs you off—which can have unintended results if you are in the middle of running a test.
There are several ways to close a connection:
- In the Connection List, select the SUT and click the Disconnect button.
- Choose Connection > Disconnect from the main menu.
- Use the
disconnectcommand in your script.
Closing a Viewer window does not close your connection with the corresponding SUT.
Connecting to a Device through Eggplant Automation Cloud
If you are working with Eggplant Automation Cloud, you can set up Eggplant Functional so that your cloud SUTs are accessible through the Connection List. See Cloud Preferences for details of establishing a connection to your Eggplant Automation Cloud environment.
After you connect to Eggplant Automation Cloud, your cloud SUTs appear on the Connection List, designated by the cloud icon (as shown in the status table above). You can use the Connection List to establish connections to those SUTs just as you do for other SUTs.
Eggplant Automation Cloud SUTs are not editable as non-cloud SUTs are. The information presented in the Connection List is what is available in the cloud environment. To make any changes, you would need to do so in your Eggplant Automation Cloud web portal. Note, however, the exception to this requirement for mobile WebDriver SUTs below.
When you make a connection to a cloud SUT through Eggplant Functional, Eggplant Automation Cloud creates an ad hoc reservation to that SUT for you. When you disconnect, the reservation is canceled.
For instructions on making reservations and other features of Eggplant Automation Cloud, see the Eggplant Automation Cloud documentation.
Accessing Mobile WebDriver SUTs
You can define a SUT in Eggplant Automation Cloud for use in mobile WebDriver testing by including the WebDriver port in the SUT definition. See Adding SUTs in Eggplant Automation Cloud for complete information about defining SUTs in Eggplant Automation Cloud.
If you define a mobile WebDriver SUT in Eggplant Automation Cloud, it appears twice in the Eggplant Functional Connection List: once as a VNC connection and once as a WebDriver connection. The WebDriver connection has -WebDriver appended to the Name to distinguish it.

Mobile WebDriver connections from Eggplant Automation Cloud shown in the Eggplant Functional Connection List
You can make both a VNC connection and a WebDriver connection to the same SUT, which would let you create hybrid tests with both object-based and image-based scripting. You can also make either connection independently. Both listings in the Connection List, however, refer to one SUT definition in Eggplant Automation Cloud.
Mobile WebDriver SUTs in the Connection List have some unique behaviors:
- When you connect to one of the two related WebDriver SUTs, both SUTs show as reserved on the Connection List. (Remember, both listings point to one SUT definition on the back end.) In the screenshot above, notice that iPhoneForObjectTests is connected (green cloud icon with check mark) and iPhoneForObjectTests-WebDriver is not connected but reserved (blue cloud icon with check mark).
- When both related SUTs are connected, the one you connected to first is the primary and the other is the secondary. You can disconnect from the secondary without affecting the connection to the primary. If you disconnect from the primary, the secondary is also disconnected.
In addition, unlike other cloud SUTs, you can edit the WebDriver listing. In fact, you typically must edit the listing to add Capabilities for the device platform (iOS or Android) and specific application that you plan to test. Without this information, you won't be able to make the WebDriver connection.
Important: Capabilities are platform-specific and application-specific. You will need to consult WebDriver documentation for the key-value pairs that meet your testing needs.
You can edit the WebDriver SUT by using any of the methods for editing a non-cloud SUT:
-
Select the SUT in the Connection List, then click Edit.
-
Right-click the SUT in the list, then select Edit Connection.
-
Select the SUT in the list, then go to Connection > Edit Connection on the main menu.
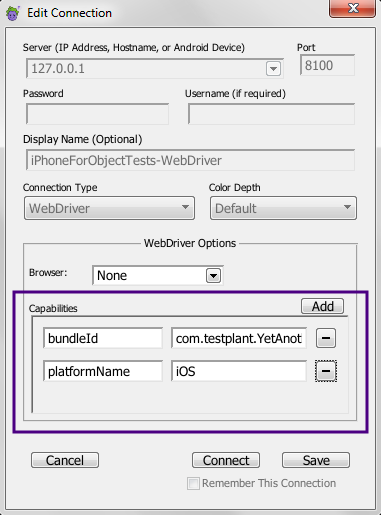
Add Capabilities for mobile WebDriver connections in the WebDriver Options section of the Edit Connection dialog box
Capabilities are saved locally per-user. Therefore, different users do not share saved capabilities.
For information about WebDriver SUTs as well as adding other SUTs in Eggplant Automation Cloud, see Adding SUTs in Eggplant Automation Cloud.
** To connect to Selenium servers in SauceLabs environments, pass the SauceLabs username and accessKey as Capabilities. Using key-value pairs, enter username and accessKey as the capability keys followed by the credential values.
Screenshot Connections
Screenshot connections are useful for troubleshooting. If a test fails, you can capture an image of the screen where the test failed, then use that screenshot to perform image and text searches to help find the source of the failure. You can also use a screenshot connection to create a character collection.
Take a screenshot of your SUT, and take note of where it's saved. To open the screenshot, go to Connection > Open Screenshot Connection. You can also open a screenshot connection using the Connect Command.
Connecting through the Available SUTs Menu
You can view what SUTs are available and open a connection to a SUT by selecting the Available SUTs option on the Connection menu. This option lets you open a connection without opening the Connection List, which is especially useful if you prefer keeping fewer windows open to reduce screen clutter.
If you have an open connection, the Available SUTs flyout menu represents the connected SUT bracketed by asterisks (*). Note that if you have more than one open connection, only the active connection is indicated with asterisks.
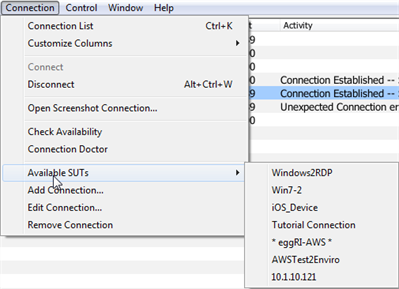
The Available SUTs flyout menu
In addition to opening a connection, selecting a SUT from the Available SUTs menu:
- brings the connected SUT's Viewer window forward
- makes the connection the active connection if it wasn't already
The Available SUTs menu shows any SUTs that you have saved in your Connection List as well as any environments that Eggplant Functional can find with Bonjour (if Bonjour is enabled). The Available SUTs list is updated dynamically as connections are added, deleted, or modified.
The Available SUTs menu does not show Eggplant Automation Cloud and WebDriver connections.
Troubleshooting SUT Connections
If you are having problems connecting to a SUT, see Troubleshooting Connection Issues.