The Tables Pane and Keyword-Driven Testing
The Tables pane in the Eggplant Functional (EPF) Suite window is where you can set up and manage keyword-driven testing. This table-based approach is also known as scriptless testing—you can parameterize test cases using the Tables feature to define the actions, arguments to pass to those actions, and the order in which to perform the actions.
The Tables Pane
The Tables pane of the Suite window lists all the tables defined in the current suite. When you select a table in the list, the table tab opens in the main suite window in preview mode. To open the table, right-click the table in the list and select Open, or click in the main pane when the table is displayed in preview mode.
To create a new table, right-click in the Tables pane and select New Table. On Mac, you can also click the gear icon on the Tables pane title bar and select New Table. When you create a new table, a new tab opens in the Suite window with a blank table, ready to be developed:
![]()
Eggplant Functional's Tables pane in the Suite window showing a newly created table
Searching Your Existing Tables
To search for a particular table in your suite, type part of a table name in the search field above the Scripts list. To set a search filter, click the magnifying glass beside the Search field and choose Search All, Search Names, or Search Contents from the drop-down list.
This search function searches all the panes in the left sidebar simultaneously.
The search works as you type, so you might find your results before you finish entering your search term. However, if you have searches that you frequently repeat, you can save your search as an item in the Search History by pressing Return after you type the term. Your search is saved on the drop-down list under the magnifying glass.
For complete information about using the search and replace function in the Suite window, see Using the Search Filter.
Setting Up a Table
A new table consists of one blank row. Each time you define a row in the table, a new blank row is added to the bottom. You can also add a new row either above or below a row by choosing the appropriate option from the Action drop-down list on the toolbar or by right-clicking a row and selecting Insert 1 Above or Insert 1 Below.
The table includes several columns:
-
Step: The first column includes the step number. This number is generated automatically and is not editable. Note that you can also click and drag on this column to re-order your table. If you do so, the step numbers update automatically to reflect the new positioning.
-
Action: This column includes a drop-down list where you pick the action you want to perform on this step. In addition to SenseTalk commands that are included here automatically, you can make your own scriptsaccessible on the Action drop-down list on the Info pane of the Script Editor tab for each script.
-
Arguments: This column is where you enter arguments required by the command or script selected in the Action column. For more information on arguments, see Specifying Table Arguments.
-
Expected Value: This column lets you insert the value you expect from the chosen action. For instance, for a Boolean expression, the expected value would be either
TrueorFalse.noteWhen you declare scripts as table actions, you can include placeholder text for the expected value or include a specific value.
-
Actual Value: After the step runs, this column displays the actual value for the action or command. This value is not editable by the user.
-
Pass/Fail: After a run, this field displays
Passand a green background if the Expected Value matches the Actual Value orFailwith a red background if they don't match. If the step encounters an exception, this column displaysError. If the line completes successfully but there are no values to compare, the table cell turns gray. -
Comment: The comment field lets you enter your own notes about this step. This field is optional and doesn't affect the running of the step in the table.
Specifying Table Arguments
The Arguments column in the table lets you pass arguments, if required, to the commands selected in the Action column. You can also pass arguments to scripts that you select as table actions. If you're passing multiple arguments for a single action, separate them with commas.
When you use the drop-down list in the Action column to insert a SenseTalk command, a token for any required argument is inserted in the Arguments column, and the token includes text that describes what the expected argument should be:
- If the expected argument is an image, such as with the
clickcommand, the inserted token acts as a drop-down list, which includes all the images in the current suite. - If the argument is text, such as with
TypeText, the token acts as placeholder text; select the token and replace it with the text you want to use.
When you declare scripts as table actions on the Script Editor tab, you can define tokens and placeholder argument text or pass actual arguments that show up here when the script is selected as an action; for information about this process, see The Script Editor page. You can highlight table action scripts by right-clicking in the Scripts list and selecting Show > Table Actions. Any scripts you've enabled for use in tables turn blue in the list.
Passing Results as Table Arguments
A table step can reference the results from previous steps as arguments. That is, if a step returns a result, that result can be used as an argument in a later step of the table. This ability effectively lets you pass table results to other table actions.
To use a step result as an argument, you reference the line or step number by using the number sign (#) and the specific step number: #<step>. For example, to reference the result of step 3, you would use #3 as the argument. You can use #prev to reference the previous line.
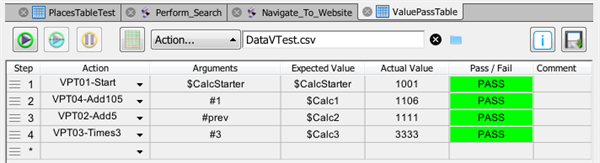
Table arguments let you pass results to later steps in the table
You can also insert step references from the table toolbar or by selecting a row and right-clicking. Select Insert Reference from the drop-down list, then choose the step number or #prev. Note that if you insert multiple arguments with this method, the arguments are listed without commas, which is also valid syntax (the number sign serves as a separator).
Step references in arguments are relative to the line they initially reference. If you later re-order the lines of the table, step references in arguments update automatically so that they continue to point to the same action at its new step number.
You can't reference a result that occurs in a later step in the table. For instance, in step 2, you can't reference the result of step 5. If you re-order a table, ensure that your references are still valid. You will get an error message if you attempt to run a table that has invalid references.
Using Tables for Data-Driven Testing
You can build a table that pulls information from an external .csv file for data-driven testing. For information about data-driven testing, see Gathering and Using Data and Data Driven Testing with Eggplant Functional.
To attach a .csv file, click the folder icon on the tables toolbar. In the file browser, locate the .csv file that you want to use, then click Open (Windows) or Choose (Mac). The file is referenced with a relative path. Best practice is to store your .csv files inside the same folder as the suite that will be accessing the file. This allows you to access the file without needing to qualify or re-establish the path if you connect to Eggplant Functional remotely or if you move the suite itself.
Your .csv file must include a header row as its first row. Headers must be single words; they can include underscores but no other special characters.
You can reference values from an attached data file in the Arguments column and the Expected Value column. To reference a value, you call the name of the column in the .csv file, preceded with the dollar sign ($). For example, if the first column in your data file is called Location, you would insert $Location to call values from that column.
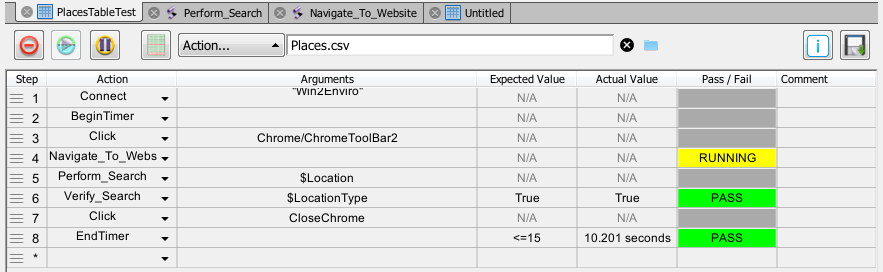
You can use tables for data-driven testing in Eggplant Functional
A typical run of a table performs each table action one time; however, when you attach a data file for data-driven testing, the table runs through fully once for each line of data in the file (excluding the header row, of course). Each iteration accesses one row of data. Within that iteration, all the rules of tables apply, including the ability to pass results to later steps. However, no values are passed between iterations; each pass of the table begins with a new row of data from the .csv file.
Responsiveness Testing with Tables
You might want to test or validate how long a table run takes to execute, or even how long specific steps take. You can perform responsiveness testing with the BeginTimer and EndTimer commands on the Actions drop-down list.
When you insert a BeginTimer command, you can include an argument, which would be a name for the timer. The name argument is optional; however, naming the timer lets you use nested timers. For instance, you could have a timer named Main as the first and last lines of your table so that it provides a timing for the whole table. Within the table, you could enclose a subset of steps in a timer called Test1, which would allow you to validate a specific procedure within the table. There is no Expected Value or Actual Value for BeginTimer.
The argument for EndTimer is the name of the timer you want to stop. If the timer doesn't have a name, leave the argument blank. Note, however, that the timer doesn't actually stop. Instead, it outputs the current timer value to the Actual Value column, and the timer continues running. Therefore, you can start a single timer, then use EndTimer to check time values at multiple points in your table run.
In the Expected Value column for EndTimer, you can insert a value that might be your timing goal for reaching that step of the table. Remember that the Actual Value is the value of the timer at that point, in seconds. The Expected Value you use should be expressed as a simple comparison; for example:
- < 1 minute
- > 2 seconds
- <= 42
Note that if you don't specify the units, seconds is assumed. Your Expected Value is compared against the Actual Value to provide a Pass/Fail value for the step.
The Table Toolbar
The toolbar contains several controls:
![]()
The Tables toolbar lets you manipulate tables for keyword-driven testing
- Run Table Script: This button begins a run of the table. In a typical run, all the steps in the table are performed once, in sequence. However, if you have attached an external file (.csv) for data-driven testing, the run performs each line of the table once for every row of data in the .csv (excluding the header). Even if an individual step fails, the run continues to the next step. During a run, the Run button changes to Abort Table Script so that you can stop the run.
- Run selection: This button lets you run selected rows from the table. Click to highlight the step or steps you want to run. Use Shift+click or Cmd+click (Mac)/Ctrl+click (Windows) to select multiple rows. The rows that you choose for Run selection don't have to be contiguous, but they always run in order.
- Pause Table Script: You can use this button to pause a running table script. Click the button again (Continue Table Script) to resume running the table.
- Show results for this table: This button takes you to the Results pane and opens the tab for the current table.
- Action: The Action drop-down list includes options for working with the table. Most of these options are available only when you have at least one line selected in the table. The options are:
- Insert 1 Above / Insert 1 Below: Inserts a new line in the table either above or below the currently selected line; these options are available only when a single line is selected in the table.
- Delete Row(s): Permanently deletes the selected row or rows from the table.
- Disable Row(s): Disables the currently selected row or rows. Disable rows are preventing from running; you can re-enable a disabled row by clicking it and selecting
Enable Row(s)from the Action drop-down list. - Clear results: Clears the results from the last execution of the table from the Pass/Fail column and the Actual Value column (for any row that receives an Actual Value).
- Reset Arguments: Resets the argument for the selected row or rows to the default value for the currently selected action; if there is no default value for an action, any value is cleared.
- Reset Expected Value: Resets the expected value for the selected row or rows to the default value for the currently selected action; if there is no default value for an action, any value is cleared.
- Insert Reference: This option lets you insert a reference to a specific line to use the result of that line as an argument. You can also insert the shortcut
#prevto refer to the result of the previous line.
- Data driven test file: If you have attached a .csv file for data-driven testing, the file name shows in this field, along with the relative path.
- Use the X (delete) button to the right of the field to remove a .csv file.
- Use the folder icon button to open the file browser to attach a .csv file for data-driven testing.
- Info: The Info button toggles a pane of additional information: table
Length(in number of rows, i.e., steps),Modifieddate, andCreateddate, as well as aDescriptionfield you can use to include notes about the current table. - Save: This button saves the current table. Typically, updates are saved automatically. However, whenever the table contains unsaved changes, the close icon of the tab changes to a yellow circle; if you attempt to close the tab or the Suite window, you'll get an Unsaved Changes warning.
Tables can't be added to schedules.
To learn more about using the tables feature to implement keyword-driven testing, see The Tables Feature and Keyword-Driven Testing.