Create Scripts with Turbo Capture
Turbo Capture speeds up script creation by recording mouse and keyboard actions as you perform them against a system under test (SUT). During a Turbo Capture session, Eggplant Functional (EPF) captures images and generates the appropriate SenseTalk code for the actions that are executed.
Step by Step: Capture Images and Actions
Follow the steps below to capture the images and actions that Eggplant Functional uses to generate your script:
-
Connect to a SUT. When you've connected, the SUT screen appears in the Viewer window.
-
Start a Turbo Capture session:
- From the main menu, select Control > Start Session > Turbo Capture Session.
- From the Viewer window toolbar, click Start Session > Turbo Capture Session.
-
Execute your test manually through the Viewer window. Actions such as clicks, scroll wheel movements, and keystrokes are recorded automatically. Hold down the Shift key while moving the mouse to capture mouse movements. Release the Shift key to stop capturing mouse movements.
As you perform your test, screen shots are taken for each action. These screenshots are used to create images for use in scripts. The edge detection feature in Eggplant Functional automatically sizes captured images, though you can adjust them later in the process.
-
To end a Turbo Capture session, click Stop Session in the Viewer window toolbar, or click End Turbo Capture Session in the Sessions tab. A new session is created in the Sessions tab.
-
Select your session and click Open Session to begin script generation.
Step by Step: Script Generation
The session opens in the Sessions tab, where you can modify and name images, and edit TypeText commands for use in the script. The following steps are specific to creating images from a Turbo Capture session. TypeText commands bring up an editing pane in which you can modify the keys that the script types, or approve them as they were captured.
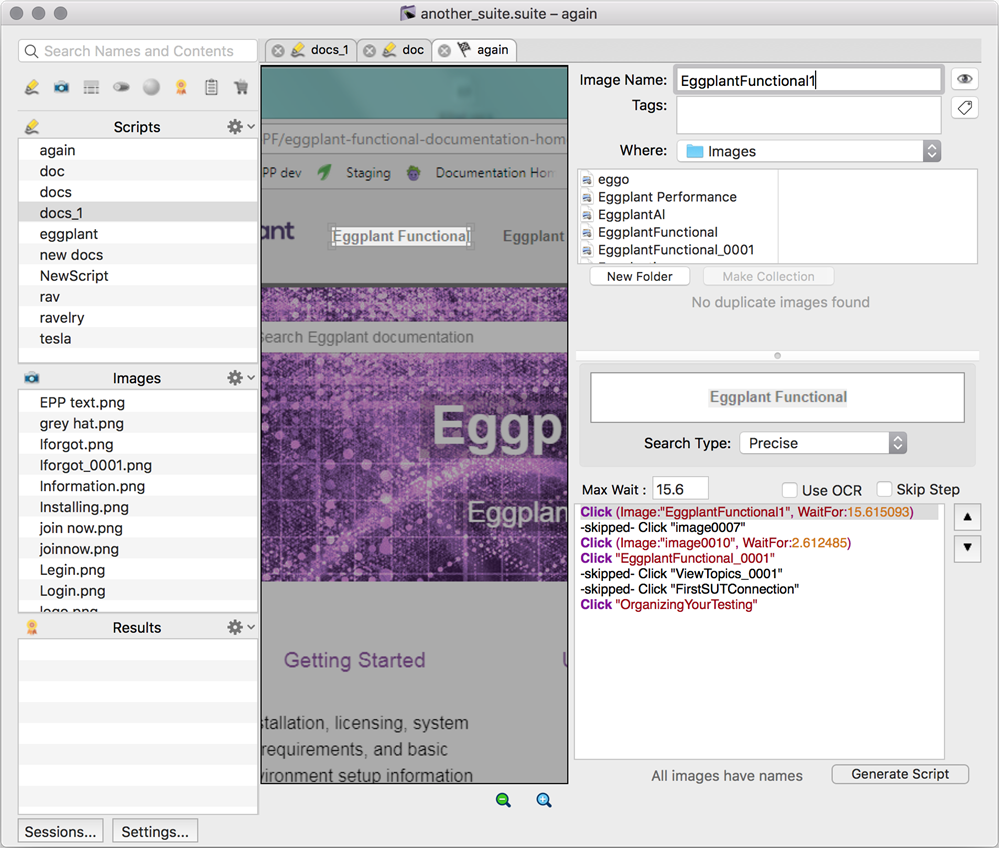
The Sessions tab in a Suite window
-
Modify the Capture Area for the image in the center panel of the session view, using image capture best practices.
-
Name the image in the file browser. Duplicate names appear in red. If Eggplant Functional detects a duplicated
image, other instances of the image display as thumbnails below the file browser. You can choose to use an existing image in your script, or select the Replace Existing checkbox to overwrite that image.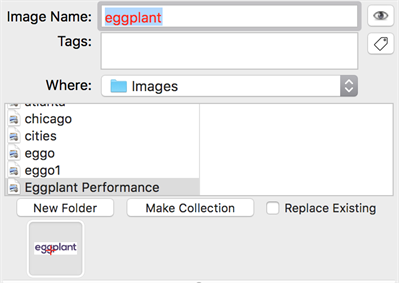
An existing image from a Turbo Capture session in Eggplant Functional, where duplicated names appear in red text
-
You can add and create Tags for ease of organization. Click the tag icon to the right of the Tags field to apply the selected tags to all of the images created in the session.
-
Adjust the search settings for the script Eggplant Functional generates. See Searching & Properties to learn more about available search types. Select Use OCR if you want the highlighted step to use optical character recognition (OCR) instead of an image search. To use OCR as the default search type for an
entire session, Shift+click the Use OCR checkbox.noteThis setting is session-specific. It is not saved in your defaults or between sessions. This setting also does not persist if you close a session and then return to that session.
If you select Use OCR, additional OCR tuning properties appear.
DPI: By default, OCR uses 72 DPI screen resolution for searches. If the resolution on your SUT is significantly different, you might need to adjust the DPI for the search.
Valid Words: This parameter limits the words that the OCR engine recognizes. By default, the engine uses the entire set of words for the language (or languages) in the current text platform. You can use the asterisk as a wildcard so that the OCR engine looks only for the words in your original text string.
Valid Characters: This parameter limits the characters that the OCR engine recognizes. By default, the engine uses the entire set of characters available for the language (or languages) in the current text platform. You can use the asterisk as a wildcard so that the OCR engine looks only for the characters in your original text string.
Valid Pattern: This property is a string that takes a regular expression value and returns only characters or words that match the specified pattern.
Contrast: Select this checkbox if you want OCR to treat the
ReadText()rectangle as a flat, two-color image. This option can be useful when working with anti-aliased text. It filters the screen of the SUT so that it appears two-toned to the OCR engine. Contrast relies on the following settings:-
Contrast Tolerance: A measure of how much a pixel can differ from the RGB value of the selected color and still be considered the primary color.
-
Color: Click the color well and select a new color using the Colors panel. OCR treats this color as the primary color of the
ReadText()rectangle. It is generally advised to select the background color for this selection.tipTip: Use the color picker in the Colors panel to copy a color from any place in your display, including the Viewer window. Click the magnifying glass in the Colors panel, then click again wherever you see the color you would like to copy.
Enhance Local Contrast: Select this checkbox if you want OCR to automatically increase the local contrast of the image.
Enable Aggressive Text Extraction: Select this checkbox if you want OCR to extract as much text from the image as possible.
Case Sensitive: Select this checkbox to enable case-sensitive searching.
Ignore Spaces: Select this checkbox to have OCR searches ignore spaces between characters during a search.
Ignore Lines: Select this checkbox to have OCR searches ignore new lines during a search.
Language: Use this drop-down menu to add or remove OCR recognition languages. You can select multiple languages for use in OCR searches. To enable additional languages, navigate to Eggplant > Preferences, then click Text and scroll to Enabled Languages.
-
-
Modify the Max Wait entry if you think a longer or shorter wait time is necessary. During Turbo Capture sessions, Eggplant Functional tracks the amount of time it takes for screens to update and inserts these times into scripts as
WaitForcommands. See the WaitFor Command for more information. -
When all images are sized and named, and all TypeText commands are modified as needed, click Generate Script. Now, Eggplant Functional generates images and code based on selections you made. Images marked
skippedor//use existing imagesare not generated. -
When script generation is complete, Eggplant Functional opens the generated script as a new tab in the same Suite window. The script is automatically given the same name as the session.
Turbo Capture sessions can take up a lot of space on your machine because full-resolution screen shots are captured at each stage of execution. After a script has been generated from a session, it is advisable to delete the session from the sessions list.