Autoscanを使って画像を取得する
Eggplant Functionalのオートスキャン機能は、現在のテスト対象システム(SUT)の画面上のすべての要素を自動的に検出し、複数の画像を素早く保存できます。オートスキャンセッションでは、画面上で画像として取得する可能性のあるエリアを見つけ、それらを強調表示し、画像の編集や保存ができます。
また、Autosnippets機能を使用して、オートスキャンセッションからSenseTalkスニペットを生成することができます。これらのスニペットは、スクリプトのモジュール化に役立つだけでなく、Eggplant AIのスニペットにも使用できる短いコードです。
オートスキャンは現在のSUT画面上のすべての要素を取得しますが、異なる画面上の画像を1回のセッションで取得することはできません。アプリケーションで2つの異なる画面上の画像を取得する必要がある場合、または画面をスクロールしたり、現在の画面の状態を調整する必要がある場合は、別のオートスキャンセッションを作成する必要があります。
Rapid Image Captureは、画像数が限られているユーザーや、SUTの異なる画面間で画像を取得する必要があるユーザーや、スニペットを生成する必要がないユーザーに適しています。
ステップバイステップ:オートスキャンセッション
オートスキ��ャンセッションは、ライブモードまたはキャプチャモードのどちらからも開始できます。ライブモードでは、Eggplant FunctionalはSUT画面全体をスキャンして、潜在的な画像を見つけます。キャプチャモードでは、キャプチャエリアまたは画面全体をスキャンすることができます。
-
SUTに接続します。接続が完了すると、SUTがビューアウィンドウに表示されます。
- キャプチャモードで作業している場合は、スキャンするSUT画面のエリアを含めるようにキャプチャエリアを調整します。
-
オートスキャンセッションを開始します:
- メインメニューから、Control > Start Session > Autoscan Entire Screen または Control > Start Session > Autoscan in Capture Area(このオプションはキャプチャモードでのみ利用可能)を選択します。
- ビューアウィンドウから、Start Session > Autoscan Entire Screen または Start Session > Autoscan in Capture Area(このオプションはキャプチャモードでのみ利用可能)をクリックします。
スキャンが完了すると、Eggplant Functionalはスイートウィンドウのセッションタブを開きます。オートスキャンが最新のセッションとしてリストの先頭に表示されます。
-
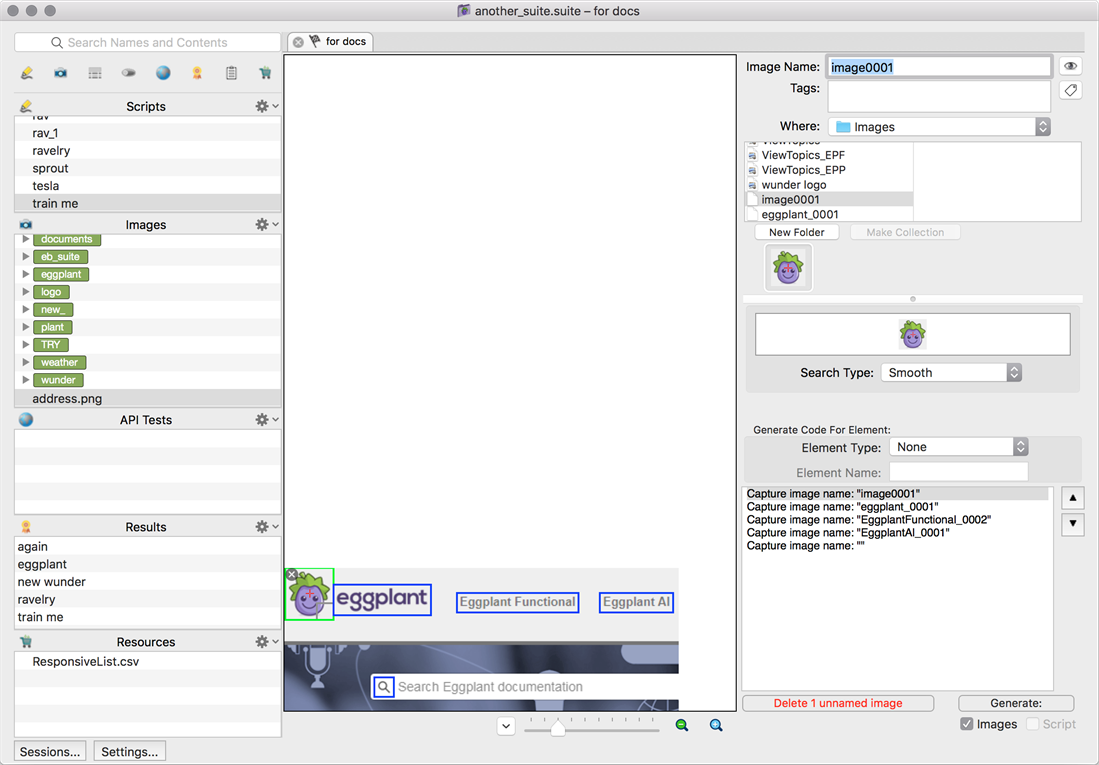
セッションに名前を付けて、Enter キーを押します。 Session Nameフィールドは、名前を変更しやすいようにすでに強調表示されています。 Enter キーを押すとセッションが開き、スキャンした画面の領域が表示され、潜在的な画像が青い四角形で強調表示されます。現在選択されている要素は緑色で�強調表示されます。
ノートこの時点で、スキャンは取得したい画像を決定しましたが、まだ画像ファイルは生成されず、スイートに追加されていません。以下の手順をすぐに進めてこのプロセスを完了させることもできますし、後でセッションタブに戻って、セッションから画像とコードスニペットを生成することもできます
-
検出された要素ごとに、スイートで生成する画像であるかどうかを決定し、image capture best practicesを使用して長方形とその他の設定を調整します。
 キャプチャ モードで実行される自動スキャン セッション。
 オートスキャン セッションから検出された要素。左側に現在選択されている要素 (緑色の四角形) が表示されます
- ハイライト四角形の右下隅をドラッグして、サイズを調整します。
- 長方形内の任意の場所をクリックし、ドラッグして位置を変更します。
- ハイライト表示された四角形の左上隅にある [X] をクリックして削除します。
- スキャンで検出されなかった要素の画像を作成する場合は、中央ペインのスキャン上の任意の場所をクリックして新しいハイライト四角形を作成します。
- 画像のhot spot を移動するには、赤い十字線を Ctrl キーを押しながらクリックするか、Ctrl キーを押しながらドラッグします (Mac の場合は Cmd キーを押しながらクリックするか、Cmd キーを押しながらドラッグします)。たとえば、フィールドのテキスト ラベルの画像をキャプチャし、ホット スポットをフィールド内に移動することができます。これにより、画像で表現するのが難しいアクションをフィールドで実行できるようになります。
- 下部にある虫眼鏡アイコンを使用して、スキャンした領域を拡大または縮小します。
- 右側の列の上部にある Image Nameフィールドにイメージの名前を入力します。各要素には、最初は
image005という形式のデフォルト名が割り当てられます。特に多くの新しいイメージをスイートに追加する場合は、意味のあるわかりやすい名前を使用する適切な命名戦略に従ってください。 - 画像の Tags を追加および作成すると、��整理しやすくなります。右上の Tags フィールドの右側にあるタグ アイコンをクリックして、選択したタグをセッションで作成されたすべての画像に適用します。
画像はデフォルトでスイートの Images フォルダに保存されます。 Where ドロップダウン メニューを使用して、その場所を変更できます。ここで画像コレクションを作成することもできます。 Eggplant Functional がスイート内で同じまたは非常によく似たイメージをすでに検出した場合、新しいイメージを作成するのではなく、既存のイメージを使用するオプションがあります。
Eggplant Functional が検出した要素のいずれかが光学式文字認識 (OCR) を使用して読み取れる場合、セッション ウィンドウの Generate Code for Element セクションの上に Use OCR チェックボックスが表示されます。個々の画像に対して画像検索の代わりに OCR 検索を使用するには、チェックボックスをオンにします。
entire sessionのデフォルトの検索タイプとして OCR を使用するには、Shift キーを押しながら Use OCR チェックボックスをクリックします。ノートこの設定はセッション固有です。デフォルトやセッション間では保存されません。この設定は、セッションを閉じて同じセッションに戻った場合にも保持されません。
先端OCR は、オートスキャン セッションからオートスニペットを生成する予定があり、画像検索ではなくテキスト (OCR) 検索を実行するコードを生成する場合にのみ使用してください。
Use OCR を選択すると、追加の OCR 調整プロパティが表示されます。
DPI: デフォルトでは、OCR は検索に 72 DPI の画面解像度を使用します。 SUT の解像度が大幅に異なる場合は、検索用に DPI を調整する必要がある場合があります。
Valid Words: このパラメータは、OCR エンジンが認識する単語を制限します。デフォルトでは、エンジンは現在のテキスト プラットフォームの言語 (複数可) の単語セット全体を使用します。アスタリスクをワイルドカードとして使用すると、OCR エンジンが元のテキスト文字列内の単語のみを検索するようになります。
Valid Characters: このパラメータは、OCR エンジンが認識する文字を制限します。デフォルトでは、エンジンは現在のテキスト プラットフォームの言語で利用可能な文字セット全体を使用します。アスタリスクをワイルドカードとして使用すると、OCR エンジンが元のテキスト文字列内の文字のみを検索するようになります。
Valid Pattern: このプロパティは、正規表現値を受け取り、指定されたパターンに一致する文字または単語のみを返す文字列です。
Contrast: OCR で
ReadText()の四角形をフラットな 2 色の画像として扱う場合は、このチェックボックスをオンにします。このオプションは、アンチエイリアス処理されたテキストを操作する場合に便利です。 SUT の画面をフィルタリングして、OCR エンジンにはツートンカラーで表示されます。コントラストは次の設定に依存します。- Contrast Tolerance: ピクセルが、選択した色の RGB 値とどの程度異なっていても原色とみなされ得るかの尺度。
- Color: カラー ウェルをクリックし、Colors パネルを使用して新しい色を選択します。 OCR は、この色を
ReadText()四角形の主色として扱います。通常、この選択には背景色を選択することをお勧めします。
先端Colors パネルのカラーピッカーを使用して、ビューアーウィンドウを含むディスプレイ内の任意の場所からカラーをコピーします。Colors パネルで虫眼鏡をクリックし、コピーする色が表示されている場所でもう一度クリックします。
Enhance Local Contrast: OCR で画像のローカル コントラストを自動的に高める場合は、このチェックボックスをオンにします。
Enable Aggressive Text Extraction: OCR で画像からできるだけ多くのテキストを抽出する場合は、このチェックボックスをオンにします。
Case Sensitive: 大文字と小文字を区別した検索を有効にするには、このチェックボックスをオンにします。
Ignore Spaces: OCR 検索で検索中に文字間のスペースを無視するには、このチェックボックスをオンにします。
Ignore Lines: OCR 検索で検索中に新しい行を無視するには、このチェックボックスをオンにします。
Language:このドロップダウンメニューを使用して、OCR認識言語を追加または��削除します。OCR検索で使用する複数の言語を選択できます。追加の言語を有効にするには、Eggplant > Preferencesに移動し、TextをクリックしてEnabled Languagesまでスクロールします。
セッション タブの右側にある上矢印と下矢印を使用して、検出された要素間を移動できます。中央ペインのスキャン内のいずれかの四角形をクリックして、リスト内のその要素を選択することもできます。保持したい要素をすべて処理し、保持したくない要素がさらにある場合は、Delete unnamed images ボタンを使用して不要な画像を削除できます。
ノート矢印を使用するか中央ペインで直接要素を選択すると、デフォルトの名前が自動入力されます。この時点では、Delete unnamed images ボタンを使用しても削除されません。ただし、これらの要素が必要ない場合は、長方形の左上隅にある [X] をクリックして削除できます。
-
不要な画像を削除した後、セッションからスニペットのスクリプトを生成する予定で、デスクトップSUTに対して作業している場合は、要素リストの下にあるClassify Imagesボタンをクリックして、画像のElement Typeを設定します。これは、デスクトップSUTに対して作業する場合にのみ必要であり、この情報はモバイル接続に対して自動的に入力されます。自動分類で Element Type を判断できない場合は、「なし」に設定されます。
ノート自動分類は、標準インターフェイスで動作するようにトレーニングされています。標準以外のインターフェースを使用している場合は、Element Typeを手動で操作する必要がある場合があります。一部の画像が分類されなかった場合は、いつでも自動分類を再実行して、後続のパスでElement Typeが認識されるかどうかを確認できます。すでに分類されている(以前に Element Typeが設定されていた)画像は、Classify Imagesを再度クリックしても影響を受けません。
Element Type ドロップダウン リストから選択できる要素のタイプは次のとおりです。
- None: 画像を生成するために使用しますが、コードは生成しません。
- Checkpoint: 要素の存在を検証するために使用できる 2 つのハンドラーを生成します。
- Button: 要素をクリックするためのハンドラーを生成します。
- Field: 2 つのハンドラーを生成します。1 つはフィールドにテキストを入力するためのもので、もう 1 つはフィールドからテキストを読み取るためのものです。
- Checkbox: チェックボックスを選択するためのハンドラーを生成します。
- RadioButton: ラジオ ボタンを選択するためのハンドラーを生成します。
- DropDown_Mobile: ドロップダウン メニューから項目を選択するための、モバイル デバイス SUT およびモバイル ブラウザ用に最適化されたハンドラーを生成します。
- DropDown_Desktop: ドロップダウン メニューから項目を選択するための、デスクトップ SUT およびブラウザ用に最適化されたハンドラーを生成します。
-
要素リストを確認し、コード スニペットを生成するすべての画像のElement TypeとElement Nameを設定します。必要に応じて要素タイプを調整し、自動分類によって決定されない画像に設定します。 Android ゲートウェイまたは iOS ゲートウェイを介して接続されたモバイル デバイス SUT からスキャンした場合、この情報は自動的に入力される可能性がありますが、情報が意図した用途と一致していることを確��認する必要があります。 Eggplant Functional がこの情報を使用してコード スニペットを生成する方法の詳細については、Eggplant Functional でのオートスニペットの生成を参照してください。
-
スイートに追加するすべての画像を特定して更新したら、Images チェックボックスがオンになっていることを確認します。スニペット コードも生成する場合は、Scriptチェックボックスがオンになっていることを確認してください。 (自動スキャン セッションを使用して、画像またはスニペットを単独で生成することも、両方を一緒に生成することもできます)。次に、Generate をクリックします。 Eggplant Functional は、選択した名前で画像を保存します。
高度なプロパティ
Eggplant Functional には、自動スキャン プロセスを微調整するための高度な機能があります。ウィンドウの下部にあるスライダーを使用して、スキャンの粒度を幅広く調整します。スライダを左に動かすと粒度が高まり、長方形の数が増えたり、小さくなったりします。スライダを右に動かすと粒度が低くなり、長方形の数が減ったり、大きくなったりします。
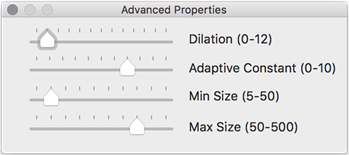
より正確に制御するには、スライダーの左側にある下矢印をクリックして、[詳細プロパティ] ウィンドウを開きます。

次のプロパティを調整できます。
- Dilation: 提案された画像の周囲のボックスのサイズを拡大または縮小します。隣接するボックスを結合して、異なるサイズの要素をキャプチャするために使用できます。
- Adaptive Constant: この設定を調整すると、ぼやけた画像やコントラストの低い画像のノイズを除去できます。
- Min Size: 提案される画像の幅または高さの最小サイズ (ピクセル単位) を設定します。このサイズより小さいイメージが見つかっても無視されます。
- Max Size: Sets a maximum size (in pixels) for the width or height of a suggested image. Any possible images found that are larger than this size are ignored.
Android ゲートウェイまたは iOS ゲートウェイを介して接続されたモバイル デバイス SUT の場合、Element Type が基礎となるオブジェクト モデルから自動的に検出される場合があります。このよ�うな場合、粒度スライダーと詳細プロパティ ウィンドウは使用できません。ただし、必要に応じて四角形を手動で変更したり、右側の列の他の画像プロパティを編集したりすることはできます。