This section covers installation and licensing of Eggplant Manager on Windows, Mac, and Linux. System requirements for each operating system are also covered.
System Requirements
You can install and run Eggplant Manager on Windows, Mac, and Linux, provided your system meets these requirements:
Supported Operating Systems
- Windows: Windows 10 (64-bit), Windows 7, Windows Server 2016, Windows Server 2012
- Mac: macOS 10.15, macOS 10.14, macOS 10.13, macOS 10.12. OS X 10.11
- Linux: Red Hat Enterprise Linux 6, 7. CentOS 6, 7.Note: The zip and unzip command line utilities must be installed to use Eggplant Manager on Linux.
Hardware Requirements
- RAM: 4 GB minimum. 8 GB recommended.
Note: More memory might be required depending on your configuration and usage.
- Disk space: 1 TB for archival purposes.
- Processor: 2 GHz dual core or faster.
If you are concerned about disk space use, consider deleting your test results after a week or more.
Eggplant Manager Agent Requirements
Any machine on which you want to run an Eggplant Manager agent must also meet the system requirements to run both Eggplant Manager and Eggplant Functional. Add 2 GB of RAM per additional instance of Eggplant Functional that you want to run. See Working with Eggplant Manager Agents for more information.
Supported Browsers
- Internet Explorer 11
- Microsoft Edge
- Recent versions of Google Chrome
- Recent versions of Firefox
- Recent versions of Safari
Specifying Ports for Eggplant Manager
By default, Eggplant Manager uses port 8080 for its server and scheduler. It uses port 9292 for its message server. These ports are configurable on the Network Configuration panel in Eggplant Manager System Preferences after installation.
Ports needed: HTTP 8080 or HTTPS 443; TCP 5901-5950; TCP 3100.
The default configuration of Eggplant Manager uses port 3100. This port can be changed if required in your setup:
- Open the em_config.yml file. Its location depends on your operating system:
- Mac: /Library/TestPlant/cache/
- Windows: C:\TestPlant\cache\
- Linux: /opt/TestPlant/cache/
- Change the port number in the app_server_port section to the appropriate port number for your setup.
- Restart Eggplant Manager to have the changes take effect.
Additionally, the Eggplant Manager agent requires port 3100, which also must be open on the firewall. You need to install an agent on each machine where Eggplant Functional is installed and remote from the Eggplant Manager server. See Specifying Ports for an Agent to learn how to resolve port conflicts.
Step by Step: Installing Eggplant Manager
These instructions guide you through installation on Mac, Windows, and Linux:
- Download the Eggplant Manager installation package from the Eggplant Downloads website.
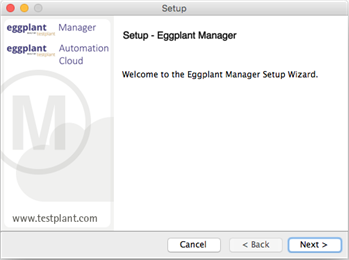
- Open the installation package and run the Setup wizard.
- On Mac and Windows, double-click the installation package.
- On Linux, open a terminal, navigate to the downloaded installation package file, and enter the following commands:
Extract commands:
tar -zxvf ./<name_of_file>.tgzRun command:
sudo ./<name_of_file>.run
Note: The Eggplant Manager Setup wizard also installs Eggplant Automation Cloud. Your license determines which features you can use.
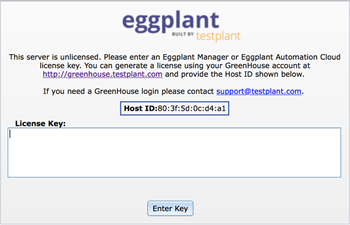
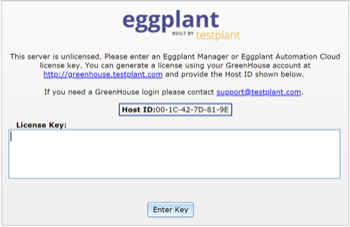
- Proceed through the Setup wizard. Setup installs and configures Eggplant Manager, and starts its processes. If there wasn't a license for a previous installation on this computer, the Setup wizard displays the License Key panel where you can enter your license key. If there was a previous installation, the browser displays the Eggplant Manager login page.

The Eggplant Manager license key dialog box on Mac

The Eggplant Manager license key dialog box on Windows
If you need an Eggplant Manager license, contact your account manager or Eggplant Support.
Note: If you use the Greenhouse web portal to generate licenses, enter the Host ID exactly as it appears in the license key dialog box, above, into the license generator. Note that the Host ID is rendered differently on Mac than on Windows.For Eggplant Automation Cloud licenses: If you are also using Eggplant Automation Cloud, add the Eggplant Automation Cloud license after you finish installing Eggplant Manager. Go to Admin > System Preferences to access the Licenses panel.
Note: You must log in to Eggplant Manager as an Administrator to access System Preferences. - Follow the on-screen instructions to complete and close the Setup wizard. The Eggplant Manager process are now running. See Starting and Stopping Eggplant Manager to learn how to manually start and stop Eggplant Manager.
- Continue to Initial Login for login instructions.
Initial Login
The Eggplant Manager user interface runs in a web browser. You access it by navigating to the URL for its login page. The URL that you use depends on whether you are using a browser on the same machine where your Eggplant Manager server is running or a different machine.
To log in to Eggplant Manager, follow the steps below:
- Launch your web browser and enter the appropriate URL:
- To display the login page on the same computer where the Eggplant Manager server is running, enter the default URL:
- To display the login page remotely on a computer where the Eggplant Manager server is not running, use the IP address or hostname of the computer in your environment where Eggplant Manager is running:
http://localhost:8080/
http:/IP address or hostname:8080/
Note: After installation, users with Administrator privileges can change the IP address or default server port (8080), as well as some of the other process ports. For information about changing ports, see Configuring Network Access.
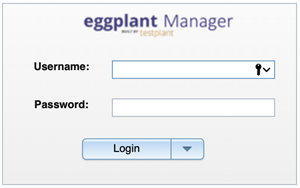
The Eggplant Manager login page
- Log in with the default username (admin) and password (admin). You can now change the password for this user, or create another user. For more information, see Creating User Accounts.
If your organization uses Active Directory credentials for login, see Logging in to Eggplant Manager Using LDAP Credentials.
- Click Log In. The Eggplant Manager Dashboard page displays by default.
Note: To change the default login page, go to Account > Account Settings. The Default View field on the Preferences panel specifies the default login page.
Uninstalling Eggplant Manager
The Eggplant Manager Uninstall wizard is the same on Mac, Windows, and Linux.
- Locate and run the Eggplant Manager uninstall program:
- Click Yes to confirm that you want to uninstall. The Uninstall wizard opens.
- Follow the on-screen instructions. A message prompts you to uninstall the database and files created by Eggplant Manager.
- Click No to save your Eggplant Manager data or files for future use.
- Click Yes to completely remove all of your Eggplant Manager data and files from this computer.
- Click OK to close the Uninstall wizard.
Mac: Open Finder and navigate to the directory where Eggplant Manager is installed. The default directory is /Library/TestPlant. Double-click uninstall.app.
Windows: Choose Start > All Programs > TestPlant > Eggplant Manager > Uninstall Eggplant Manager.
Linux: Navigate to the directory where your Eggplant Manager is installed. The default directory is /opt/TestPlant, and it contains the uninstall file. Enter the following command:
sudo ./uninstall