Working with Virtual User Scripts
- Creating virtual user scripts
- Editing virtual user scripts
- Renaming virtual user scripts
- Cloning virtual user scripts
- Deleting virtual scripts
- Exporting virtual user scripts
- Regenerating virtual user scripts
- Creating a workflow from a virtual user script
Creating Virtual User Scripts
VU scripts are available in different languages and they must follow certain rules or patterns. You can create VU scripts in Eggplant Performance Studio in a number of ways:
Instructions for how to create scripts from these different options follow.
Generating a Virtual User Script from a Recording
Many VU scripts can be generated by recording real user or client interactions with the system under test (SUT). For example, the user interactions of a web browser can be recorded to create web virtual user scripts.
To generate a virtual user script from a recording, perform the following steps:
- Right-click a recording item within the Project tree.
- Select Generate script(s) from the pop-up menu. The Script Generation wizard opens.
- Follow the wizard to generate the script.
Creating a Virtual User Script from a Template
Not only are VU scripts available in different programming languages but they also have certain rules or patterns they must follow. You can create a specific VU script by basing your new script on a readily available template that ensures it conforms to the standard of a particular VU type.
To create a new empty VU script from a template, perform the following steps:
- Right-click the Scripts folder (or a custom Scripts folder) within the Project tree.
- Select New empty script from the pop-up menu. The New Script Specification wizard opens.
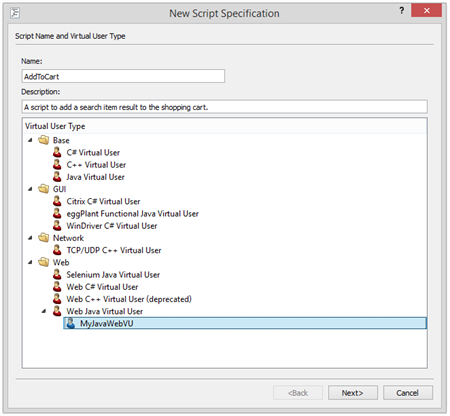
Provide the following information on the Script Name and Virtual User Type panel:
Name: A unique name for your new VU script.
Description: An optional description of your new VU script.
Virtual User Type: Select the type of VU script you want to create from the list of available script types.
- If you selected a C# or Java VU type, click Next to continue to the options page. Otherwise, click Finish to create the script.
- On the Options page you will be asked to enter either the Namespace (for a C# Virtual User script), the Package name (for a Java Virtual User script). The Create background script (advanced) will make this script a background script.
- Click Finish to create the new VU script.
Generating a Virtual User Script from a Web Service
You can generate a VU script from a web service. To do so, you must first add the web service to your Eggplant Performance Studio workspace. See Creating a Web Service in Managing Services in Eggplant Performance Studio for information about adding a web service in your workspace.
To create a VU script from a web service, perform the following steps:
- Right-click the Scripts folder within the Project tree.
- Select Generate script from web service from the pop-up menu. The Create a Script wizard opens to the Choose a web service to target panel.
- Follow the wizard to generate the script. See The Create a Script Wizard for Web Services for information about using this wizard.
Importing a Virtual User Script
You can import a VU script into a project from a compressed script archive file. Eggplant Performance Studio can import scripts from .zip or Eggplant Performance (.epa) archive files. For information about .epa files, see Eggplant Performance Archive Files.
To import a VU script into a project from an archive file, perform the following steps:
- Right-click the Scripts folder (or a custom Scripts folder) in the Eggplant Performance Studio Project tree, and select Import script... from the pop-up menu. The Import script from an archive file dialog box opens.
- Select the archive containing the script you want to import and click Open. The Import script from <script_archive_name> dialog box opens, where <script_archive_name> is the name of the archive file you selected.
- Provide the information on the Import script from... dialog box, which includes what code you want to overwrite during the import process. The options on this dialog box vary depending on whether you are importing a script that exists in the current project or is new to the project. See the explanations below for the difference between importing an existing script and importing a new script.
- Click the OK button to complete the import.
Importing an Existing Script
The Import script from <script_archive_name> dialog box provides the following options when you select to import a script that already exists within the current project.
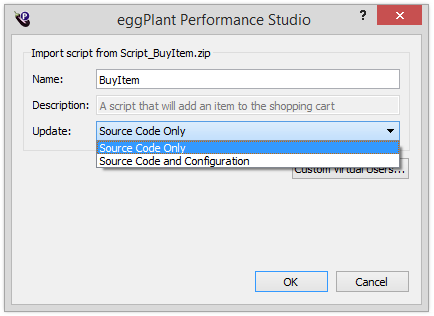
Name: Name of the script.
Description: An optional description of the script.
Update: Specifies what you want to do with the existing script during the import process. The options are as follows:
- Source Code Only: Only overwrite the existing script source code.
- Source Code and Configuration: Overwrite all script-specific data (recording files, database properties, etc.) in addition to script source code. Note that the import of custom VU types related to the script is controlled by the Import Custom Virtual User dialog box. You can display the Import Customer Virtual User dialog box by clicking the Custom Virtual Users button.
Importing a New Script
The Import script from <script_archive_name> dialog box provides the following options when you select to import a script that is new to the current project.
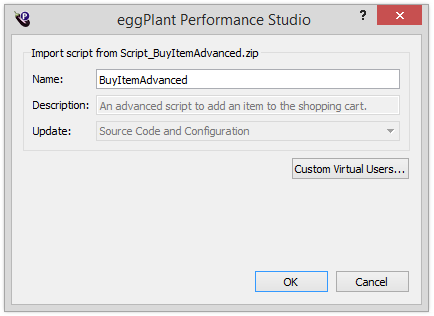
Name: Name of the script.
Description: An optional description of the script.
Update: Source Code and Configuration: This option is automatically selected for new scripts. It ensures that in addition to script source code all script specific data are imported (recording files, database properties etc.). Note that the import of custom VU types related to the script is controlled by the Import Custom Virtual User dialog box. You can display the Import Customer Virtual User dialog box by clicking the Custom Virtual Users button.
Using Source Files
In complex projects you may find it necessary to hand-code additional scripts or script fragments. An example of this would be creating a custom Java class to be used by other scripts because Java insists that public classes reside in separate source files. For this reason, Eggplant Performance gives you the option to create or import source files.
Information about creating or importing a source file is provided below.
Creating a New Empty Source File
To create a new empty source file, perform the following steps:
- Right-click the Scripts folder (or a custom Scripts folder) in the Eggplant Performance Studio Project tree.
- Select New empty source file from the pop-up menu. The Create a source file dialog box opens.
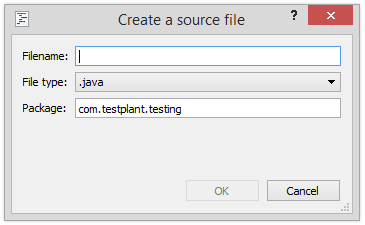
- Enter the following information:
Filename: A unique name for your new source file.
File type: The source file type i.e. C++ (.cpp), C# (.cs), or Java (.java)
Package: The package or namespace for your source file. Only required by certain source file types.
- Click OK to create your new empty source file.
Importing an Existing Source File
You can also import an existing source file that was created in another package or copied from another location.
To import an existing source file, perform the following steps:
- Right-click the Scripts folder (or a custom Scripts folder) in the Eggplant Performance Studio Project tree.
- Select Import source file from the pop-up menu. The Import source file dialog box opens.
- Click OK to import the source file.
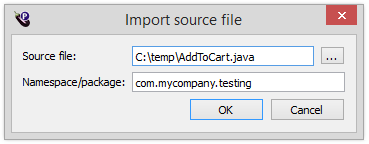
Source file: Enter the file path of the existing file, or use the Browse button to navigate to an existing source file.
Namespace/package: The namespace or package for your source file. This places the source file in the relevant folder within the project scripts folder as shown in the following example:
[workspace folder]\projects\Demo\scripts\java\com\mycompany\testing\AddToCart.java
Editing a Virtual User Script
To edit the source of a virtual user script, either right-click the script within the Eggplant Performance Studio Project tree and select Edit Script from the pop-up menu, or double left-click the script within the Eggplant Performance Studio Project tree.
The VU script source will open in the external text editor defined as a property of the Workspace. For more detailed information and other ways of editing source code see the topic Editing Virtual User Scripts.
Renaming a Virtual User Script
To rename a virtual user script, perform the following steps:
- Right-click the script within the Eggplant Performance Studio Project tree and select Rename script from the pop-up menu. The Rename script dialog box opens.
- Provide the following information in the Rename Script dialog box:
- Click OK to rename the script.
New name: The new name for the script.
New description: An optional new description for the script.
Cloning a Virtual User Script
You can make copies of VU scripts and edit them independently, as long as you give the copies unique names.
To clone a virtual user script, perform the following steps:
- Right-click the script you want to clone in the Eggplant Performance Studio Project tree and select Clone script from the pop-up menu.
- Enter a New script name in the window which appears.
Deleting a Virtual User Script
To delete a virtual user script, perform the following steps:
- Right-click the script you want to delete in the Eggplant Performance Studio Project tree, then select Delete from the pop-up menu.
Or: Select the script you want to delete, the click Delete script in the Studio toolbar.
- Click Yes on the Delete Script confirmation dialog box to delete the script and the corresponding source file.
You can delete multiple scripts at once by following these steps:
- Select the scripts you want to delete in the Studio Project tree by using Ctrl+click, or Ctrl+shift for contiguous items.
- Click the Delete selected scripts button in the main Studio window.
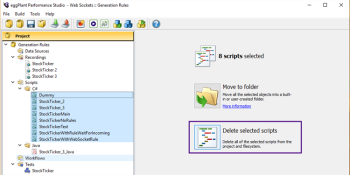
- Click Yes on the Delete Script confirmation dialog box to delete the script and the corresponding source file.
Exporting a Virtual User Script
You can export virtual user scripts from Eggplant Performance Studio as compressed Eggplant Performance Archive (.epa) file. The archive file contains much of the data required to recreate the script in another project. Its contents include:
- script source code files
- script generation rules
- script database properties
- complete set of recordings
- trace database properties
- custom virtual user data (see Exporting a Custom Virtual User)
To export a virtual user script:
- Right-click the script you want to export in the Eggplant Performance Studio Project tree.
- Select Export script from the pop-up menu.
- In the Export script to an archive file dialog, choose a location and filename for the exported archive and click Save.
- The archive will be created and a prompt to open explorer in the selected location will be displayed.
Regenerating a Virtual User Script
Scripts generated from a recording can be regenerated. Scripts that were created from a template cannot be regenerated, and neither can source files. If a script is imported from an archive file, and it was generated from a recording in its original workspace, then the recording will be imported alongside the script and the script can be regenerated from that recording.
You can regenerate a single script or multiple scripts at one time as described below:
Regenerating a Single VU Script
To regenerate a single VU script:
- Right-click the script you want to regenerate in the Project tree.
- Select Regenerate script from the pop-up menu. The Regenerate script dialog box opens, and contains a warning that the selected script will be overwritten if it is regenerated.
- Click Yes to continue or No to cancel. The Script Generation wizard opens with the Enter new script settings panel.
Regenerating Multiple Web VU Scripts
This procedure only applies to scripts that were generated from a web recording. To generate multiple web VU scripts at one time:
- Ctrl+click to select multiple web scripts in the Project tree.
- On the X scripts selected view, click Regenerate selected scripts, and continue to step 3, OR
Right-click a script folder that contains only web scripts. Click Regenerate all scripts to regenerate all the scripts in the folder.
- When the Regenerate dialog box opens, it displays a warning telling you the selected script will be overwritten if it is generated. Click Yes to continue or No to cancel. The Regenerate scripts window appears, and the scripts begin regenerating immediately.
- Either wait for them all to finish and then click Close, or click Cancel to stop regeneration.
The scripts are regenerated with the settings that were previously used, there is no opportunity to change them before regenerating using this method.
Create a Test from a Virtual User Script
It is possible to create a Test that is based on an existing script. See the section on Managing Tests for more details.
To create a Test:
- Right-click the script you want in the Project tree.
- Select Create test from the context menu.
- The Create test from script
dialog is displayed.
Test name: Enter a name for the Test. A default name is supplied, based on the name of the selected script.
Group name: Enter a VU Group name for the Test. A VU Group comprises one or more Virtual Users. See the section on Virtual User (VU) Groups for more details.
- Click the OK button to create the Test.
Create a Workflow from a Virtual User Script
It is possible to create a Workflow that is based on an existing script. The script will be used in the Repeated sequence of the Workflow definition. See the section on Working with Workflows for more details.
To create a Workflow:
- Right-click the script you want in the Project tree.
- Select Create workflow from the pop-up menu.
- The Create workflow from script dialog opens.
Name: Enter a name for the Workflow. A default name is supplied, based on the name of the selected script.
Description: Optionally enter a description for the Workflow. A default description is supplied, based on the description of the selected script.
- Click the OK button to create the Workflow.