Eggplant DAI uses algorithms to generate tests that explore user journeys. If you need to capture specific user journeys in your model runs, you can create test cases. You create, view, and edit your defined test cases on the Test Case Builder tab in the right pane of the Modeler UI.
A test case can include test cases from submodels as well. When defining test cases, you are presented with an option to include a test case from the submodel. You can also monitor a submodel activity in a test case when viewing the test case results, to view the actions from your defined test cases.
About Test Cases
When you define a test case, you establish a specific sequence of actions, or user journey, that you want to track when you run your model. A user journey can be anything from a single action to a lengthy series of actions and states that meet specific conditions; a test case, then, might be only a subset of the complete model run.
Focused Test Cases
Each time you run a model, Eggplant DAI selects the path to follow based on its algorithms and other factors, including test cases. Test cases are weighted by the path selection algorithms, which increases the probability of running the test cases that have not been hit in previous tests.
When you view the results of a test run in the Console, you can see which, if any, test cases carried extra weight in that run under the Focused test cases header.
Creating Test Cases
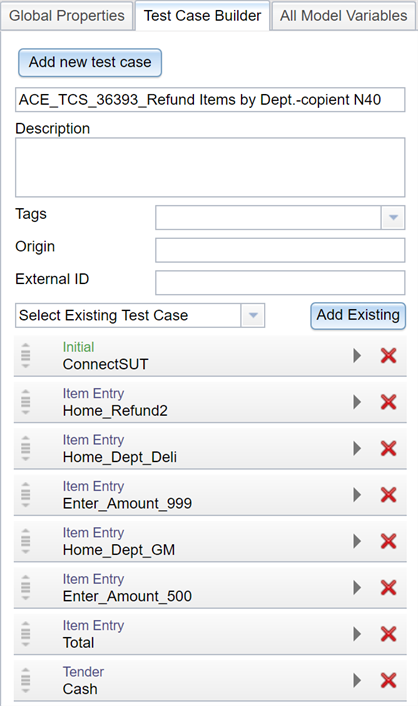
The Test Case Builder tab lets you use the graphical interpretation of your model on the Model tab to create test cases. You can use the Test Case Builder to design new test cases as well as to edit existing test cases.

Step by Step: Creating a New Test Case
You always define test cases for the model that is open. Use the Test Case Builder to create a new test case for the open model.
- Select the Test Case Builder tab in the right pane of the Modeler UI.
- Click Add new test case to create a new test case. On the Test Cases tab in the center pane, the new test case is added as a blank line, ready to be defined. You also can click New in the Test Cases tab to create a new test.
- Enter information about your test case. Only a name is required:
- Name: A name for the new test case. Do not use the following characters in this field: " \ ; : }.
- Description: A brief description of the new test case.
- Tags: Create new tags, or use the drop-down menu to select existing tags, for the test case. Tags are useful for categorizing test cases and their results. When you view test case results in Eggplant DAI Insights, tags are used to group those results.
- Origin: Indicate where the test case came from. This can be an external system.
- External ID: If the test case came from an external system with its own unique identifier, that identifier can be stored here.
- Select the Model tab to switch to the graphical representation of your model.
- Click each state or action you want to add to your test case. Typically, you should add the elements in the order you want them to occur in the test case. However, you can adjust order and other aspects of each element later on the Test Case Builder tab.
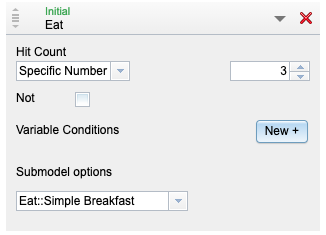
- (Optional) Use the Test Case Builder tab to edit each state or action you add to your test case if you want more precision about the details for that element. Click the right arrow
 to configure additional details including test cases from a submodel.
- Hit Count: Use the drop-down menu to specify the number of times actions within a state or an action step (depending on your selection) should occur:
- Once: Occurs only once within the test case.
- Range: Occurs a number of times within the specified range.
- Zero or Many: May or may not occur.
- One or Many: Occurs at least once. It looks at previous runs to find the pattern of the test case. For example, if a test case has A-B-C actions and Hit Count for B step is set to One or Many, an exploratory run that includes A-BBBB-C would count as a run, and A-B-C would as well.
- Specific Number: Occurs a specific number of times based on the number you specify in the Number field.

- Optional: May or may not occur, which means the state or action may or may not occur.
Not: This state or action does not occur in this position during this test case.
Variable Conditions: Using the existing state or action variables for this model, set any variable conditions you want this state or action to meet for this test case.
Submodel options: Use the drop-down menu to select a directed test case that is defined in your submodel. See adding submodels to your test cases to learn how to define submodels in your test cases. If you don't want to select a test case, select No testcase from the drop-down list.
- Hit Count: Use the drop-down menu to specify the number of times actions within a state or an action step (depending on your selection) should occur:
- To change the sequence of the test case, click and drag the vertical arrow to the left of the state or action name, then drag and drop it in the desired location.
- Click the red cross if you want to delete an element from your test case.
In addition to adding individual states and actions to a test case, you can add previously defined test cases. This functionality lets you create broader test cases from smaller, modular pieces. To add an existing test case, select it from the Select Existing Test Case drop-down menu on the Test Case Builder tab, then click Add Existing.
Editing an Existing Test Case
You can view and edit your defined test cases from the Test Cases tab in the center pane. To edit a test case, click Edit in the Edit Test Case column for the test case you want to modify. The test case opens in the Test Case Builder tab.
You can perform the same editing tasks at this stage as when you create a new test case (steps 5 and 6 in Creating a New Test Case, above). You can add new elements from the Model tab, adjust settings for existing or new elements, or remove elements.
Change the name of a test case by clicking in the Name field of the test case on the Test Cases tab and entering a new name, or by using the Test Case Builder tab.
Important: Remember, if you change the name of a state or action in a model, then make sure to update the testcases to reflect it or else the test will fail because that action or state name no longer exists.
Removing a Test Case
When making changes to your model, you might need to update or even remove a test case. To remove an existing test case, follow these steps:
- Select the Test Cases tab in the center pane of the Modeler UI.
- Select the checkbox in the left column for the test case you want to remove. Select multiple checkboxes to delete more than one test case at a time.
- Click the Delete Selected button
 to remove the selected test cases, or right-click within the list of test cases and select Delete Selected.
Directed Test Cases
After you define test cases in the Model tab, you can run those specific sequences as Directed Test Cases from the Test Cases tab. You can also add test cases from your submodels into directed test cases. See Running directed test cases with submodels for more information. The test case run data along with submodels information can be viewed in the Test Cases tab or in Eggplant DAI Insights. This capability lets you test specific elements of your system under test.
To run a specific test case, follow these steps:
- Select the Test Cases tab in the center pane of the Modeler UI.
- Select the checkbox for the test case you want to run. You can select multiple test cases. If you run multiple directed test cases, they execute sequentially.
- Click Play Selected Tests at the top of the Test Cases tab, or right-click within the list of test cases and choose Play Selected from the context menu to run the selected test cases.
The results appear in the Console tab just as those for typical model runs do.
Running Directed Test Cases with Submodels
You can add submodels to directed test cases. Doing so allows Eggplant DAI to focus on hierarchical test cases in order to gain test case coverage. You can monitor activity from these submodels when viewing the test case results.
To add a submodel to a directed test case, follow these steps:
- In the Test Case Builder tab, create a new test case or edit an existing test case as described in Creating a New Test Case.
- In the Model tab, switch to the graphical representation of your model. Click the action that contains the submodel to add to your test case.
- Use the drop-down menu to select a directed test case that is defined in your submodel. If you don't want to select a test case, select No testcase from the drop-down list.
Viewing Test Case Results
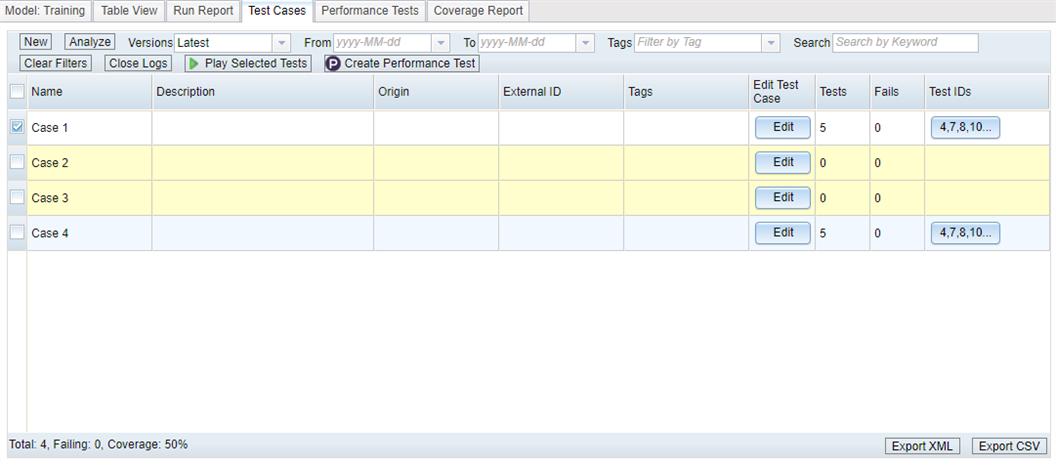
After you configure new or existing test cases, click Analyze at the top of the Test Cases tab to view test case statistics. These statistics show how many times each defined test case sequence occurred during model runs, as well as if the runs encountered any failures.
From the Test Cases tab toolbar, you can sort results by a date range, by versions of test cases, or by tags. You also can clear any filters you've applied, close logs, select and play specific test cases, or create performance tests. Note that you need Eggplant Cloud credentials to create performance tests.

The columns displayed in the Test Cases tab are:
- Name: Mirrors the content in the Test Case Builder tab. You can edit the name in this column if needed.
- Description: Mirrors the content in the Test Case Builder tab. You can add or edit the description in this column if needed.
- Origin: Mirrors the content in the Test Case Builder tab. You can edit the origin in this column if needed.
- External ID: Mirrors the content in the Test Case Builder tab. You can add or edit the external ID in this column if needed.
- Tags: Mirrors the content in the Test Case Builder tab. You can add or edit tags in this column if needed.
- Edit Test Case: Click Edit to open the test case in the Test Case Builder tab.
- Tests: The number of times the test case has been met by model executions.
- Fails: Any failures encountered while executing the test case.
- Test IDs: The test ID number for every instance of a model run where the test case definition was matched. Note that the list is a button that opens the Run Report tab, from which you can rerun a specific model run, if desired.
When you click Analyze at the top of the Test Cases tab, Eggplant DAI highlights the test case information by using color codes:
- If a test case is highlighted in red, then one or more of the tests matching this test case failed.
- If a test case is highlighted in yellow, then no runs of the model have matched the test case.
- If a test case is not highlighted, then all the test runs have passed.