C# Configuration Options for Custom Virtual Users
Eggplant Performance Studio provides configuration options for custom C# virtual users (VUs). The following configuration options are available for C# VUs:
- Adding .NET assembly files
- Configuring environment variables
Displaying the C# Configuration Options
To display the options for a C# custom (VU) , select the VU in the Workspace tree, expand it, and select C# Configuration to display the configuration view as shown below. You see two tabs in the Viewer pane: .NET and Environment.

.NET Assemblies
The .NET tab is for adding any .NET assembly files that are required to build and/or run your custom VU. For general information about assembly files (called "assemblies"), see the Microsoft MSDN .NET documentation topic: Assemblies.
Adding a .NET Assembly
-
To add a new .NET assembly file to your workspace, click the
 Add button on the right side of the Viewer pane in the .NET tab shown above. The Add Assembly dialog box opens. It contains Framework, Extensions, and Browse tabs. The Framework tab is in focus
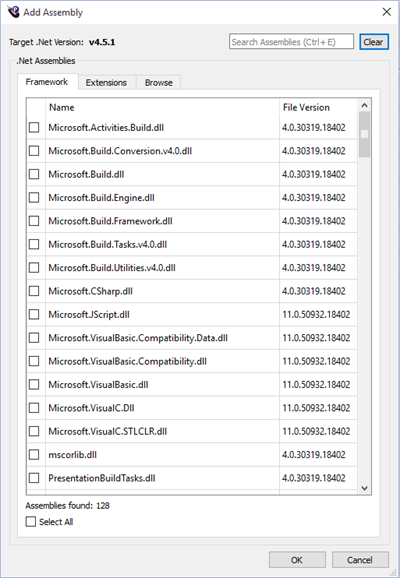
-
Use the tabs and Search box on the Add Assembly dialog box to add assemblies to your configuration. Any files you select now and add to the C# User configuration options are excluded from the list of assemblies on Framework and Extensions tabs the next time you open the dialog box. Explanations of how to use the tabs and Search box on this dialog box follow:
- Search box: The search box at the top of the Add Assembly dialog box lets you filter the assemblies you see. Any filters you apply affect the files listed on both the Framework and Extensions tabs. You can clear a filter by clicking the Clear button to the right of the search box. The shortcut for the Search box is Ctrl+E.
noteIf you apply a filter and then choose Select All to add all the files on either the Framework or Extension tab, you are actually only adding the files currently shown. Any files you do not see in the list because of an applied filter are not selected.
- Framework tab: This tab contains a list of assemblies that have a version that matches the target .NET Framework version by default. You can specify the Target .NET version in the C# options on the Compilers and IDEs tab in the Eggplant Performance Studio Preferences. You can select assemblies individually or use select the Select All check box to select (or deselect) all the displayed files.
- Extensions tab: This tab lists all available assemblies that are extensions, including those with earlier target .NET versions because you may be able to use them with later .NET versions. These files are not installed with .NET. They are additional files which may be from other Microsoft applications, or third-party vendors. On the Extension tab, you can select files individually or using Select All.
- Browse tab: The Browse tab to provides a field in which you can enter the file location of an assembly, or navigate to one using the file browser button on the right side of the field.
-
Click OK when you finish adding assembly files.
Portability
For portability, .NET assemblies you add to the table from the Browse tab are automatically copied to your workspace directory, and can be found in the files folder. This means that when you export your workspace or move it to a different location, the .dll files remain with it. For .dll files that were copied this way, the paths listed in the table reflect the new location of the .dll files. For .dll files that were chosen on the Framework and Extensions tabs, the paths listed in the table reflect their actual location on the machine.
Assembly Options
For each assembly, three options are available as shown in the table below. All three options default to true for any assemblies you select on the Browse tab. If you select any assemblies on the Framework or Extensions tabs, only the Add reference when building option is selected by default. If you require either of the other two options for these assemblies, you must manually select them.
| Option | Description |
|---|---|
| Transfer to injector | The assembly will be transferred to each injector at the start of the test. |
| Add reference when building | A reference to the assembly will be added to the Visual Studio project when you Build the Workspace |
| Load assembly at runtime | The assembly will be loaded by each engine process at the start of the test |
Removing a .NET Assembly
To remove a .NET assembly, select the assembly to be removed, and click the ![]() Remove button.
Remove button.
Environment Tab
This tab allows you to provide any environment variables that you will need to access from your C# custom VU scripts. Any environment variables specified in this area will be passed to the engine processes running on each injector. Click the ![]() Add button in the upper right corner of the Environment tab to add an environment variable.
Add button in the upper right corner of the Environment tab to add an environment variable.
To read more about the Environment tab and specifying environment variables, please see Setting Runtime Environment Variables.