Virtual User Parameterization Process
Performance testing often involves data that changes in some way. Common examples include using different sets of login credentials for accessing an application, account IDs for lookups, or session variables for keeping track of states. In order to produce successful Eggplant Performance test scripts, changes need to be made to the script to allow it to control which data gets used, and how the script should handle dynamic data sent by the server.
Parameterization, which is the handling of data input by the user, and correlation, which is the handling of dynamic data sent by the server to the client, can help you create successful performance test scripts.
Preparing Data
- Within the scripts, identify data that is likely to vary
- Replace this data with calls to the data API:
- using Generation Rules (e.g. Replace Value, Data Correlation)
- or manually modifying the script code
When using Data Correlation, the variable data is automatically extracted from responses sent by the server and replaced accordingly. For other types of parameterisation, you must provide the data.
- Create data sources
- Assign data sources to the test
See below for more information about each of these steps.
Parameterization
When working with recordings, such as those created using an Eggplant Performance web virtual user (VU), chances are that you will use test data. Examples include login credentials, customer orders, or customer records. When you subsequently create a script from the recording, these values end up in the script as hard-coded values.
This is where parameterization can help. Parameterization allows you to change those hard-coded values into some other value that would be taken from a data file instead. This file can eventually contain multiple values, and the way those values are accessed by VUs is fully customizable.
Consider this HTML form, where the user is prompted for a username and password:
<form id="myForm" action="http://www.example.com">
Username: <input type="text" name="username"><br/>
Password: <input type="password" name="password"><br/>
<input type="submit"></input>
</form>
If you create a script from a recording using this form, the generated code would look similar to the example below. This example uses the C# web VU:
Form form_2_0 = Get<Form>("form_2_0").Copy();
form_2_0.GetInputElement("username").value = "myUsername";
form_2_0.GetInputElement("password").value = "myPassword";
request4.SetMessageBody(form_2_0);

using (Response response4 = request4.Send())
{
  ...
The first line grabs a copy of the form from the response in which it was found. This is important because any fields that didn’t change (i.e., hidden form fields, which are typically used to maintain state) will be set to their appropriate value; only fields that changed are written into the script. This is why the username and password fields are visible here, and are set to the values used to perform the login in the original recording.
You can parameterize these fields using the GetString() API method:
string value = GetString("key");
The method itself is simple: when provided with a key, a value is returned. In order for the method to not raise an exception, a data source with the given key must be assigned to the test, and one or more values should be associated with it.
The most common data source is a data table. It is the most flexible of the different data source types because it allows users to define either one-to-one or one-to-many relationships between keys and values.
Example: Creating a Data Table
Follow these steps to create a sample data table featuring keys for the username and password fields:
-
In Studio, right-click the Data Sources folder and select New data source.
-
Select Create new data table file, then click Next.
-
Give the file a name and click OK.
-
Open the new file from the file tree.
-
Add the following data to the file and save it:
username,password
TestUser01,TestPass01
TestUser02,TestPass02
TestUser03,TestPass03
The corresponding GetString() code to fetch values from this file looks as follows:
string userName = GetString("username");
string passWord = GetString("password");
The names of the keys used in the script must match the keys listed in the first row in the data table file, and are case-sensitive. To adapt this to the example form, the code could look as follows:
form_2_0.GetInputElement("username").Value = GetString("username");
form_2_0.GetInputElement("password").Value = GetString("password");
You must also assign this data source to the test. Creating the file does not make it available to all of your tests. This is by design, as you might have multiple sets of data depending on the type of test you want to run.
Although editing the script itself is a valid approach to working with scripts, the preferred method of performing parameterization is to use Generation Rules. The two relevant rule types are Replace Value and Replace Key Value. Generation rules essentially allow you to perform tasks using a set of wizards rather than through manual editing of scripts, and are therefore less susceptible to user error. Furthermore, you can apply generation rules to other recordings, meaning you only need to define them once per application. Generation rules are discussed in greater detail in Correlation, below.
Correlation
Correlation is the process of handling values that are received from the server rather than input by the user. These values can end up in a script as hard-coded values, and failure to correlate them can result in errors when you try to play back the script. To complicate matters, the web server often isn’t programmed to tell you when something hasn’t been correlated properly, and might display cryptic error messages or, even worse, not display any error messages at all and simply redirect you to an unexpected page.
The process of correlation is primarily why performance testing at the protocol level is considered difficult. Once you have mastered correlation, you should be able to automate any website.
In Eggplant Performance, the recommended approach to dealing with correlation is to use the Data Correlation Generation Rule. With it, you only need to worry about finding the dynamic values in your script, rather than also putting in all of the relevant code to handle them, which can in some cases be a significant amount of code depending on the application and the length of the business process you are attempting to automate.
In the example of correlation shown below, the server presents a drop-down list to the user, where the underlying HTML looks like this:
<form method="post">
  Please select your holiday package:
  <select name="packageDropdown">
    <p>
    <option value="option0001">Package 1 - All-Inclusive</option>
    <option value="option0002">Package 2 - Air & Hotel only</option>
    <option value="option0003">Package 3 - Air only</option>
    <option value="option0004">Package 4 - Hotel only</option>
    </select>
    </p>
    <input type="submit"></input>
</form>
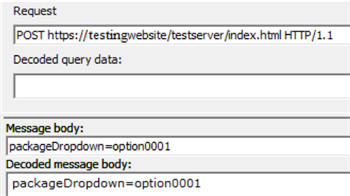
When this form is submitted to the server for processing, the body of the POST request contains the name of the select drop-down menu, as well as the value that the user selected from that menu.

This is how the form appears in the default generated script:
Form form_2_0 = Get<Form>("form_2_0").Copy();
form_2_0.GetSelectElement("packageDropdown").SetSelectedOption("option0001");
request4.SetMessageBody(form_2_0);

using (Response response4 = request4.Send())
{
  ...
The selected value will change if we want our VUs to select different options from the drop-down menu. While you could prepopulate a data file with all of the possible options and use parameterization to handle the selection, if those values change, your script fails. It's better to handle the selection of values through correlation instead.
To verify that you are dealing with a server-generated value rather than something originating from the client, use the Assistant in the Rules Generation Wizard. Enter the option value in the dialog and click Analyze. The assistant determines the source of the value, and suggests which rule could be used to handle it.
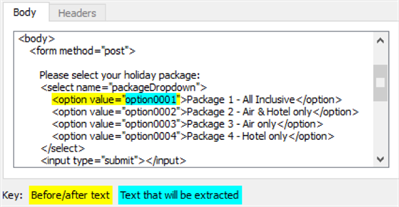
Once the data correlation rule is selected, the options related to how the extract should be performed are displayed. Primarily, this involves setting appropriate left and right boundaries. These are essentially the characters that appear to the left and right of the value that needs to be extracted.
Eggplant Performance tries to guess what appropriate left and right boundaries should be, but those boundaries might need to be tweaked to achieve the desired result. For example, if there is a dynamic value within the left boundary, the dynamic value would need to be stripped out. Note that you can define multiple left boundaries separated by new lines in order to skip the dynamic portions of the boundary.
In this case, the appropriate boundaries would simply be:
| Left Boundary | Right Boundary |
|---|---|
<option value=" | " |
In most cases, the right boundary is a single character. The above yields the following in the preview:

It is important to note that this current correlation rule will only handle selecting the first value in the drop-down list, even if the value changes. Given that we’re dealing with a drop-down list with several options, the more appropriate rule to use would probably be the Data List Correlation Rule. This rule is designed to handle any kind of list you might encounter, such that you could select a particular item or even at random from the list.
For now, we’ll continue with the standard Correlation rule for example purposes. Once the left and right boundaries are configured correctly, the next screen asks for the variable name to be used in the script.
You don't need to make any changes to the next few screens in the wizard. Click through until the rule is complete. The rule modifies the script in two ways: first, code is inserted to perform the actual extraction:
// Rule: Correlate packageOption
// Matching value extracted from recording: "option0001"
ExtractionCursor extractionCursor3 = new ExtractionCursor();
Set<string>("packageOption_3", response3.Extract(extractionCursor3, "<option value=\"", "\"", ActionType.ACT_WARNING, true, SearchFlags.SEARCH_IN_BODY));
Next, the variable defined during the rule creation wizard appears wherever the originally recorded value appeared in the script. In this example, the value appears in a single request only, although in more complex applications, the value could appear in many more places:
Form form_2_0 = Get<Form>("form_2_0").Copy();
form_2_0.GetSelectElement("packageDropdown").SetSelectedOption(GetString("packageOption_3") /* Rule: Correlate packageOption */ );
request4.SetMessageBody(form_2_0);

using (Response response4 = request4.Send())
{
  ...
The observant will notice that a number gets appended to the variable name, i.e., packageOption_3. This is to allow multiple extracts to be performed, in situations where the rule is designed to handle multiple correlations of different values. The number represents the ID of the request where the extract was performed.