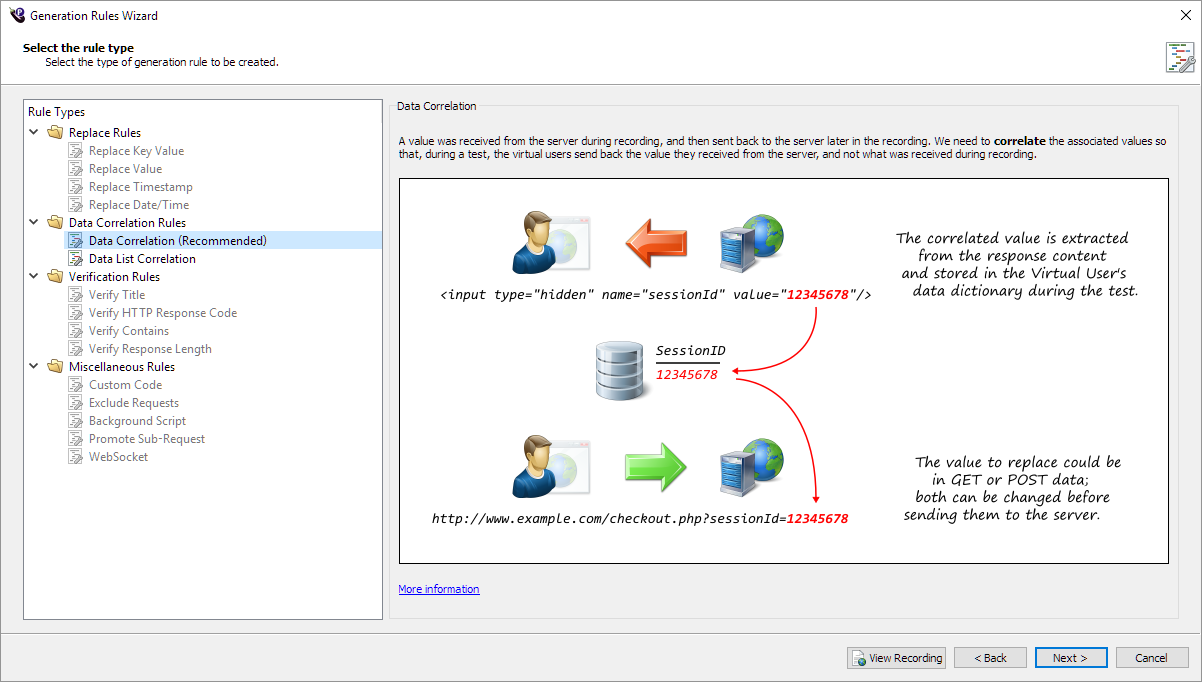
Data Correlation Rule
The Data Correlation rule is one of the rules you can apply when you generate a web virtual user (VU) script from a recording in Eggplant Performance Studio using the Generation Rules wizard. This rule is useful if the web server sends a value, such as a session ID, during the recording that needs to be sent back to the server in a later request. We need to correlate the associated values so that during a test the VUs send back the value they received from the server, and not what was received during recording.
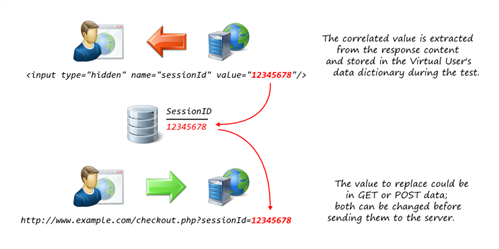
The Data Correlation rule is similar to the Replace Value rule, but the replacement value is extracted from a response at runtime and placed into the VU's data dictionary, and the Data Correlation rule uses a variable name. See Enter variable name, and success/failure options for more information about the variable name.
Example Script Code Changes (Java)
The following example code shows the effect of applying a Data Correlation rule:
try (Response response1 = request1.send())
{
  ....
}

....

Url url2 = new Url(protocol2, mail, "/default.aspx");
try (Request request2 = getWebBrowser().createRequest(HttpMethod.GET, url2))
{
  Form form_1 = get("form_1");
  form_1.getInputElement("sessionId").setValue("12345678");

  request2.setMessageBody(form_1);

  try (Response response2 = request2.send())
  {
    response2.verifyResult(HttpStatus.OK, ActionType.ACT_WARNING);
  }
}
Changes to the following:
try (Response response1 = request1.send())
{
  // Matching value extracted from recording: "12345678"
  ExtractionCursor extractionCursor = new ExtractionCursor();
  List<String> beforeStrings_SessionId = new ArrayList<String>();

  beforeStrings_SessionId.add("name=\"sessionId\" value=\"");

  set("SessionId_1", response1.extract(
      extractionCursor,
      beforeStrings_SessionId,
      "\">",
      ActionType.ACT_WARNING,
      true,
      SearchFlags.SEARCH_IN_BODY
      ));
  ....
}

....

Url url2 = new Url(protocol2, mail, "/default.aspx");
try (Request request2 = getWebBrowser().createRequest(HttpMethod.GET, url2))
{
  Form form_1 = get("form_1");
  form_1.getInputElement("sessionId").setValue(getString("SessionId_1"));

  request2.setMessageBody(form_1);

  try (Response response2 = request2.send())
  {
    response2.verifyResult(HttpStatus.OK, ActionType.ACT_WARNING);
  }
}
Searching for Text to Correlate
When you create a Data Correlation rule, the Generation Rules wizard provides three options for the way you can search for the text you want to correlate. An explanation of each method follows. Information about using the Generation Rules wizard to create a Data Correlation rule, including where to specify the search method, follows in Creating or Editing a Data Correlation Rule.
Searching with the Text to Correlate
You enter the text you want to correlate on the Enter the text to correlate page in the Generation Rules wizard, which is shown below. The text you enter to correlate is used to help locate values that might change during a test. Because the values from the server might be different when a VU runs the generated script, you need to provide a reliable way of extracting the values from the responses sent by the server.
 Enter the text to correlate page for Data Correlation rules in the Generation Rules wizard
The Generation Rules Wizard enables you to extract values from responses sent by the server on the Enter the before and after values page, which follows the Enter the text to correlate page when you are creating a Data Correlation rule. On the Enter the before and after values page you provide the text before and after the value you want to extract in the response content as shown below.
 Enter the text to correlate page for Data Correlation rules in the Generation Rules wizard
As an alternative to using the before and after values in a front to back extraction search, you can select the Search from end checkbox to reverse the extraction search. By selecting this checkbox, the search begins with the right boundary (the after string), then extracts in reverse order towards the left boundary as shown below.

Using the Search from end checkbox is useful in situations where the left boundary cannot be made sufficiently unique to locate the desired value. For example, consider the following JSON structure:
{
  "objects": {
    "0": {
      "objectId": 12345,
      "name": "My First Product"
    },
    "1": {
      "objectId": 67890,
      "name": "My Second Product"
    }
  }
}
Assuming the number of objects returned is variable, there is no combination of left boundary values available that would reliably extract the objectId associated with the object that has a name value of "My Second Product":
response1.Extract(new ExtractionCursor(), "objectId\": ", ","); // would always yield the objectId for the very first object in this structure
Instead, you would want to look for an object that has a name value of "My Second Product", navigating backwards to reach the objectId. The preferred method of doing so also involves supplying more than one boundary value as shown in the following example:
List<string> boundaryStrings = new List<string>();
boundaryStrings.Add("My Second Product"); // search first for the value uniquely-identifying the desired object
boundaryStrings.Add(","); // look through any number of characters (backwards) until the next comma, which in this case would be the comma after '67890', the desired value
response1.ExtractFromEnd(new ExtractionCursor(), boundaryStrings, " ");
Searching with Regular Expressions
Regular expressions are a powerful tool for creating text matches. When you select Regular expressions from the match text using pull-down menu on the Enter the before and after values page, the fields change to accept regular expression definitions. In the sample screen below, the regular expression searches for a script type of text/javascript followed by a </script> tag. For more information about using regular expressions, see this Regular Expressions Tutorial at the Regular-Expressions.info website.
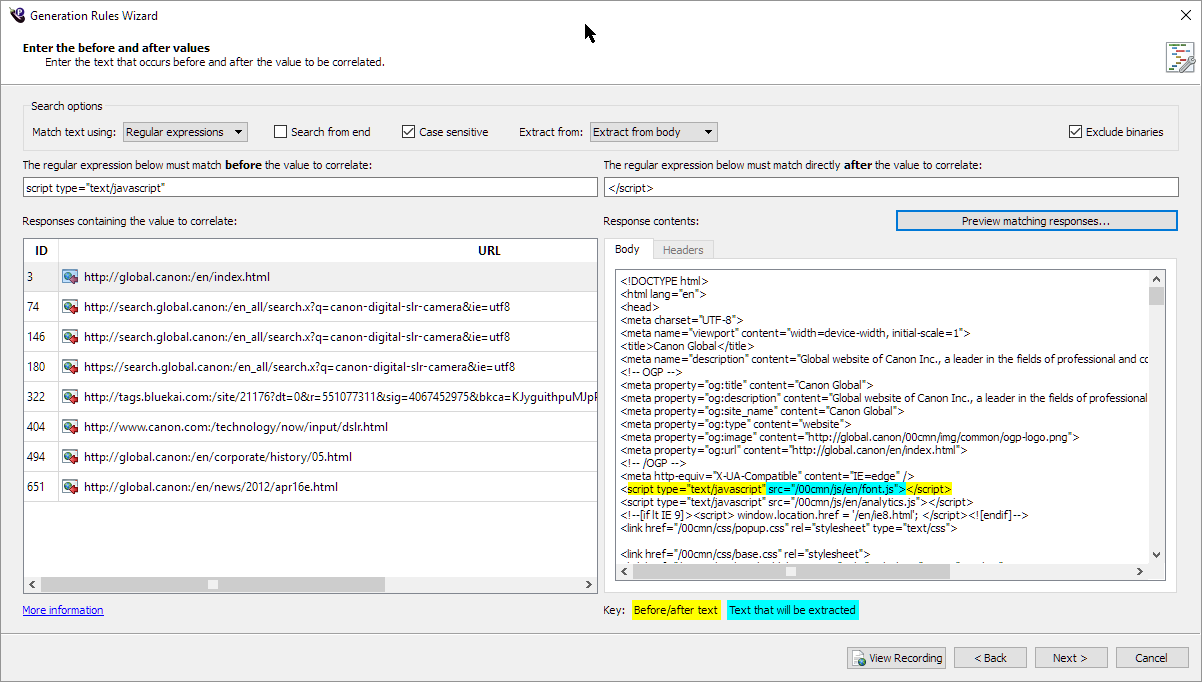 The Enter the before and after values page configured to use regular expressions
Searching with an XPath Expression
XPath can be used to navigate through the elements and attributes in an XML document. When you select An XPath expression from the match text using pull-down menu on the Enter the before and after values page, the fields change to accept XPath expressions. An XPath expression doesn't require any before/after strings or regular expressions. Instead, this option lets you enter an XPath expression to identify the HTML or XML node from which to extract the text. The text to extract can be an element node's text contents or an attribute node's value. If the XPath expression you enter matches more than one node (a node-set), the extraction occurs from the first node in the set. For more information about XPath, see XPath Tutorial or XML Path Language.
Select the An XPath expression option only if you expect the response content to be HTML or XML.
The following sample XML code contains some highlighted lines with values you might want to search.
<?xml version="1.0" encoding="UTF-8"?>
<breakfast_menu>
  <food>
    <name>Belgian Waffles</name>
    <price>$5.95</price>
    <description>Two of our famous Belgian Waffles with plenty of real maple syrup</description>
    <calories>650</calories>
  </food>
  <food>
    <name>Strawberry Belgian Waffles</name>
    <price>$7.95</price>
    <description>Light Belgian waffles covered with strawberries and whipped cream</description>
    <calories>900</calories>
  </food>
  <food>
    <name>Homestyle Breakfast</name>
    <price>$6.95</price>
    <description>Two eggs, bacon or sausage, toast, and our ever-popular hash browns</description>
    <calories>950</calories>
  </food>
</breakfast_menu>
By entering the following XPath expression into the Enter XPath expression field, the Generation Rules wizard should find and display Belgian Waffles after finding it in the <name> element under the first <food> element in the above XML example.
/breakfast_menu/food/name
By entering the following XPath expression into the Enter XPath expression field, the Generation Rules wizard should find and display Homestyle Breakfast from the <name> element under the first <food> element that has a <calories> element with a value greater than 900 in the above XML example.
/breakfast_menu/food[calories>900]/name
Creating or Editing a Data Correlation Rule
To create or edit a Data Correlation rule when you generate a new script, perform the steps described below.
1. Create a new rule or edit an existing one
- Create a new rule by clicking the Add button on the Choose which script generation rules to apply page in the Generate Script from Recording wizard. The Generation Rules Wizard opens to the Select Rule Type page shown below.
- Or edit an existing data correlation rule by clicking the edit button (the notepad and pencil) on the Choose which script generation rules to apply page. The Generation Rules Wizard opens to the Enter the before and after values page described below.
2. Select rule type
 Select the Data Correlation Rule Type
In the Rule Types pane on the left side of the page, locate Data Correlation Rules and then select Data Correlation underneath. The pane on the right changes to provide an explanation and example of how to use the Data Correlation rule.
Click Next. The Enter text to correlate page, shown below, opens.
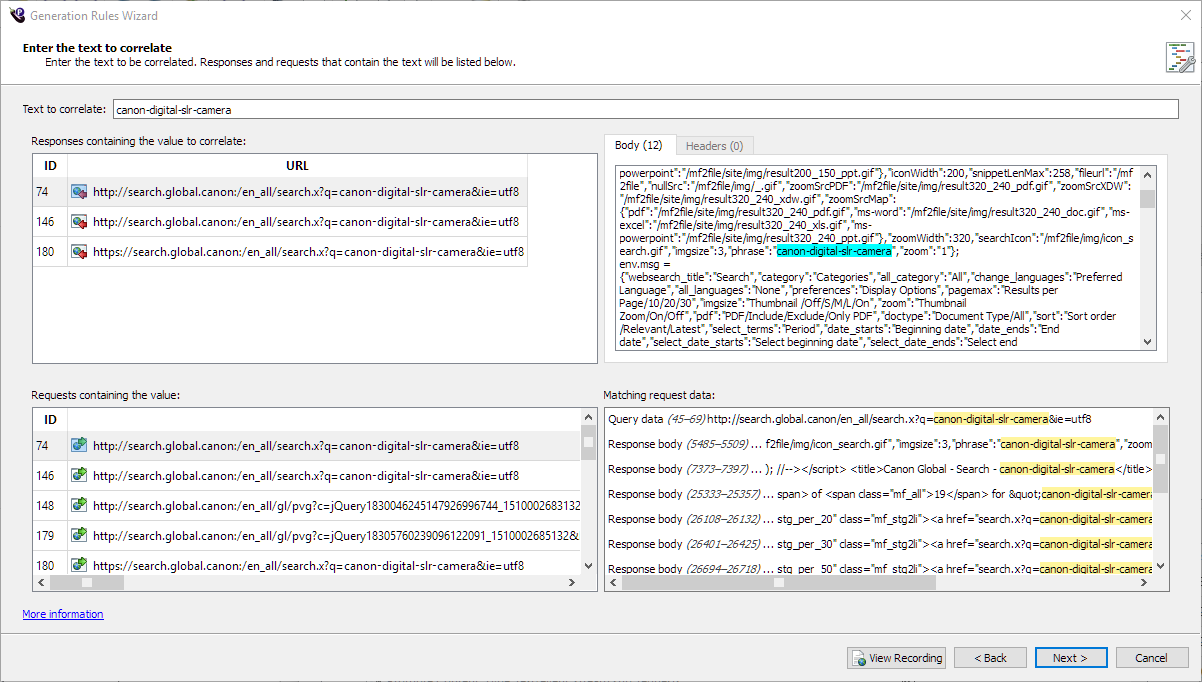
3. Enter text to correlate
Enter text to correlate page for Data Correlation rules in the Generation Rules wizard
In the Text to correlate box at the top of the screen, enter a value that you think might change depending on what the server sends during a test.
As you type, the wizard suggests values that were sent and received in GET or POST data in the current recording. The rule can search for text that appears anywhere in the request, including the headers and URL.
You can open the current recording in a separate window by clicking the View Recording button, and you can view GET and POST data in the Web Log Viewer.
In the example screen above, the text specified in the Text to correlate box is part of the destination of a link clicked by the user during recording. If VUs search for different products in the example e-commerce website, they need to follow different links. We can extract the link from the HTML search results page (response 2), and then replace the URL of the request to view the product page (request 4).
The tables display responses and requests (in the current recording) that contain the text to correlate you entered. You can select a response or request in the table to show its contents in the box on the right-hand side, with the text to correlate highlighted.
When you have finished using the Text to correlate page, click Next. The Enter the before and after values page, shown below, opens.
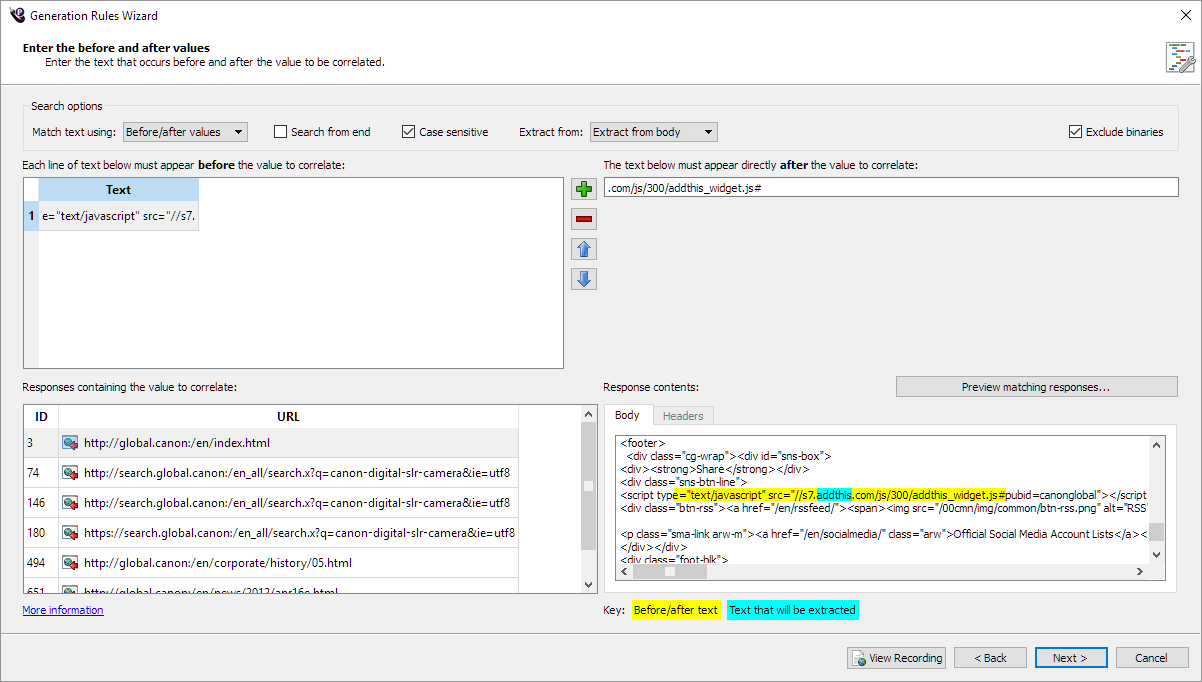
4. Enter the before and after values
 Enter the before and after values page configured to search using Text to correlate
This page provides options for searching for text. The three search methods available are:
- using the text to correlate you entered on the previous page
- using a regular expression you can enter on this page as described in Searching with Regular Expressions
- using an XPath expression you can enter on this page as described in Searching with an XPath Expression
Specify how you want to search for your text:
- To use the text you entered on the Text to correlate page, select Before/after values in the Match text using drop-down menu. You can enter one or more lines of text in the before and after boxes.
- To use a regular expression, select Regular expressions in the Match text using drop-down menu. After the fields change to accept regular expression definitions, enter the expression you want to use.
- To use an XPath expression, select An XPath expression in the Match text using drop-down menu. After the fields change to accept XPath expressions, enter the expression you want to use.
Regardless of the search method you use, notice that the table at the bottom lists Responses containing the value to correlate (see the screenshot, above).
Select one of these responses. You see the response content displayed on the Body or Headers tab in the Response contents box. The response content is also highlighted in different colors to show exactly where the value would be extracted from if that response were received during the test.
The yellow highlighted text shows the text that matched the before and after expressions you entered. This demonstrates how a VU searches for the value in the response content.
If you use the text to correlate method, each line of text in the before box is searched for separately. Think of the different lines as different search expressions to narrow down the search. Each search begins at the location immediately after the previous search was found. In the above Text to correlate example, the first search is for a <div> HTML tag with class picture. This is to narrow down the next search for <a href=", which could match in many places. However, because it is the second search expression in the list, the search begins after the <h2> tag previously found. The text matched by the second search expression does not have to be on the next line in the response content; it can appear anywhere after the text matched by the first search expression.
The yellow highlighted text shows the before/after search matches, and the text between them is blue.
If you make your before/after search expressions too general, a value could be extracted from a response not in this list. The list shows only responses that match the text to correlate .
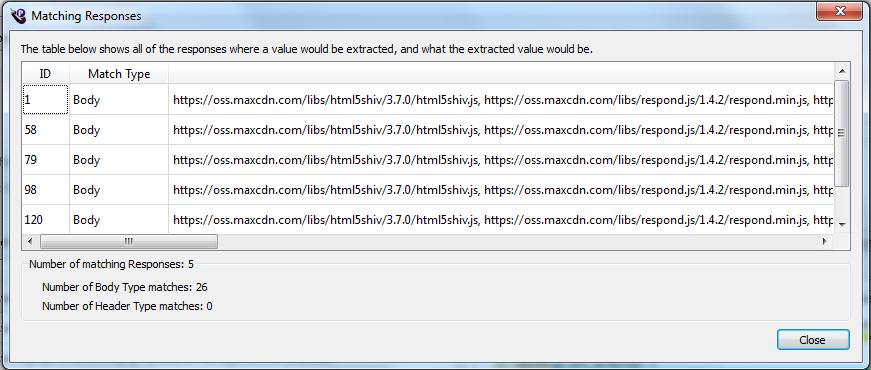
Before applying the before/after search expressions to all responses in the current recording, you can click the Preview matching responses button to check the values that will be extracted from all matching responses. If you do, the Matching Responses dialog, shown below, opens.
5. Preview matching responses
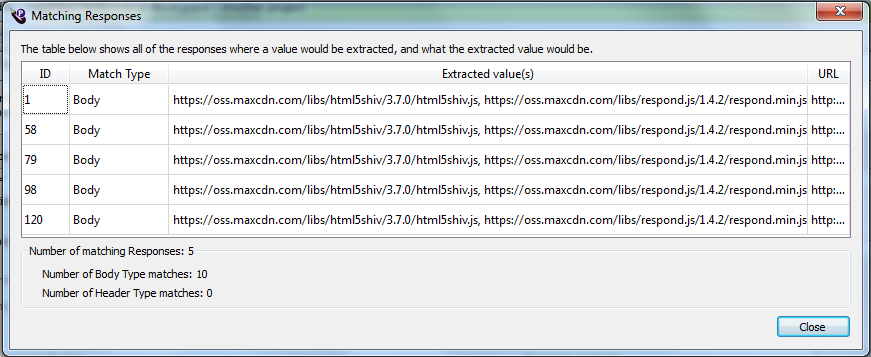
The responses are listed in the table, along with the text extracted from each.
Below is an example of responses that resulted from a before search expression that was too general. The search expression <a href=" matches something other than what was expected in most responses, because <a href=" is a common HTML tag that is used in many places. Applying this rule would cause too many extractions and replacements in the generated script code. For comparison, the responses in the sample screen above resulted from two before search expressions: <h2 class="product-title"> and <a href=".
 Example of responses from a "before" search expression that was too general.
6. Other search options
Select any other search options you want to use in the Search Options section of the page:
-
Match text using regular expressions (advanced): This option is for searching for values that might change using regular expressions as discussed in the previous steps and Searching with Regular Expressions above.
-
Match text using an XPath expression (advanced): This option is for searching for values that might occur in an XML or HTML document as discussed in the previous steps and Searching with an XPath Expression above.
-
Search from end: This option is for reversing the extraction search so that the search begins from the right boundary (the after string), then extracts in reverse order towards the left boundary. This is discussed in more detail in the section Searching with the Text to Correlate above.
-
Search case sensitive: This option performs a case-sensitive search when looking for the before and after values.
-
Extract from: This option helps to narrow down from which part of the HTTP response to extract a value. This is useful in case the before/after values are too general, or if you only want to make sure matches are only found in headers or cookies. The Response contents box is divided into Body and Headers tabs to help distinguish from where values should be extracted.
noteYou can use the Search case sensitive and Extract from search options with using text to correlate or regular expressions.
-
Exclude binaries: This option prevents extraction of values from responses that appear to contain binary data. This should only be unchecked if you expect extractions to occur within binary data. This option excludes responses with the
Content-Typeheader set to the following:application/octet-stream- Any starting with
image/\* - Any starting with
audio/\* - Any starting with
video/\* - Any specified in the comma-separated
customBinarieslist within the generation options file (Advanced)
When you are finished with the Enter before/after values page, click Next. The Enter the variable name page, shown below, opens.
7. Enter the variable name
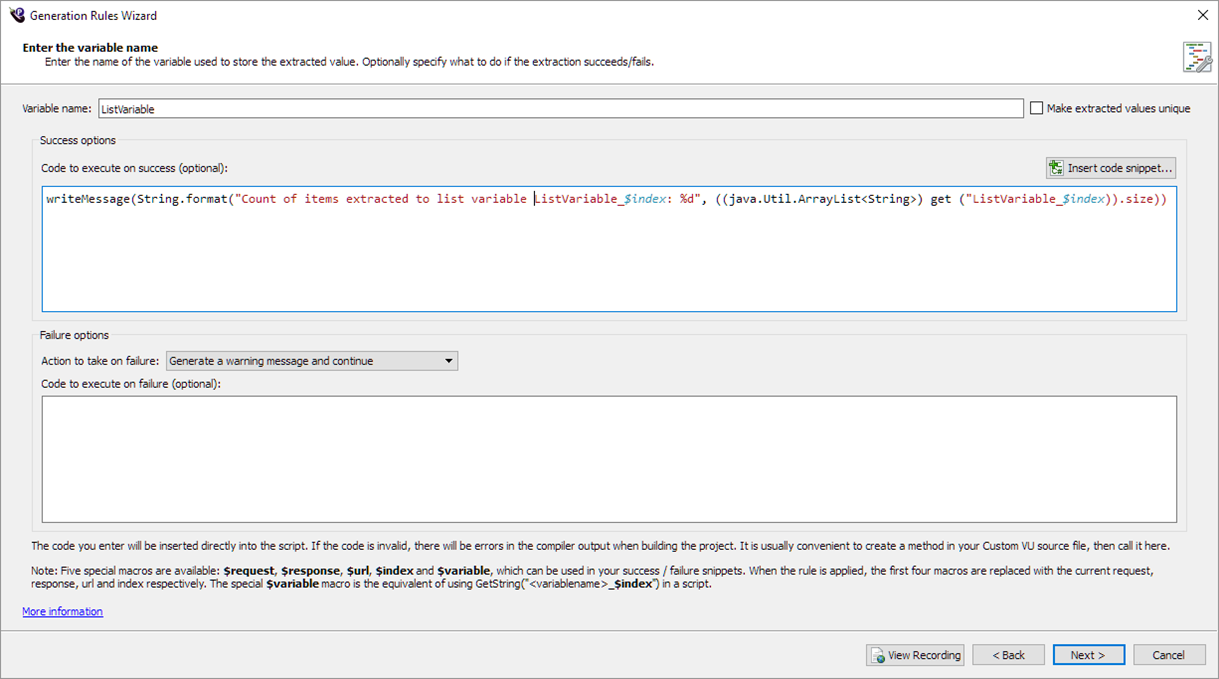 Enter variable name page
Enter a Variable name for the extracted value. The variable name is used as the key in the VU's data dictionary, and can be passed as the key parameter to the getString(string key) method to obtain the extracted value. The index of the request or response the value was extracted from is appended as a suffix to the variable name. For example, if the value is extracted from request number 4 and you enter ProductUrl as the variable name, the variable name is stored as ProductUrl_4. Appending the suffix makes it possible to have multiple "live" values of variables.
The variable name you choose could conflict with the names of keys in data sources bound to a VU group running the generated script during a test.
Enter the code in Code to execute on success and Code to execute on failure (both optional). Other than the Variable name field, this page is the same as the common Success/failure options page. To specify the variable name in these fields, you can use the $variable macro. For example, see how $variable is shown in the sample screen above. The options are for the success/failure of the extraction of a value from a response. If the VU receives a response but the before or after search expressions are not found within the response content, the script takes failure action. See Success/failure options for information about the code to execute on success and code to execute on failure fields, including how to use macros in these fields.
When you have finished entering information on the Enter variable name page, proceed through the wizard to complete the final two common pages: